
SAML 2.0 with Keycloak
If your company manages accounts in Keycloak, you can let users sign in to your Allure TestOps Cloud instance with those accounts instead of separate Allure TestOps passwords. Keycloak acts as the identity provider (IdP): it authenticates the user and sends Allure TestOps a SAML assertion with the user's email, name, and, optionally, group memberships that decide the user's global role.
This page describes the steps for Keycloak. For the general process, the way user accounts are handled, and the common sign-in errors, see Configuration of SAML2 SSO in a Cloud instance.
Before you begin
- Allure TestOps account with the Admin role and a local password. You will need it if the SAML configuration has to be fixed after the switch. See Keep a way back in.
- Keycloak administrator account that can create clients and, if needed, realms.
- Group names you plan to map to Allure TestOps roles, if you want roles to come from Keycloak.
1. Start the SAML 2.0 configuration in Allure TestOps
Sign in to Allure TestOps as an administrator.
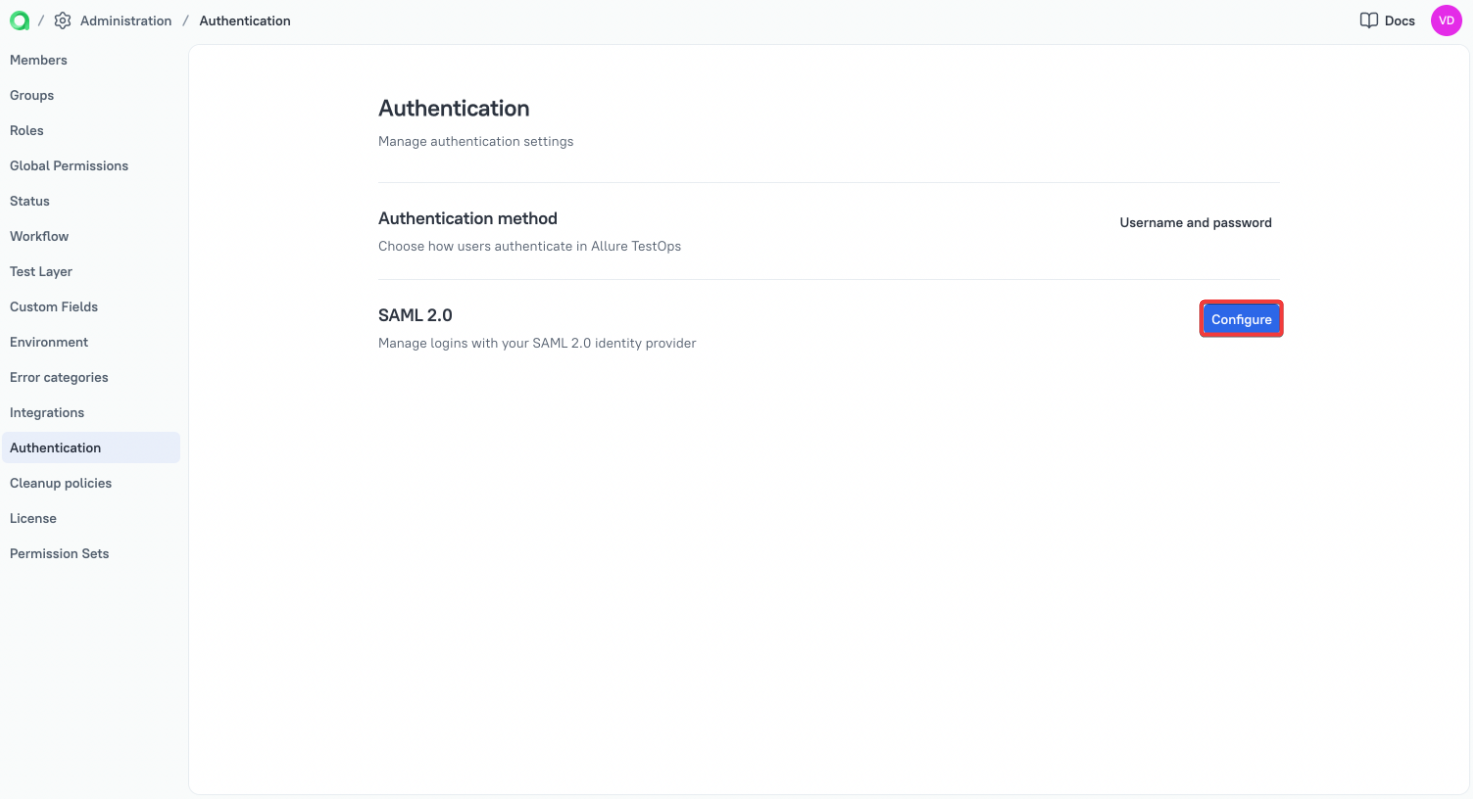
Go to Administration → Authentication.
Next to SAML 2.0, click Configure.
Under Configuration Name, enter a name for this configuration, for example,
Keycloak. Users will see it on the sign-in button as Login via Keycloak.Under Service Provider Details, copy the Entity ID and the Assertion Consumer Service (ACS) URL.
Keep this browser tab open. You will come back to it to provide the metadata from Keycloak.
2. Create a realm in Keycloak
Skip this step if your users are already in a realm other than master.
- Sign in to the Keycloak Admin Console.
- Open the list of realms and click Create realm.
- Enter the Realm name, for example, Allure TestOps, and click Create.
Keycloak creates the
masterrealm automatically, and its administrators can manage all other realms. Use a separate realm for your organization's users and applications.
3. Create the client
- In the sidebar, go to Clients and click Create client.
- In Client type, select SAML.
- In Client ID, paste the Entity ID (whole URI string with the protocol) from Allure TestOps and click Next.
- In Valid redirect URIs, paste the Assertion Consumer Service (ACS) URL from Allure TestOps and click Save.
Copy both URLs exactly as Allure TestOps shows them, including the registration ID at the end.
On the Settings tab of the client:
In the SAML capabilities section, select email in Name ID format.
In the Signature and Encryption section:
- turn on Sign assertions;
- select
CERT_SUBJECTin SAML signature key name.
Click Save.
On the Keys tab of the client, turn off Client signature required. Keycloak turns this option on for new SAML clients, but Allure TestOps does not sign its requests, so Keycloak would reject them.
4. Set the user attributes
Add a mapper for each attribute that Keycloak sends to Allure TestOps:
| Name | User Attribute | SAML Attribute Name |
|---|---|---|
| firstName | firstName | firstName |
| lastName | lastName | lastName |
- In the sidebar, go to Clients and select your client on the Clients list tab. Its Client ID is the Entity ID from Allure TestOps.
- On the Client scopes tab, click the scope that ends with
-dedicated. - On the Mappers tab, click Configure a new mapper and select User Attribute.
- Fill in the fields for email and click Save.
- Return to Dedicated scopes, click Add mapper → By configuration, select User Attribute, and repeat for firstName and lastName.
These names match the default values under Attribute Mapping in Allure TestOps. If you use other names, enter them in Allure TestOps in step 7.
5. Add the group attribute (optional)
Skip this step if you don't need roles from Keycloak. In that case, every new user gets the default global role.
To let Allure TestOps assign roles based on group membership, create the groups and make Keycloak send them in the assertion:
In the sidebar, go to Groups and click Create group.
Enter the group name, for example,
adminGroup, and click Create. Repeat this for each group you plan to map.Open the group, go to the Members tab, click Add member, and select the users.
Go to Clients, select your client, and on the Client scopes tab click the scope that ends with
-dedicated.Click Add mapper → By configuration and select Group list.
Fill in the fields and click Save:
- Name: groups.
- Group attribute name: groups. You will enter the same name as Role attribute name in IdP in Allure TestOps.
- Single Group Attribute: turned on.
- Full group path: turned off.
Full group path is turned on by default. With this option, Keycloak sends the group as
/adminGroup, which doesn't match the nameadminGroupin the role mapping.
6. Get the metadata
- In the sidebar, go to Realm settings and click SAML 2.0 Identity Provider Metadata. Keycloak opens an XML document.
- Save the document as an XML file.
- In the file, find the
WantAuthnRequestsSignedattribute and set it tofalse. Allure TestOps does not sign its requests, so it cannot work with the metadata that requires signed requests.
You will upload this file in step 7. When the signing certificate of the realm changes, repeat this step and upload the new file, otherwise users will not be able to sign in.
7. Finish the configuration in Allure TestOps
Return to the dialog from step 1. To change a saved configuration later, go to Administration → Authentication and click Edit configuration next to SAML 2.0.
Under Identity Provider Details, select Metadata XML File and upload the file from step 6.
Under Attribute Mapping, check that the values match the names from step 4:
- Email Attribute: email
- First Name Attribute: firstName
- Last Name Attribute: lastName
Click Save.
Default global role
In the drop-down next to Default global role, select the role for users to whom no role mapping applies. See Default global role for the description of the roles.
Don't use Admin as the default role. Every user who can sign in to this Keycloak client would get full control over the instance. Use the role with the least permissions your team needs, and grant more through role mapping.
Role mapping (optional)
If you added the group attribute in step 5, click Configure mapping next to Role mapping and fill in the fields:
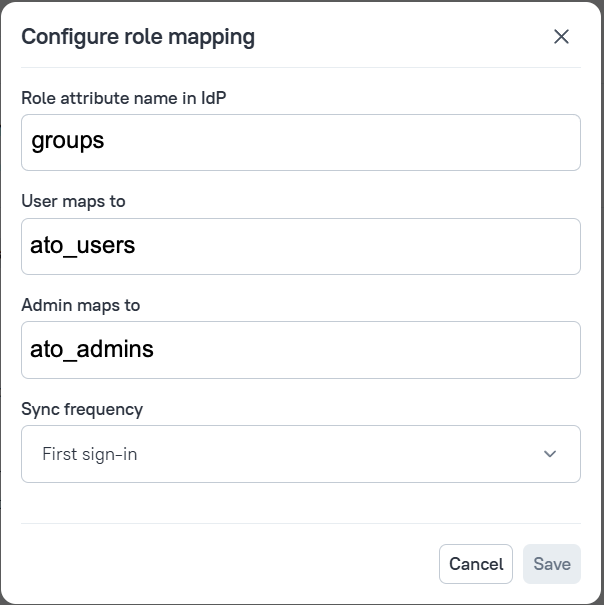
- Role attribute name in IdP: the Group attribute name from the Keycloak mapper, for example, groups. The names must match exactly.
- User maps to: Keycloak groups whose members get the User role.
- Admin maps to: Keycloak groups whose members get the Admin role.
- Sync frequency: when Allure TestOps updates the role from Keycloak, at First sign-in or at Each sign-in (recommended).
Click Save. See Role mapping for how Allure TestOps determines the role from the groups.
8. Switch the authentication method to SAML 2.0
- On the Authentication page, in the Authentication method list, select SAML 2.0.
- Confirm the switch by clicking Yes, switch.
The indicator next to the configuration name turns green. Users will authenticate through Keycloak the next time they sign in. Check the result as described in Verify the sign-in.
Troubleshooting
Keycloak shows these messages on its page after the user clicks Login via Keycloak:
| Message | Cause | What to do |
|---|---|---|
| Client not found. | The Client ID in Keycloak differs from the Entity ID in Allure TestOps. | Copy the Entity ID to Client ID again, see step 3. |
| Invalid requester | Keycloak requires a signature on the requests from Allure TestOps. | Turn off Client signature required on the Keys tab of the client, see step 3. |
| Invalid redirect uri | The Assertion Consumer Service (ACS) URL is missing from Valid redirect URIs. | Copy the URL to Valid redirect URIs again, see step 3. |
For the errors that Allure TestOps shows on the sign-in page, see Troubleshooting.
