
Configuration of SAML2 SSO in a Cloud instance
This article describes the general approach to setting up single sign-on (SSO) with SAML 2.0 in an Allure TestOps Cloud instance. An administrator configures it in the Allure TestOps UI. The steps apply to any identity provider (IdP) that supports SAML 2.0.
For step-by-step instructions and troubleshooting for a specific identity provider, see:
How the setup works
Allure TestOps acts as the service provider (SP), and your identity provider authenticates the users. The setup goes back and forth between the two systems:
- Allure TestOps gives you the Entity ID and the Assertion Consumer Service (ACS) URL.
- You register Allure TestOps in the IdP with these values, configure the user attributes, and assign users.
- The IdP gives you its SAML metadata.
- You finish the configuration in Allure TestOps and set the default role and, optionally, the role mapping.
- You switch the authentication method to SAML 2.0.
An instance has one SAML 2.0 configuration. Users cannot sign in through it until you switch the authentication method, so you can prepare the configuration without affecting anyone.
Before you begin
- Allure TestOps account with the Admin role and a local password. You will need it if the SAML configuration has to be fixed after the switch. See Keep a way back in.
- Access to the IdP settings that allows registering a new SAML application.
- Free seats. New accounts with the Admin or User role take a paid seat, see Seats, roles, and billing.
1. Create the configuration in Allure TestOps
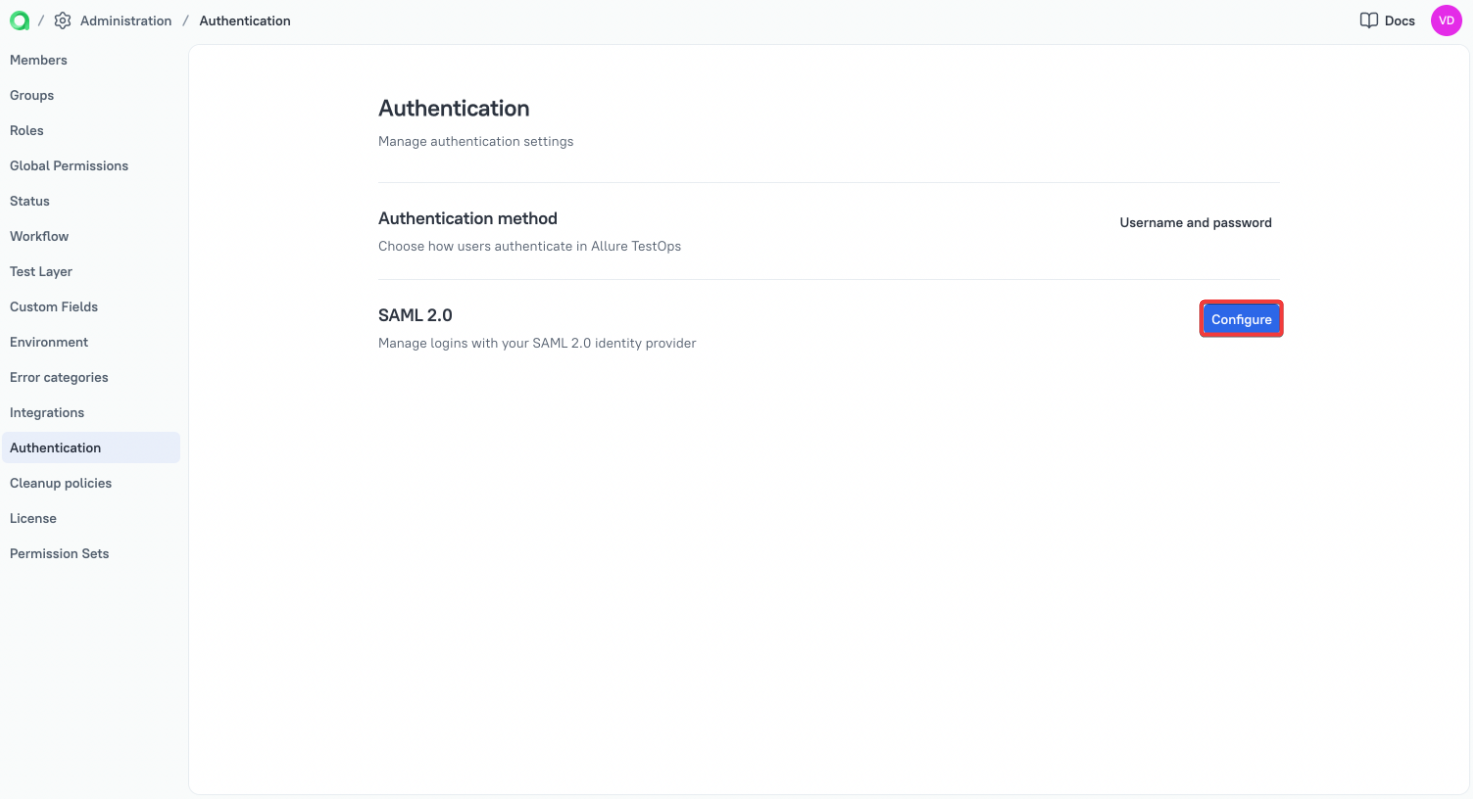
Go to Administration → Authentication.
Next to SAML 2.0, click Configure.
Under Configuration Name, enter a recognizable name, for example, the name of your IdP. Users will see it on the sign-in page.
Under Service Provider Details, copy the Entity ID and the Assertion Consumer Service (ACS) URL.
Both URLs end with the same registration ID:
https://
https://
Keep this browser tab open while you work in the IdP. The configuration is saved only in step 4, and if you reload the page before that, Allure TestOps generates a new registration ID. In this case, update both URLs in the IdP. After you save the configuration, the URLs no longer change.
2. Register Allure TestOps in the identity provider
Create a new SAML application in the IdP and fill it in with the values from Allure TestOps. IdPs name these fields differently:
| Allure TestOps | Common names in identity providers |
|---|---|
| Entity ID | Audience URI, Identifier, SP Entity ID |
| Assertion Consumer Service (ACS) URL | Single sign-on URL, Reply URL, ACS URL |
Copy both values exactly as Allure TestOps shows them, including the registration ID at the end.
Check these settings of the application:
- Signing: the IdP must sign the SAML response or the assertion. Allure TestOps checks the signature with the certificate from the IdP metadata.
- Assertion encryption: keep it turned off. Allure TestOps has no certificate for decrypting assertions.
- Signed authentication requests: keep this requirement turned off. Allure TestOps does not sign its requests to the IdP.
- Single logout: leave the logout URL empty. Allure TestOps does not use SAML single logout, so signing out of Allure TestOps does not sign the user out of the IdP.
Then configure which user attributes the IdP sends in the assertion:
| User data | Required | Default attribute name in Allure TestOps |
|---|---|---|
| Yes | email |
|
| First name | No | firstName |
| Last name | No | lastName |
| Groups, for role mapping | No | No default, see Role mapping |
You can use the attribute names your IdP already has. Write them down exactly as the IdP sends them, including the letter case, because you will enter them in Allure TestOps in step 4.
Finally, give the users or groups who need Allure TestOps access to the application, if your IdP requires an assignment.
3. Get the metadata from the identity provider
The metadata tells Allure TestOps where to send users for authentication and which certificate the IdP signs its responses with. Most IdPs provide it in the application settings as a URL, as an XML file, or both.
Prefer the URL if the IdP publishes it on the internet. Allure TestOps reads the metadata from the URL when users sign in, so a new IdP signing certificate is picked up automatically.
Use the XML file if your Cloud instance cannot reach the metadata URL, for example, if the IdP is available only inside your corporate network. When the IdP certificate changes, you need to download the new metadata and upload it to Allure TestOps, otherwise users will not be able to sign in.
4. Finish the configuration in Allure TestOps
Return to the dialog from step 1. To change a saved configuration later, go to Administration → Authentication and click Edit configuration next to SAML 2.0.
Under Identity Provider Details, provide the metadata:
- select Metadata URL and paste the URL, or
- select Metadata XML File and upload the file.
Under Attribute Mapping, enter the attribute names from step 2 in Email Attribute, First Name Attribute, and Last Name Attribute.
Click Save.
5. Set the user roles
After you save the configuration, the SAML 2.0 section on the Authentication page shows Default global role and Role mapping.
Default global role
Select the role for users to whom no role mapping applies. The initial value is Guest:
- Admin: manages global settings and all projects, can invite users and assign user roles;
- User: can view and make changes to public projects and private projects they are invited to;
- Guest: can only view public projects and private projects they are invited to.
Don't use Admin as the default role. Every person who passes authentication in the IdP could then get full control over the instance. Use the role with the least permissions your team needs, and grant more through role mapping.
Role mapping (optional)
Role mapping assigns global roles based on the groups of the user in the IdP. The IdP must send the groups in the assertion as an attribute with group names as its values.
Click Configure mapping and fill in the fields:
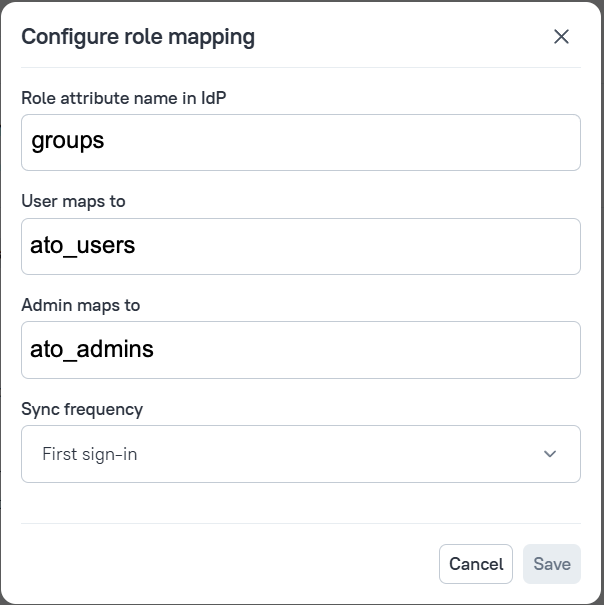
- Role attribute name in IdP: the exact name of the attribute that contains the groups.
- User maps to and Admin maps to: the IdP groups for each role. Type a group name and press Enter. At least one of these fields must be filled in, and the same group cannot be in both of them.
- Sync frequency: when Allure TestOps updates the role from the IdP:
- First sign-in: only when the account is created. After that, you manage the role in Allure TestOps.
- This check type implies manual role assignment in future.
- Each sign-in: at every sign-in (recommended). A role changed manually in Allure TestOps is overwritten the next time the user signs in.
- This check type implies automatic role assignment if a person gets promoted to a certain group on IdP side.
- First sign-in: only when the account is created. After that, you manage the role in Allure TestOps.
Allure TestOps determines the role from the groups in the assertion:
| The user's groups in the assertion | Role |
|---|---|
| At least one group from Admin maps to | Admin |
| At least one group from User maps to, none from Admin maps to | User |
| Only groups that are not mapped | Guest |
| No groups, or role mapping is not configured | Default global role |
If the assertion contains groups but none of them is mapped, the user gets Guest, even if the default global role is User. To give such users the default role, either map their groups or make sure the IdP does not send them.
6. Switch the authentication method to SAML 2.0
- Stay signed in to Allure TestOps with your local administrator account, so that you can undo the switch.
- On the Authentication page, in the Authentication method list, select SAML 2.0.
- Confirm the switch by clicking Yes, switch.
The indicator next to the configuration name turns green. From now on, the sign-in page offers SAML 2.0 by default.
Verify the sign-in
- Open Allure TestOps in a private browser window.
- Click Login via <configuration name> and sign in to the IdP as a user who is not an Allure TestOps administrator.
- In your administrator session, go to Administration → Members and check the user:
- the email, first name, and last name are filled in;
- the global role is the expected one.
If you configured role mapping, test one user from each mapped group.
How accounts are handled
- Matching. Allure TestOps finds an account by the email from the assertion. If there is an account with this email, the user signs in to it. Otherwise, Allure TestOps creates a new account at the first sign-in, and you don't need to invite the user.
- Profile. The first and last names from the IdP replace the names in the account at every sign-in.
- Seats. A new account with the Admin or User role takes a paid seat. If there are no free seats, the user cannot sign in. Guest accounts are free.
- Deactivated accounts. A deactivated account that signs in through the IdP becomes active again, and it takes a seat if its role requires one. To revoke access, remove the user from the application in the IdP as well.
- Two-factor authentication. If it is enabled on the Authentication page, users go through it after the IdP authentication.
Keep a way back in
Switching to SAML 2.0 doesn't disable local accounts. If the IdP or its configuration breaks, sign in with a local account that has the Admin role: on the sign-in page, select Username and password in the Authentication method list. Keep at least one such account with a known password.
To turn SSO off, select Username and password in the Authentication method list on the Authentication page. Users who have never set a local password need to restore it by email on the sign-in page.
Troubleshooting
Allure TestOps shows these messages on the sign-in page after the redirect from the IdP:
| Message | Cause | What to do |
|---|---|---|
| Failed to get the email from SAML2 response | The assertion has no attribute with the name from Email Attribute, or its value is empty. | Compare the attribute name with what the IdP sends, including the letter case. Check that the user has an email in the IdP. |
| License limit reached. Unable to add user | The user needs a paid seat, but all seats are taken. | Free up or add seats, see Seats, roles, and billing, or use Guest for such users. |
| Last admin cannot sign in | Sync frequency is Each sign-in, and the sync would take away the role of the last administrator. | Sign in with Username and password. Add the user to a group from Admin maps to, or grant the Admin role to another account. |
| Failed to login via SAML 2.0 | Allure TestOps rejected the response from the IdP. | Check that the Entity ID and the ACS URL in the IdP match Allure TestOps, that the response or the assertion is signed and not encrypted, and that the metadata is up to date. |
If the error appears on the IdP page instead, Allure TestOps has not received a response yet. The usual causes are a mismatch in the Entity ID or the ACS URL, or a user who is not assigned to the application.
If a user gets an unexpected role, compare the groups the IdP sends with the role mapping rules. With First sign-in, changes in the IdP groups do not affect existing accounts.
