
SAML 2.0 with Microsoft Entra ID
If your company manages accounts in Microsoft Entra ID (formerly Azure AD), you can let users sign in to your Allure TestOps Cloud instance with those accounts instead of separate Allure TestOps passwords. Entra ID acts as the identity provider (IdP): it authenticates the user and sends Allure TestOps a SAML assertion with the user's email, name, and, optionally, group memberships that decide the user's global role.
The setup goes back and forth between the two systems:
- Allure TestOps gives you two service provider URLs: Entity ID and Assertion Consumer Service (ACS) URL.
- You register Allure TestOps in Entra ID as an enterprise application with these URLs, assign users, and configure the claims.
- Entra ID gives you the App Federation Metadata URL.
- You finish the configuration in Allure TestOps and switch the authentication method to SAML 2.0.
Before you begin
- Allure TestOps administrator account with a local password. Keep it: you will need it if the SAML configuration has to be fixed after you switch the authentication method. See Keep a way back in.
- Entra ID role that allows creating enterprise applications, for example Cloud Application Administrator or Application Administrator.
- Group names you plan to map to Allure TestOps roles, if you want roles to come from Entra ID.
1. Start the SAML 2.0 configuration in Allure TestOps
Sign in to Allure TestOps as an administrator.
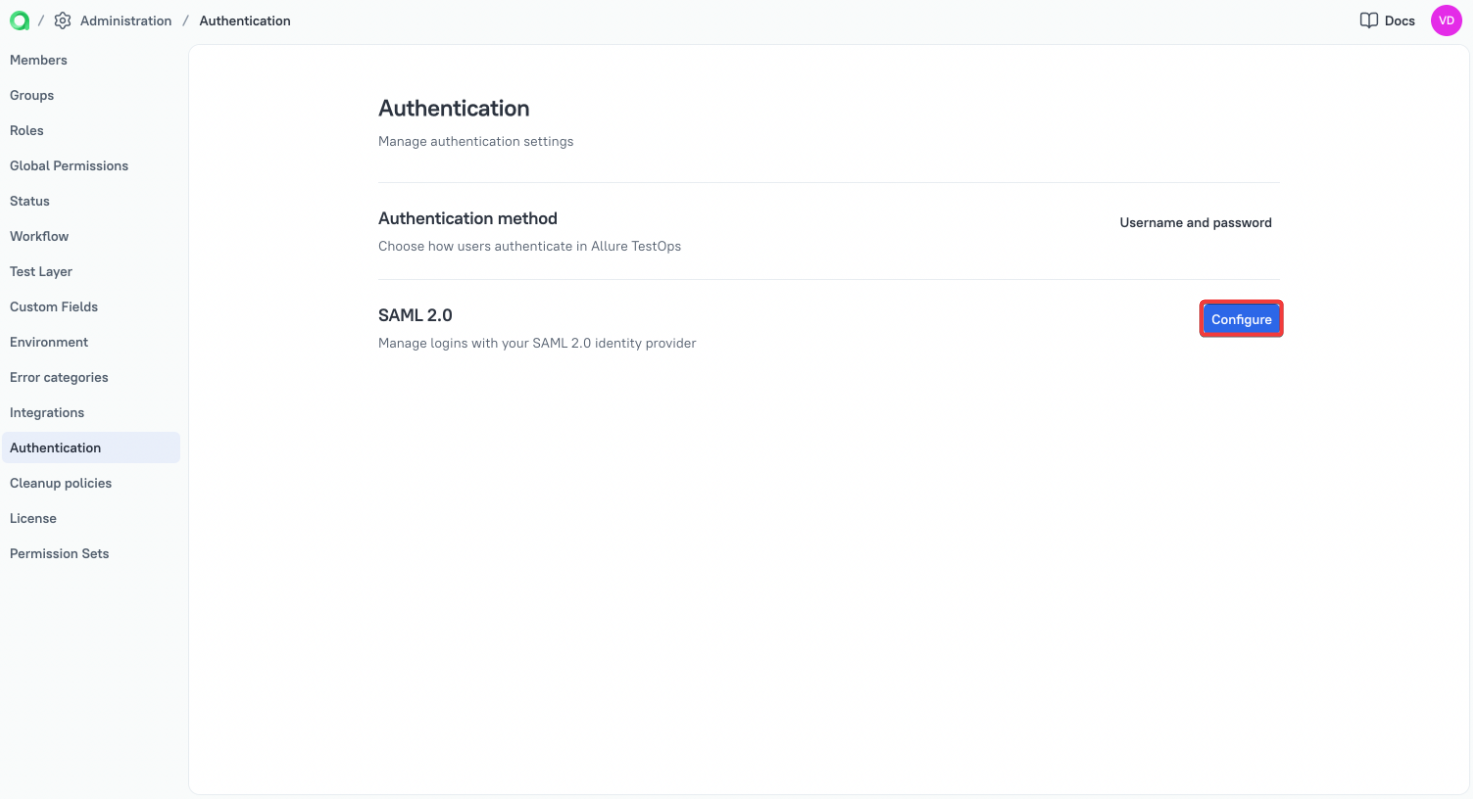
Go to Administration → Authentication.
Next to SAML 2.0, click Configure.
In Configuration Name, enter a name for this configuration, for example
Microsoft Entra ID. Users will see it as a sign-in option in the drop-down menu on the sign-in page.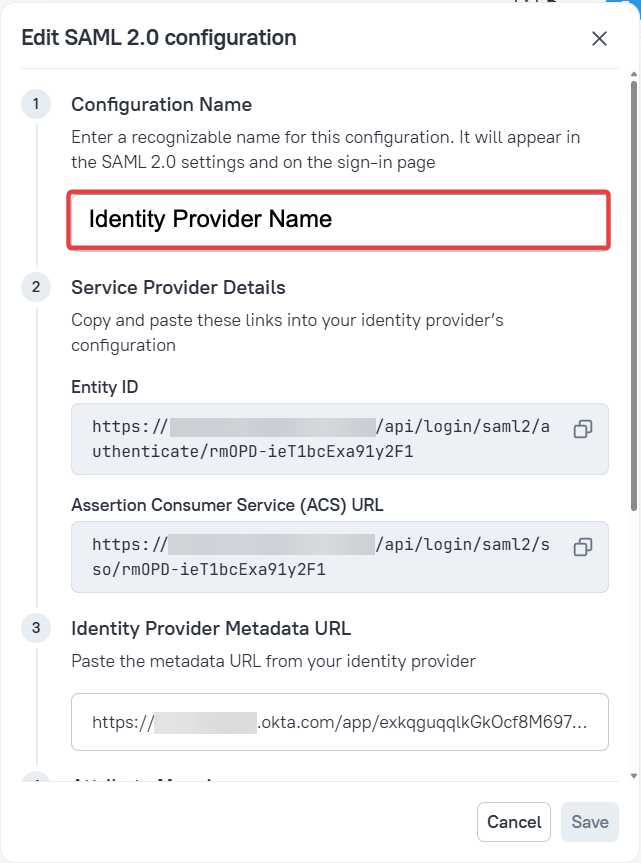
Under Service Provider Details, copy the Entity ID and Assertion Consumer Service (ACS) URL.
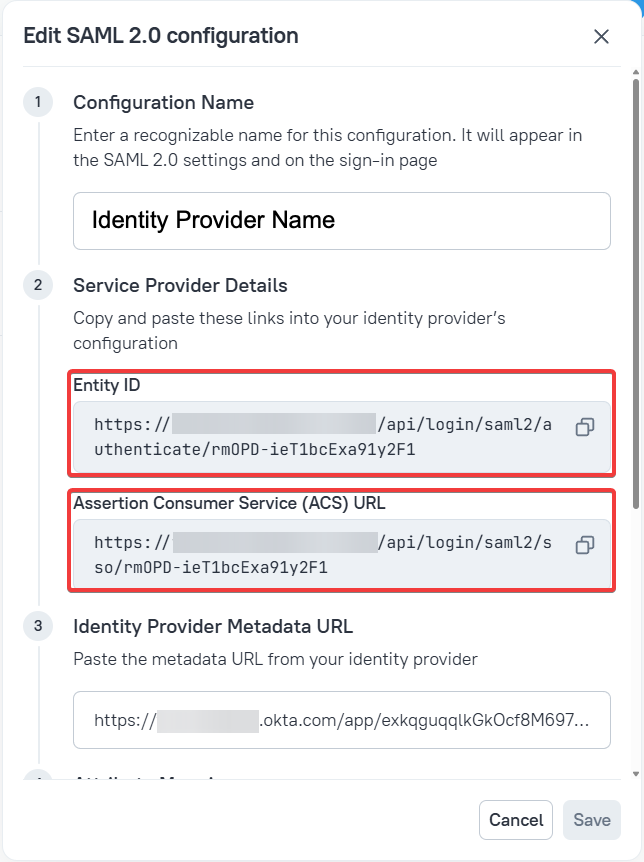
Both URLs end with the same registration ID, for example:
- https://
/api/login/saml2/authenticate/<registration ID> - https://
/api/login/saml2/sso/<registration ID>
Keep this dialog open in a separate browser tab. You will come back to it to paste the metadata URL from Entra ID.
2. Create the enterprise application in Entra ID
- Sign in to the Microsoft Entra admin center as an administrator.
- Go to Microsoft Entra ID → Enterprise applications and click + New application.
- Click + Create your own application.
- Enter a name, for example Allure TestOps, select Integrate any other application you don't find in the gallery (Non-gallery), and click Create.
3. Configure Basic SAML Configuration
On the application page, go to Single sign-on and select SAML.
In the Basic SAML Configuration section, click Edit.
Fill in the fields with the URLs from step 1:
Entra ID field Value from Allure TestOps Identifier (Entity ID) Entity ID Reply URL (Assertion Consumer Service URL) Assertion Consumer Service (ACS) URL Leave the other fields empty.
Click Save.
Copy both URLs exactly as Allure TestOps shows them, including the registration ID at the end. A mismatch in Identifier (Entity ID) makes Entra ID reject the sign-in with error
AADSTS700016; a mismatch in Reply URL causes errorAADSTS50011.
4. Assign users and groups to the application
Enterprise applications created this way require assignment by default: only users assigned to the application, directly or through a group, can sign in.
- On the application page, go to Users and groups.
- Click + Add user/group.
- Select the users or groups who should have access to Allure TestOps and click Assign.
If you plan to map Entra ID groups to Allure TestOps roles, assign those groups here. This is also required if you use the Groups assigned to the application option in step 6.
A user who is not assigned to the application sees error
AADSTS50105in Entra ID after selecting the Entra ID sign-in option. Add the user or one of their groups in Users and groups.
5. Check the user attribute claims
Allure TestOps needs three values for each user: email, first name, and last name. Entra ID sends them in the Attributes & Claims section of the Single sign-on page. A new application already contains them:
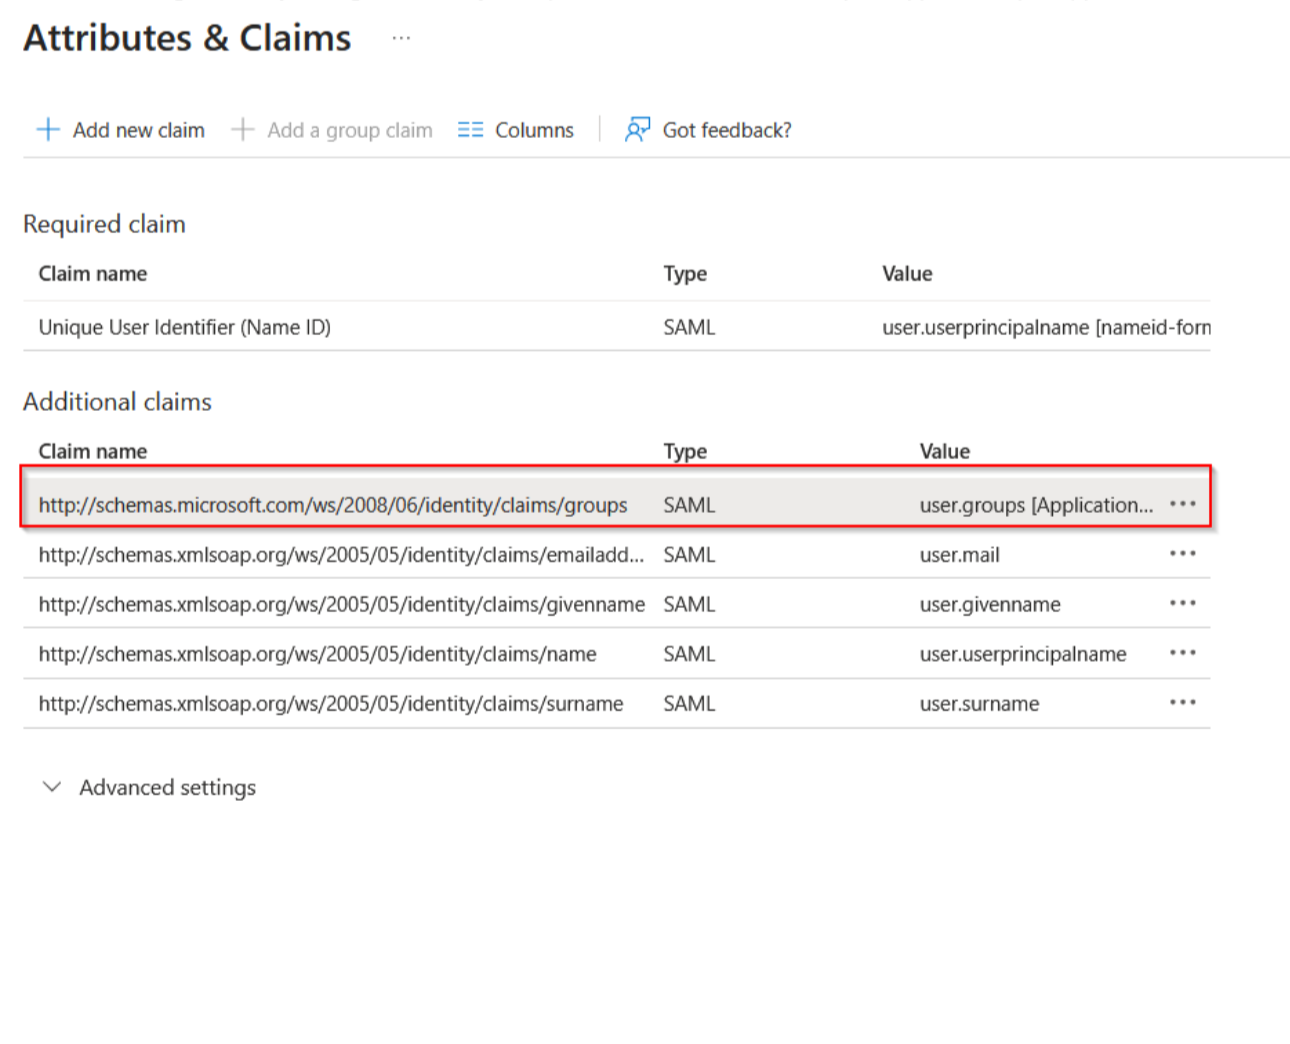
Each field in Allure TestOps corresponds to one claim:
- Email Attribute
- Claim name:
http://schemas.xmlsoap.org/ws/2005/05/identity/claims/emailaddress - Value:
user.mail
- Claim name:
- First Name Attribute
- Claim name:
http://schemas.xmlsoap.org/ws/2005/05/identity/claims/givenname - Value:
user.givenname
- Claim name:
- Last Name Attribute
- Claim name:
http://schemas.xmlsoap.org/ws/2005/05/identity/claims/surname - Value:
user.surname
- Claim name:
Write down the claim names exactly as they appear in your application. You will enter them in Allure TestOps in step 8. If you renamed a claim or added a custom one, use your name instead of the default.
Users without a mailbox can have an empty
user.mailattribute, and Allure TestOps cannot create an account without an email. Make sure the email, first name, and last name are filled in for every user who will sign in, or change the value of the email claim to an attribute that is always populated, for exampleuser.userprincipalname, if it holds the users' email addresses.
6. Add the group claim (optional)
Skip this step if you don't need roles from Entra ID. In that case, every new user gets the default global role.
To let Allure TestOps assign roles based on group membership, Entra ID must send the user's groups in the assertion:
In the Attributes & Claims section, click Edit.
Click + Add a group claim.
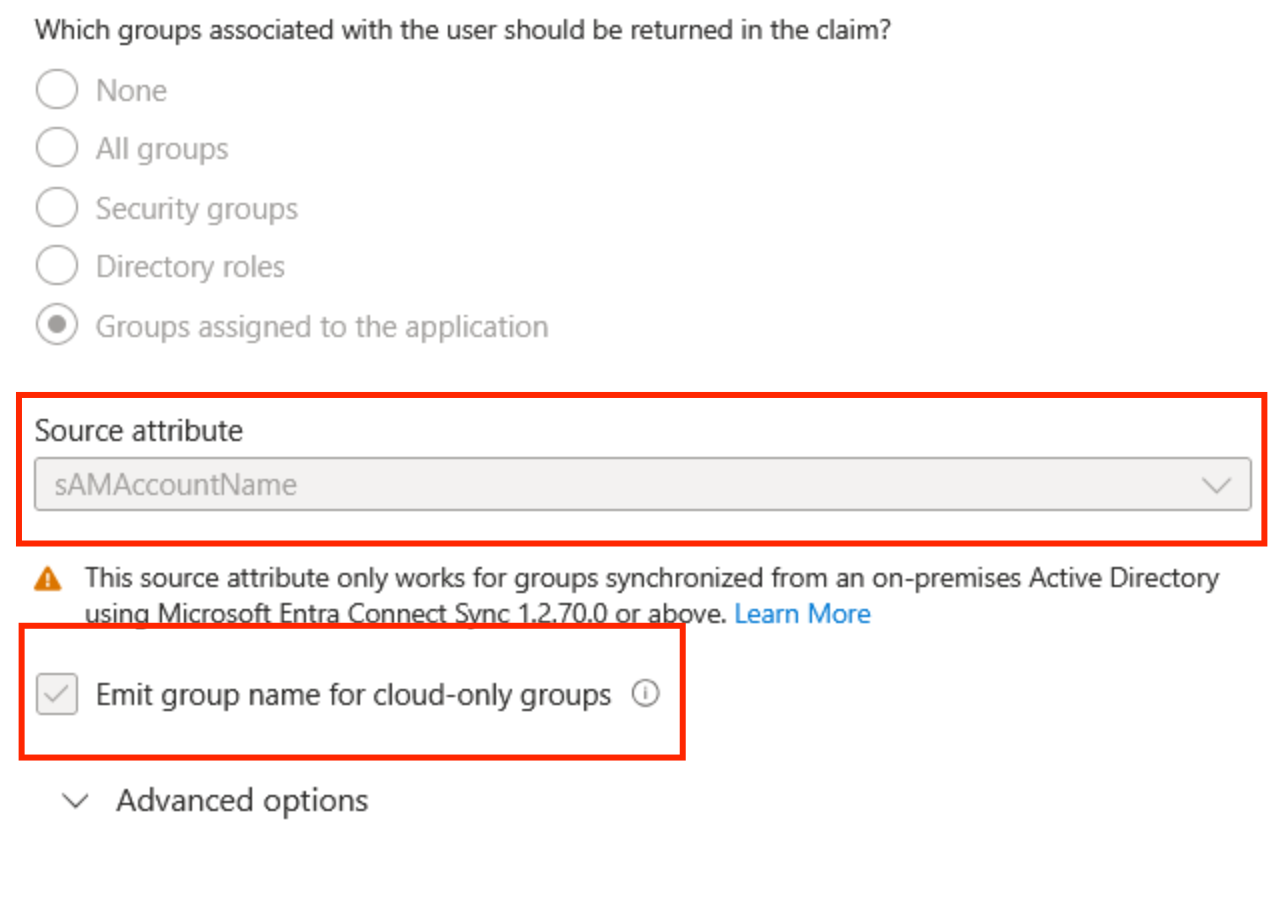
Under Which groups associated with the user should be returned in the claim, select one of the options:
- All groups — sends every group the user belongs to.
- Groups assigned to the application — sends only the groups you assigned in step 4. Choose this option if your groups are cloud-only (see the note below) or if users belong to many groups.
In Source attribute, select sAMAccountName.
If you selected Groups assigned to the application, enable Emit group name for cloud-only groups.
Click Save.
The group claim appears in the Additional claims list with the claim name http://schemas.microsoft.com/ws/2008/06/identity/claims/groups and the value user.groups. You will need this claim name for role mapping.
Allure TestOps maps roles by group name, so the claim must contain names, not object IDs. What Entra ID sends depends on where the group comes from:
- Synced groups come from on-premises Active Directory through Microsoft Entra Connect. Their Source in Entra ID is
Windows Server AD. For these groups, the sAMAccountName source attribute sends the group name. - Cloud-only groups are created directly in Entra ID. Their Source is
Azure Active Directory. For these groups, Entra ID sends only the object ID, for example"groups": ["e2044baa-f2eb-..."], unless Emit group name for cloud-only groups is enabled. Without the group name, role mapping never matches.
To check a group's type, go to Microsoft Entra ID → Groups, open the group, and look at the Source field.
If a user belongs to more than 150 groups, Entra ID doesn't put the groups into the SAML assertion at all. Use Groups assigned to the application to keep the list short.
If the groups don't exist yet, create them in Microsoft Entra ID → Groups → New group and add members. The group names must match the names you will enter in the Allure TestOps role mapping exactly.
7. Copy the App Federation Metadata URL
- On the application's Single sign-on page, find the SAML Certificates section.
- Copy the App Federation Metadata URL.
The URL looks like https://login.microsoftonline.com/<tenant ID>/federationmetadata/2007-06/federationmetadata.xml?appid=<application ID>. Allure TestOps reads the Entra ID sign-in endpoint and signing certificate from it.
8. Finish the configuration in Allure TestOps
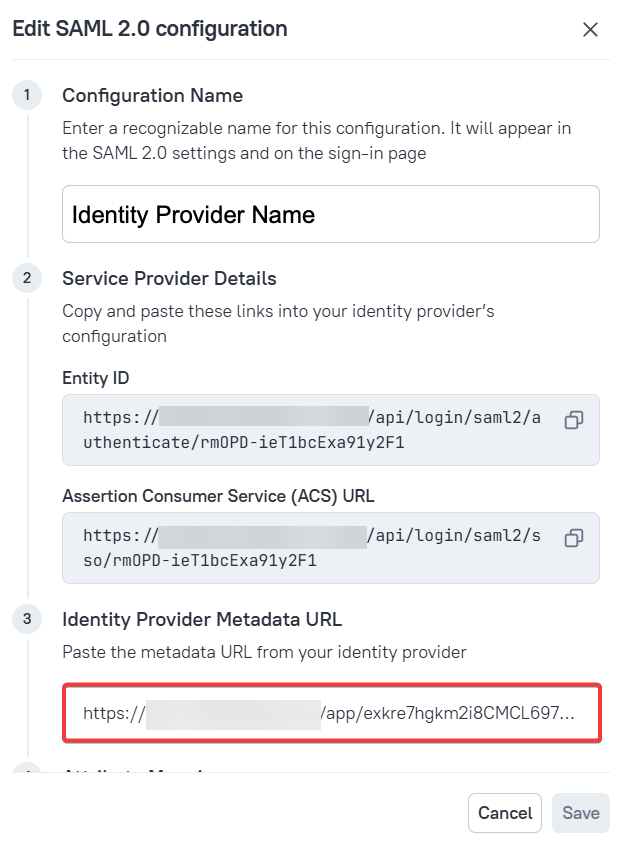
Return to the Edit SAML 2.0 configuration dialog from step 1. If you closed it, go to Administration → Authentication and click Edit configuration next to SAML 2.0.
Paste the App Federation Metadata URL into Identity Provider Metadata URL.
Under Attribute Mapping, replace the default values with the Entra ID claim names from step 5:
- Email Attribute —
http://schemas.xmlsoap.org/ws/2005/05/identity/claims/emailaddress - First Name Attribute —
http://schemas.xmlsoap.org/ws/2005/05/identity/claims/givenname - Last Name Attribute —
http://schemas.xmlsoap.org/ws/2005/05/identity/claims/surname
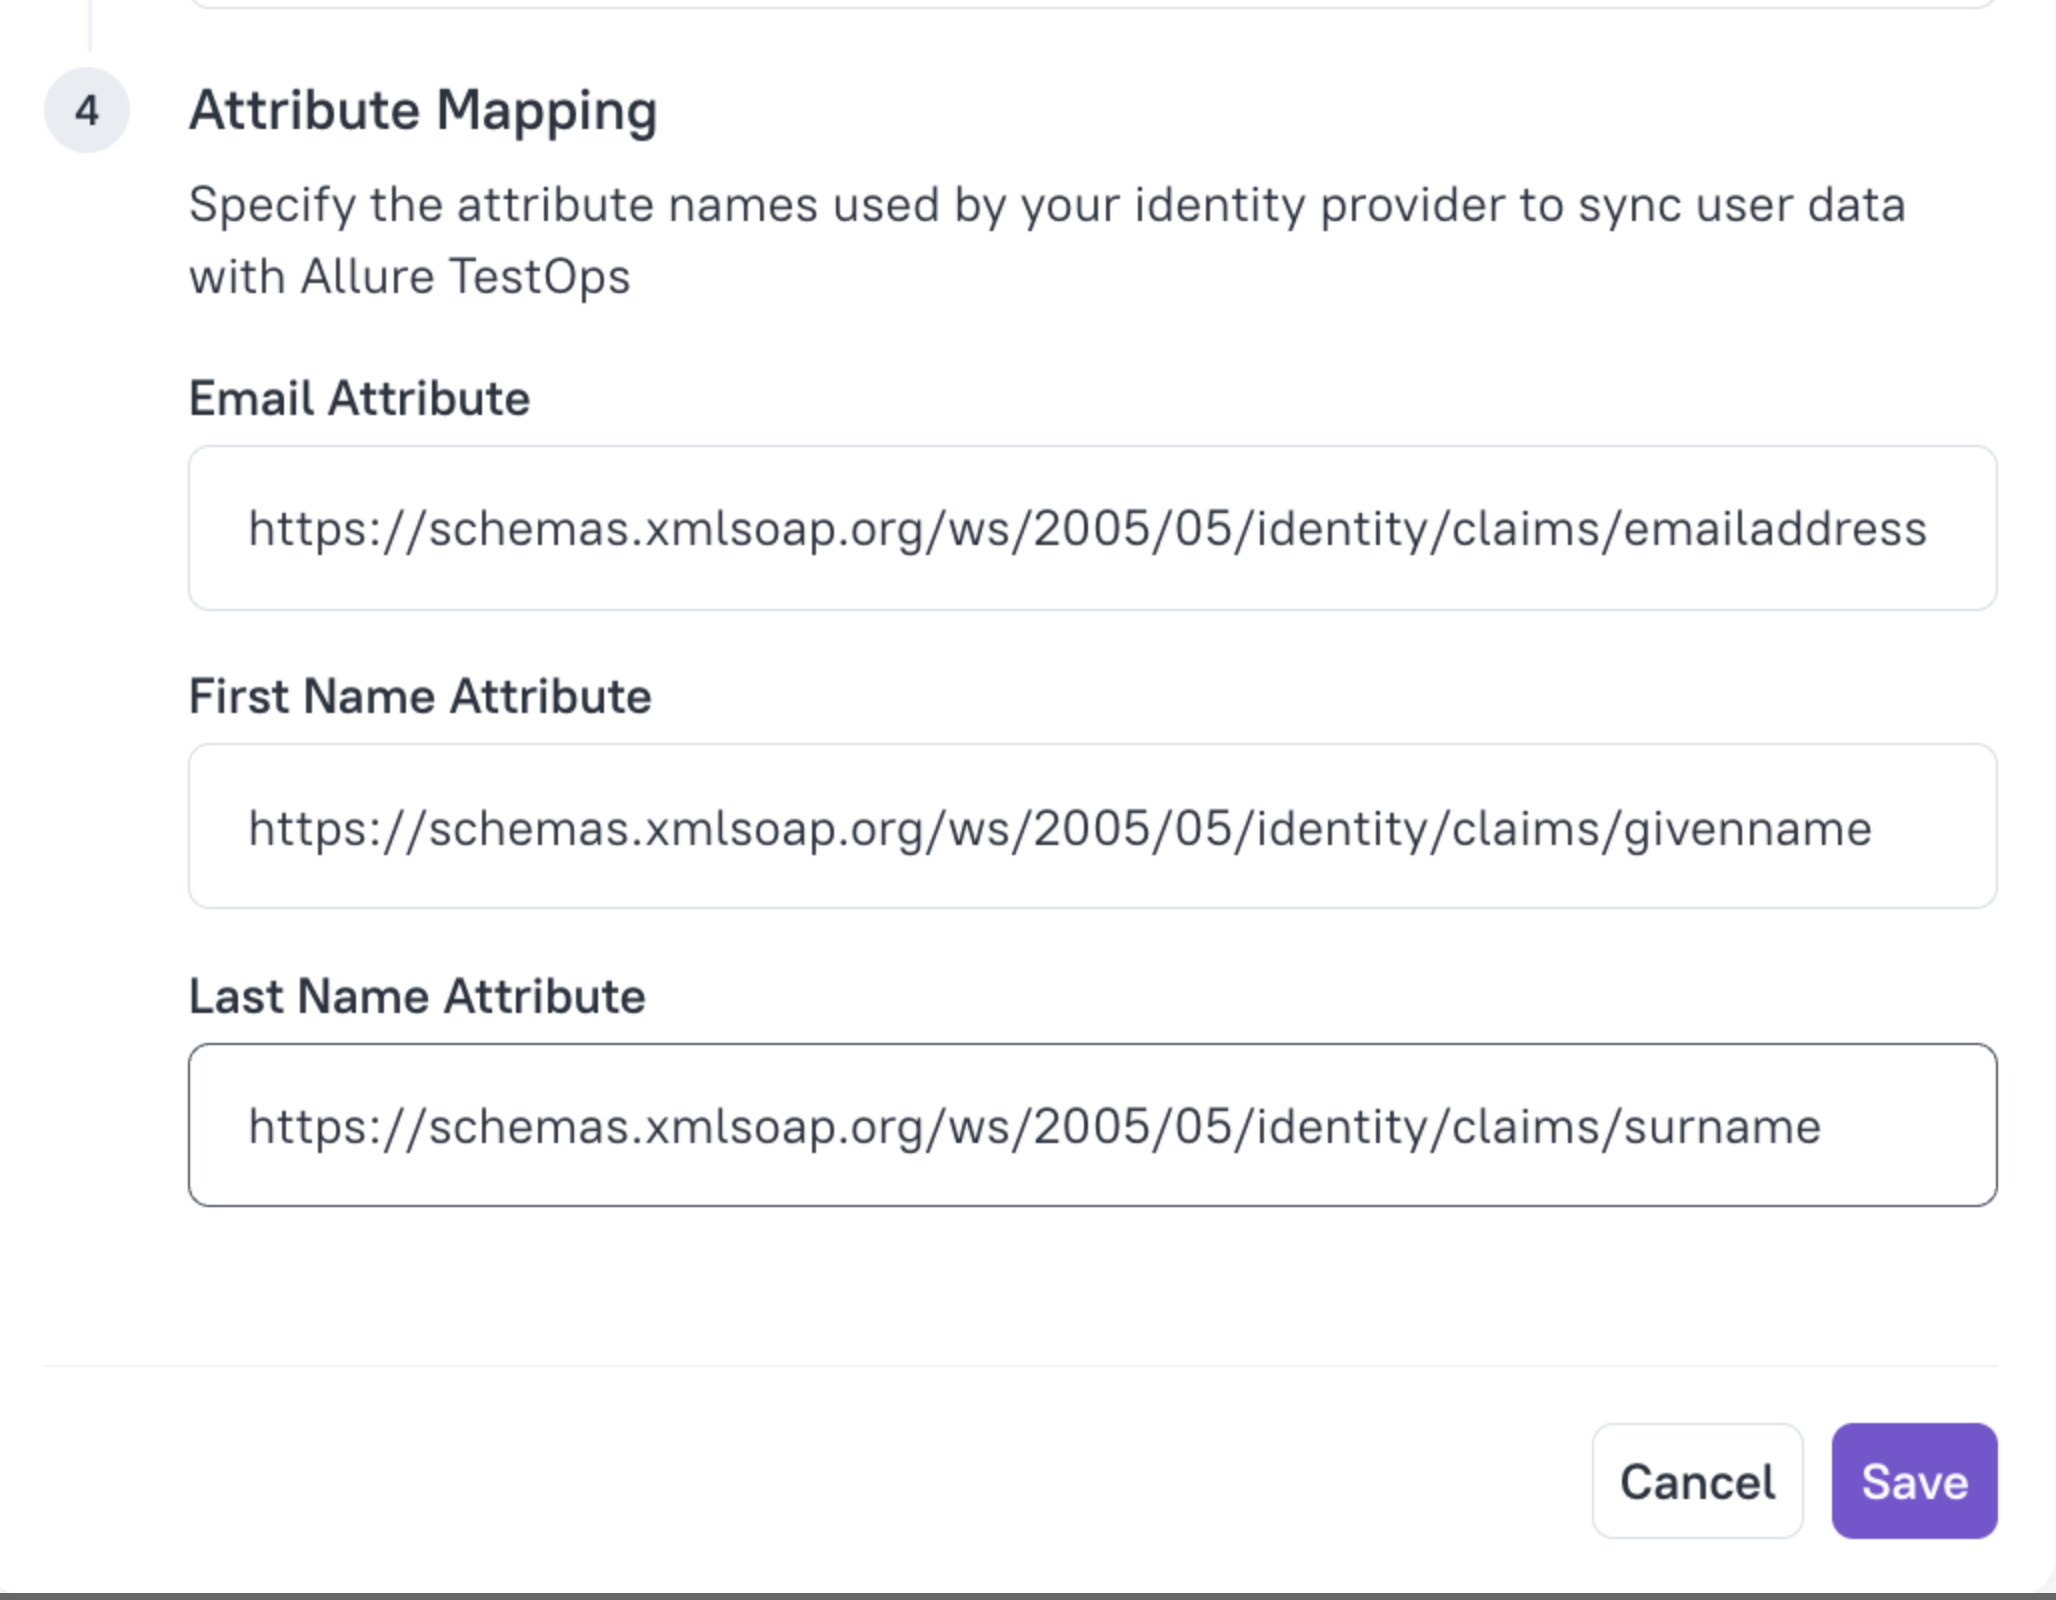
The defaults
email,firstName, andlastNamedon't match Entra ID claim names. Entra ID uses full URIs as claim names, so enter the complete value, not only the last part such asemailaddress.- Email Attribute —
Click Save.
Default global role
In the drop-down next to Default global role, select the role that new users get:
- Admin — manages global settings and all projects, can invite users and assign roles;
- User — can view and change public projects and private projects they are invited to;
- Guest — can only view public projects and private projects they are invited to.
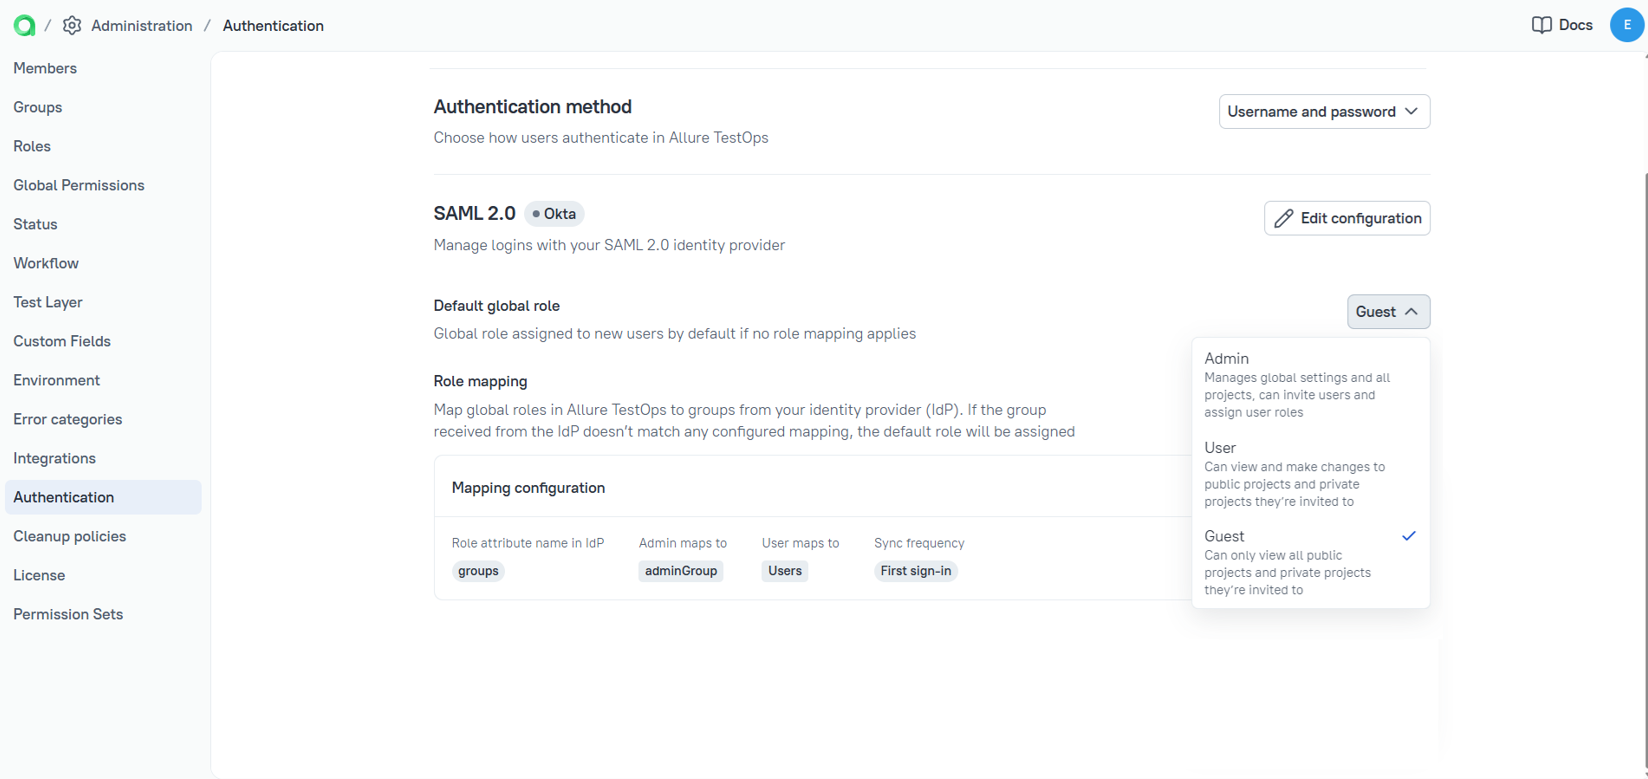
Allure TestOps assigns the default role when role mapping is not configured or when the user doesn't belong to any mapped group.
Don't use Admin as the default role. Every new Entra ID user who is assigned to the application would get full control over the instance, including the ability to delete data and change system settings. Use the role with the least permissions your team needs, usually Guest, and grant more through role mapping.
Role mapping (optional)
If you added the group claim in step 6, click Configure mapping next to Role mapping and fill in the fields:
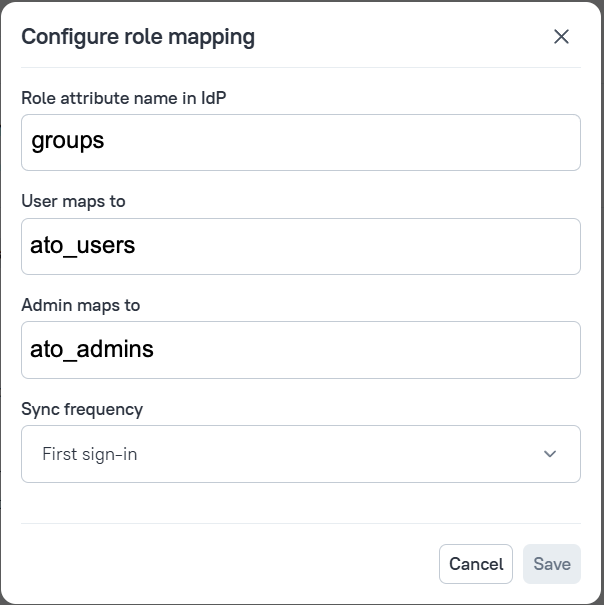
- Role attribute name in IdP — the name of the group claim, by default
http://schemas.microsoft.com/ws/2008/06/identity/claims/groups. - User maps to — Entra ID groups whose members get the User role.
- Admin maps to — Entra ID groups whose members get the Admin role.
- Sync frequency — when Allure TestOps updates the user's role from Entra ID:
- First sign-in — the role is set once, when the account is created; later changes in Entra ID groups are ignored, and you can change the role manually in Allure TestOps;
- Each sign-in — the role is recalculated every time the user signs in, so group changes in Entra ID take effect at the next sign-in.
Click Save.
Use the group claim name as Role attribute name in IdP. Don't use
memberOf: it is a user property in Entra ID, not a claim in the SAML assertion, so Allure TestOps never receives it and role mapping doesn't work.
9. Switch the authentication method to SAML 2.0
- On the Authentication page, under Authentication method, select SAML 2.0.
- Check that the indicator next to the SAML 2.0 configuration name is green.
From now on, users sign in to Allure TestOps through Entra ID. Accounts are created automatically at the first sign-in.
Verify the sign-in
- Open Allure TestOps in a private browser window.
- On the sign-in page, select Microsoft Entra ID (or the configuration name you entered in step 1) in the drop-down menu.
- Sign in with an Entra ID account that is assigned to the application and is not an Allure TestOps administrator.
- After the redirect back to Allure TestOps, open Administration → Members in your administrator session and check the new user:
- the email, first name, and last name are filled in;
- the global role matches the mapped group or the default role.
If role mapping is configured, test one user from each mapped group.
Keep a way back in
Switching the authentication method to SAML 2.0 doesn't disable local accounts. On the sign-in page, a drop-down menu lets users choose how to sign in: through Entra ID or with a username and password.
If the Entra ID side breaks, for example after the signing certificate rotates or the application is deleted, select username and password sign-in in the drop-down and sign in with a local Allure TestOps administrator account. Keep at least one such account with a known password for this purpose.
Troubleshooting
Entra ID shows an AADSTS error during sign-in
| Error | Cause | Fix |
|---|---|---|
AADSTS700016 |
Identifier (Entity ID) in Entra ID doesn't match the Allure TestOps Entity ID. | Copy the Entity ID again from Administration → Authentication → Edit configuration and paste it into Basic SAML Configuration. |
AADSTS50011 |
Reply URL in Entra ID doesn't match the Allure TestOps ACS URL. | Copy the ACS URL again and paste it into Reply URL. |
AADSTS50105 |
The user is not assigned to the enterprise application. | Add the user or their group in Users and groups. See step 4. |
The user signs in, but the name or email is empty, or the account isn't created
The attribute mapping in Allure TestOps doesn't match the claims Entra ID sends.
- In Entra ID, open the application → Single sign-on → Attributes & Claims and copy the claim names.
- In Allure TestOps, open Edit configuration and paste them into Attribute Mapping as full URIs.
- Check that the user has the
mail,givenName, andsurnameattributes filled in Entra ID.
Roles are not synchronized
Role synchronization depends on group membership. If a user doesn't get the expected role, either the user isn't in the expected group, or the group information doesn't reach Allure TestOps in a usable form.
- Check the role attribute name. In Allure TestOps, Role attribute name in IdP must be the name of the group claim, by default
http://schemas.microsoft.com/ws/2008/06/identity/claims/groups. If it is set tomemberOf, synchronization doesn't work. - Check that the group claim exists. In Entra ID, Attributes & Claims must list a claim with the value
user.groups. If it's missing, add it as described in step 6. - Check that the claim contains group names. Allure TestOps compares the group names from the claim with the names in User maps to and Admin maps to. For cloud-only groups, Entra ID sends object IDs instead of names unless Emit group name for cloud-only groups is enabled. Open the group in Microsoft Entra ID → Groups and check the Source field:
Azure Active Directory— cloud-only group: select Groups assigned to the application, enable Emit group name for cloud-only groups, and assign the group to the application;Windows Server AD— synced group: thesAMAccountNamesource attribute sends the name.
- Check the group names in the mapping. The names in User maps to and Admin maps to must match the Entra ID group names exactly.
- Check the sync frequency. With First sign-in, group changes don't affect existing users. Switch to Each sign-in if roles should follow Entra ID group changes.
- Check the number of groups. If the user belongs to more than 150 groups, Entra ID omits the groups from the assertion. Use Groups assigned to the application.
You are locked out after switching to SAML 2.0
On the sign-in page, select username and password sign-in in the drop-down menu and sign in with a local administrator account. Then fix the configuration on the Authentication page, or switch the authentication method back to Username and password.
