Jira Software Cloud
Jira service accounts are not supported. The integration must be configured using a regular user account.
Jira Software Cloud is the cloud-hosted Jira integration for Allure TestOps. It covers:
- linking test cases, launches, results, and defects to Jira issues;
- configuring issue mappings so test metadata becomes Jira links in TestOps;
- embedding TestOps panels inside Jira Cloud issues through the Jira app;
- synchronizing defect lifecycle state through Jira webhooks.
The embedded panels run in an iFrame. The TestOps instance does not need to be reachable from Jira Cloud, but it must be reachable from the user's browser. Browser settings that block cross-site cookies can prevent the panels from loading — see Troubleshooting if users report issues.
For manual issue lookup from TestOps, the TestOps server must be able to reach Jira.
Before you begin
- The Jira site URL, for example
https://example.atlassian.net. - Access to create an Atlassian API token.
- Instance administrator access in TestOps.
- Project owner access in the target TestOps project.
- Jira administrator access if you want the embedded panels or webhook sync.
- HTTPS enabled on TestOps if you want the embedded panels to work.
1. Enable Jira issue links in TestOps
Create the Jira API token
- In Jira, click your avatar and go to Profile.
- Click Manage your account.
- Go to the Security tab.
- Under API tokens, click Create and manage API tokens.
- Click Create API token.
- Enter a name to identify the token, for example
Token for Allure TestOps. - Click Create, then click Copy to copy the token. Save it in a secure location.
Add the global Jira integration
An instance administrator should:
- Open Administration → Integrations in TestOps.
- Click + Add integration.
- Select Jira Software Cloud.
- Fill in the fields:
- Name — a stable name for the Jira instance, for example
Jira production. - Endpoint — the Jira site URL, for example
https://example.atlassian.net.
- Name — a stable name for the Jira instance, for example
- Click Add integration.
Enable the integration in the project
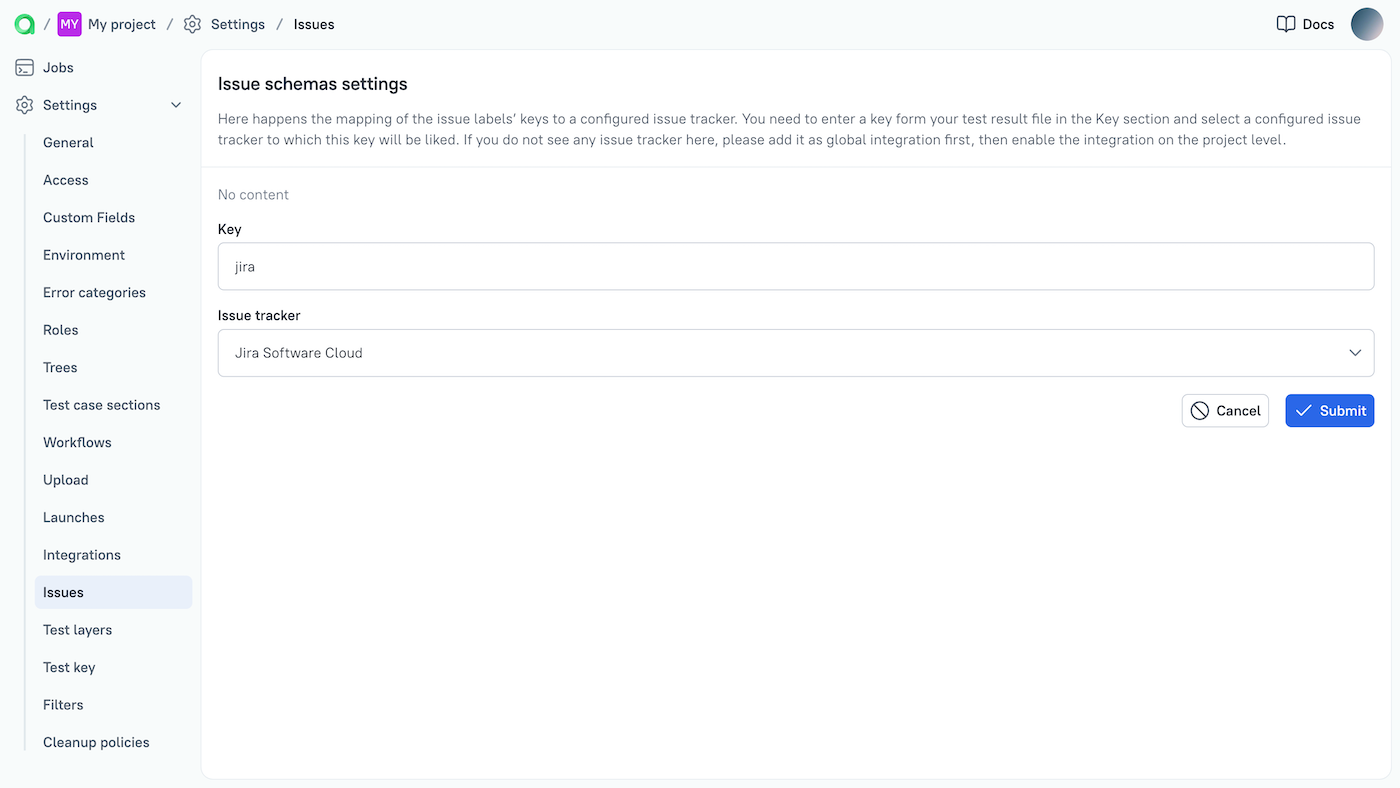
Configure issue mapping
If your tests already emit issue labels through an Allure adapter, configure an issue mapping so TestOps can turn those labels into Jira links automatically.
- Open the TestOps project.
- Go to Settings → Issues.
- Click + Create.
- Fill in the fields:
- Key — the short identifier your tests use in metadata, for example
jira. - Issue tracker — the Jira Software Cloud integration enabled for the project.
- Key — the short identifier your tests use in metadata, for example
- Save the issue mapping.
To emit issue labels from your tests, use the Allure adapter for your framework. Example in TypeScript:
allure.label("jira", "BUG-123");Here
jirais the mapping key andBUG-123is the Jira issue ID. In a real project, wrap the label call in a helper function so the key is defined in one place.
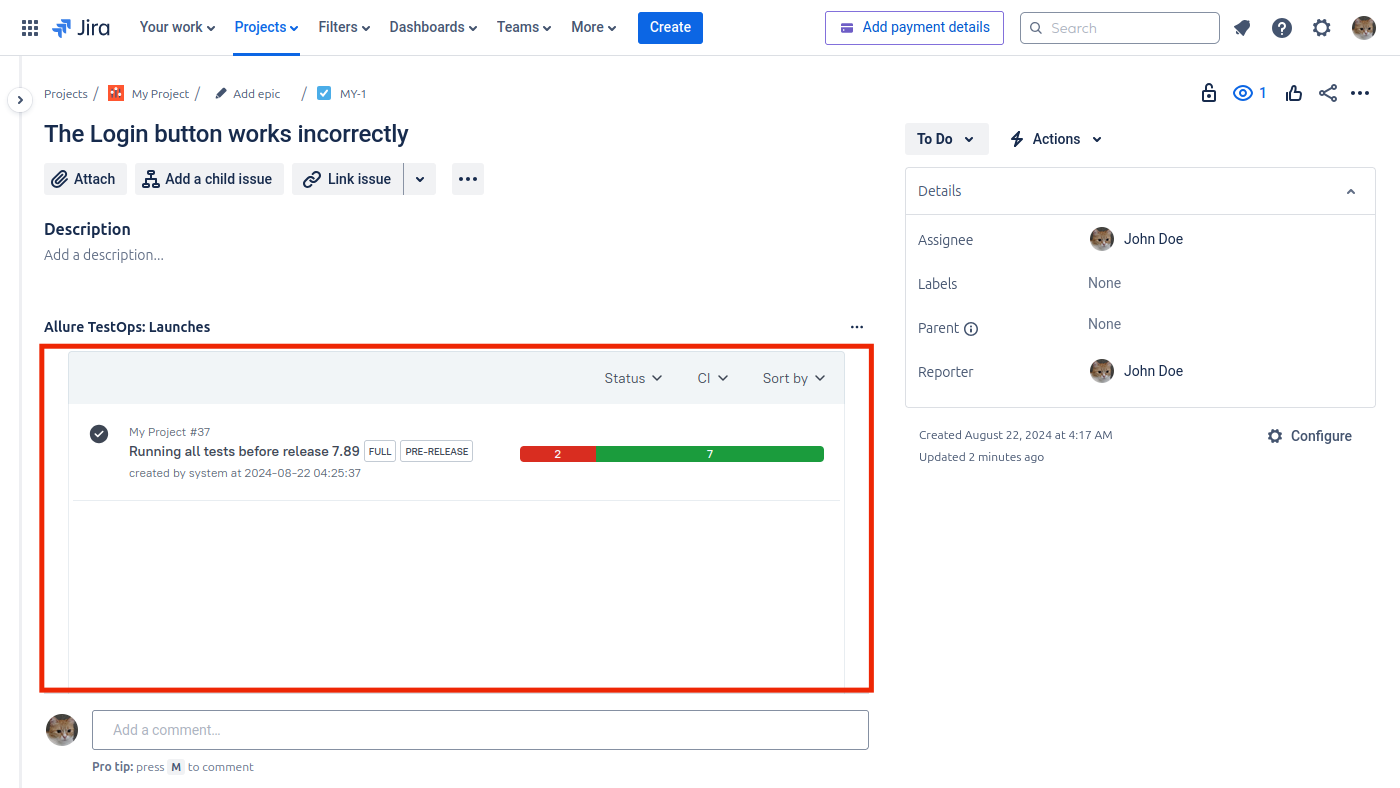
2. Embed TestOps panels in Jira Cloud issues
The embedded panels show linked TestOps test cases and launches directly inside Jira issues. This requires secure cookies, the Jira app, and the TestOps integration ID.
Enable secure cookies in TestOps
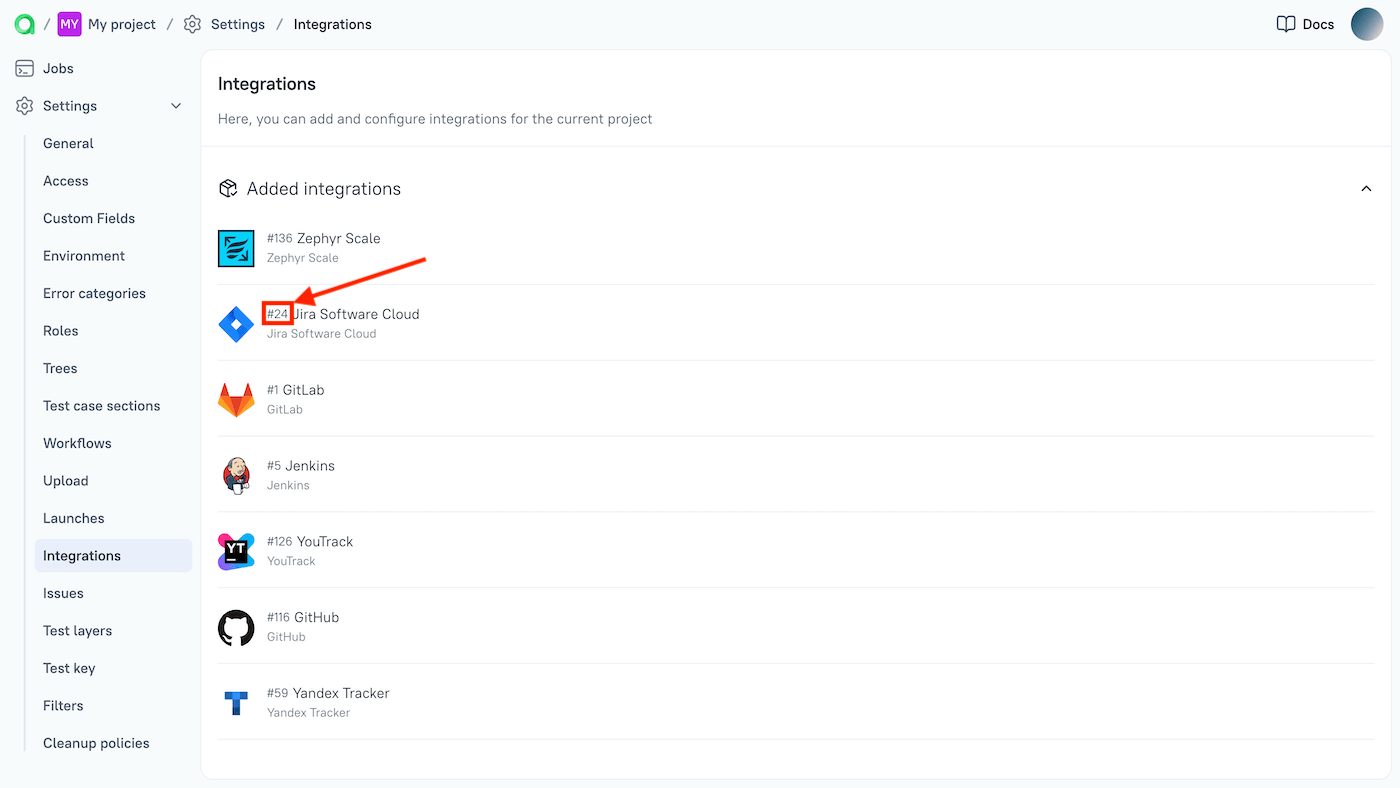
Find the integration ID in TestOps
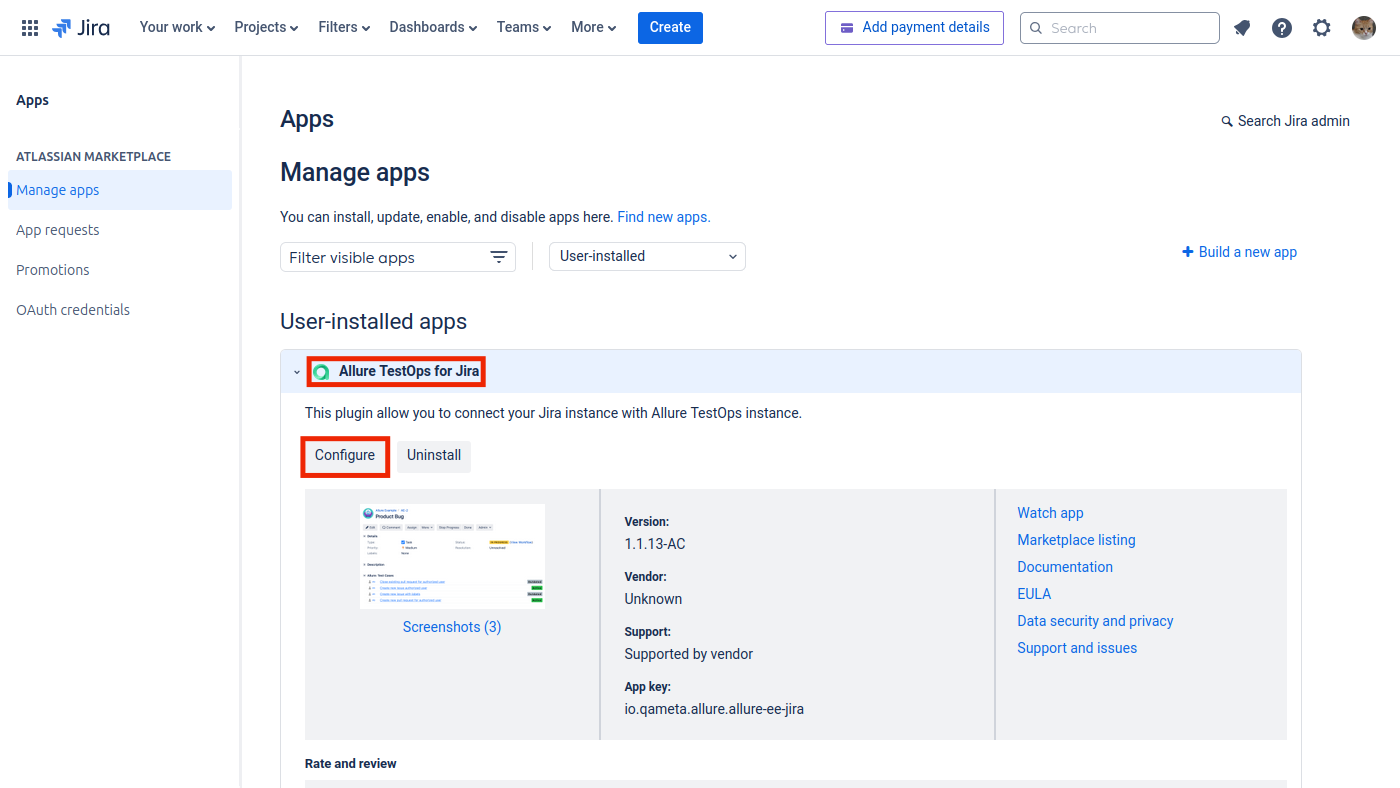
Install and configure the Jira app
In the app configuration, fill in the fields:
- Enabled — turn the app on.
- Endpoint — the TestOps URL without a trailing slash.
- Version — the option that matches your current TestOps release line.
- Integration ID — the Jira Software Cloud integration ID from the step above.
- Test Cases — set to Show in main issue panel.
- Launches — set to Show in main issue panel.
Click Save.
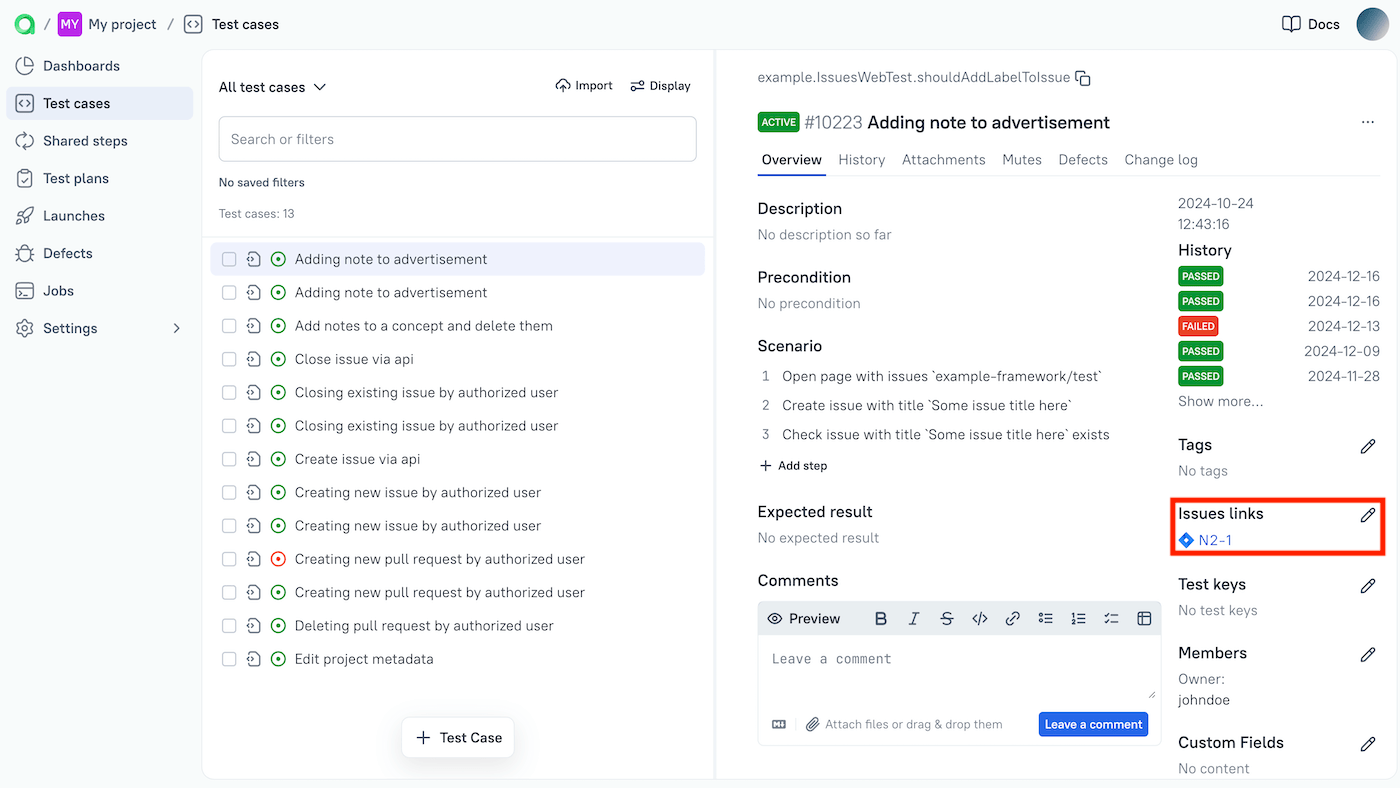
Verify the integration
In TestOps, add a Jira issue link to a test case or launch.
Confirm that the Jira issue picker can search the expected project.
Open the linked Jira issue and confirm that the TestOps panels appear.
3. Enable synchronization of the issue lifecycles
When this path is enabled, Jira issue status changes can open or close the linked defect in TestOps.
Create the webhook in TestOps
- Open Administration → Integrations in TestOps.
- Open the Jira Software Cloud integration.
- Go to the Webhooks tab.
- Click + Create webhook and confirm the creation.
- Copy the generated webhook URL.
Add the webhook in Jira
- In Jira, click the Settings icon and select System.
- In the left sidebar, under Advanced, click WebHooks.
- Click Create a WebHook.
- Fill in the fields:
- Name — a name to identify the webhook.
- Status — Enabled.
- URL — the webhook URL copied from TestOps.
- Issue related events — select Issue → updated.
- Click Create.
Troubleshooting
The iFrame shows a sign-in button
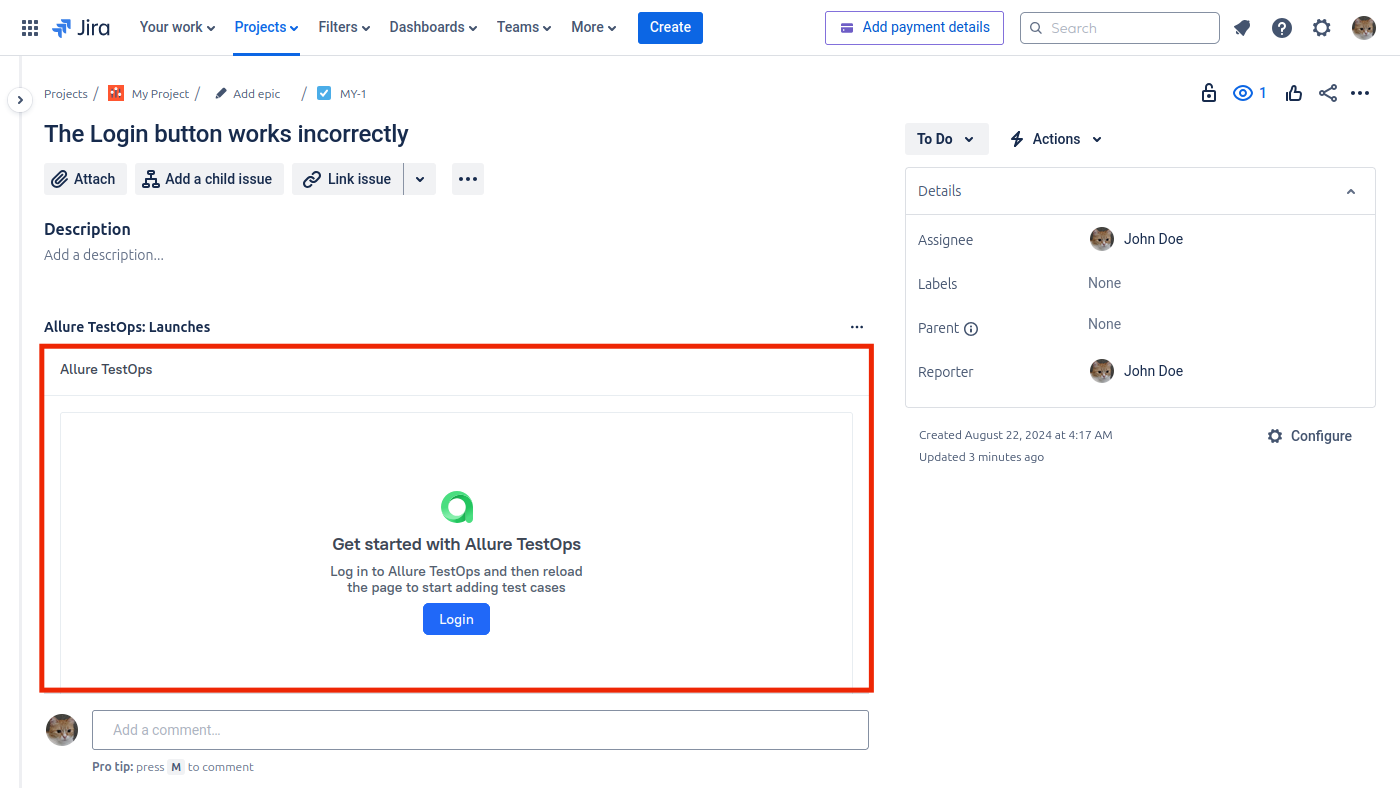
If you are signed in to TestOps but still see a Sign in button in the Jira issue view, the browser is blocking the cross-site cookies required for the embedded panel.
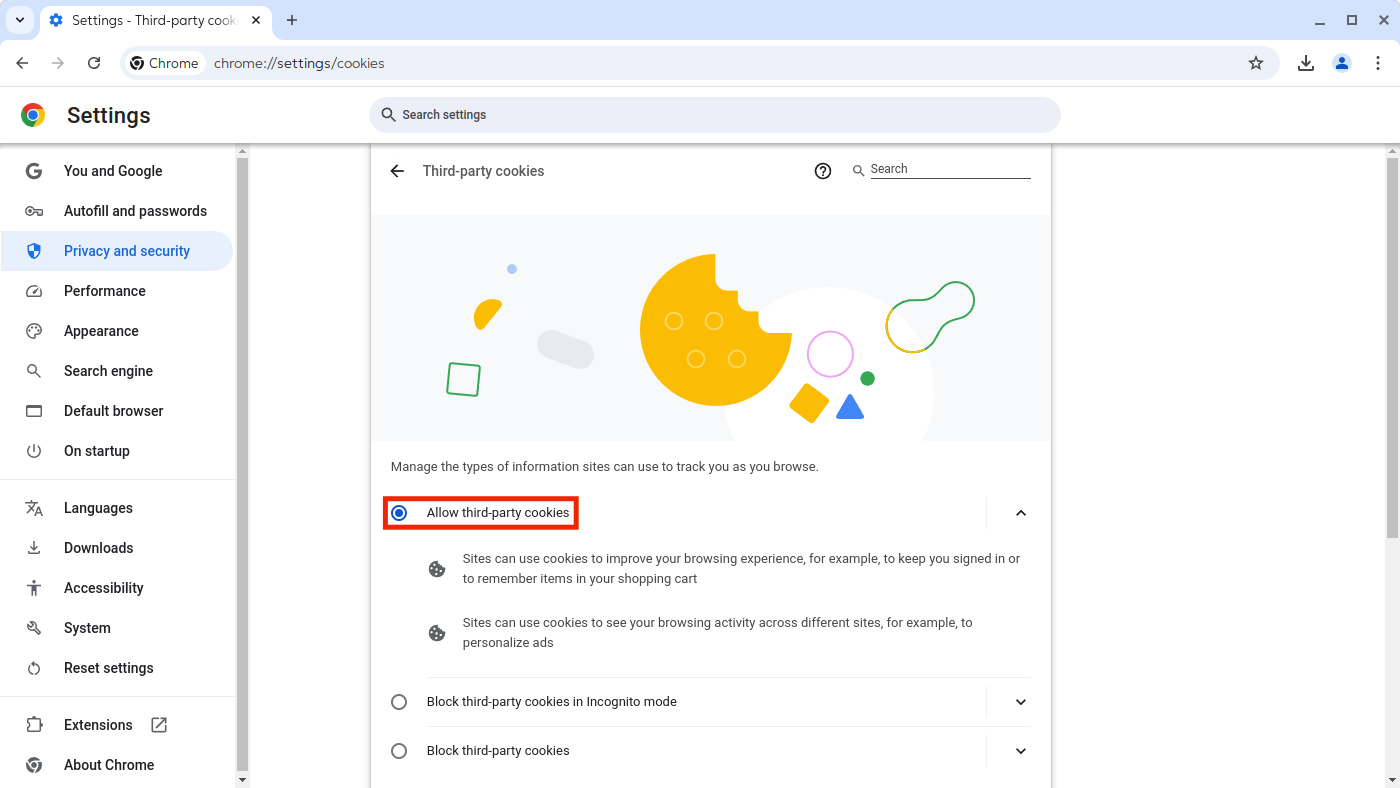
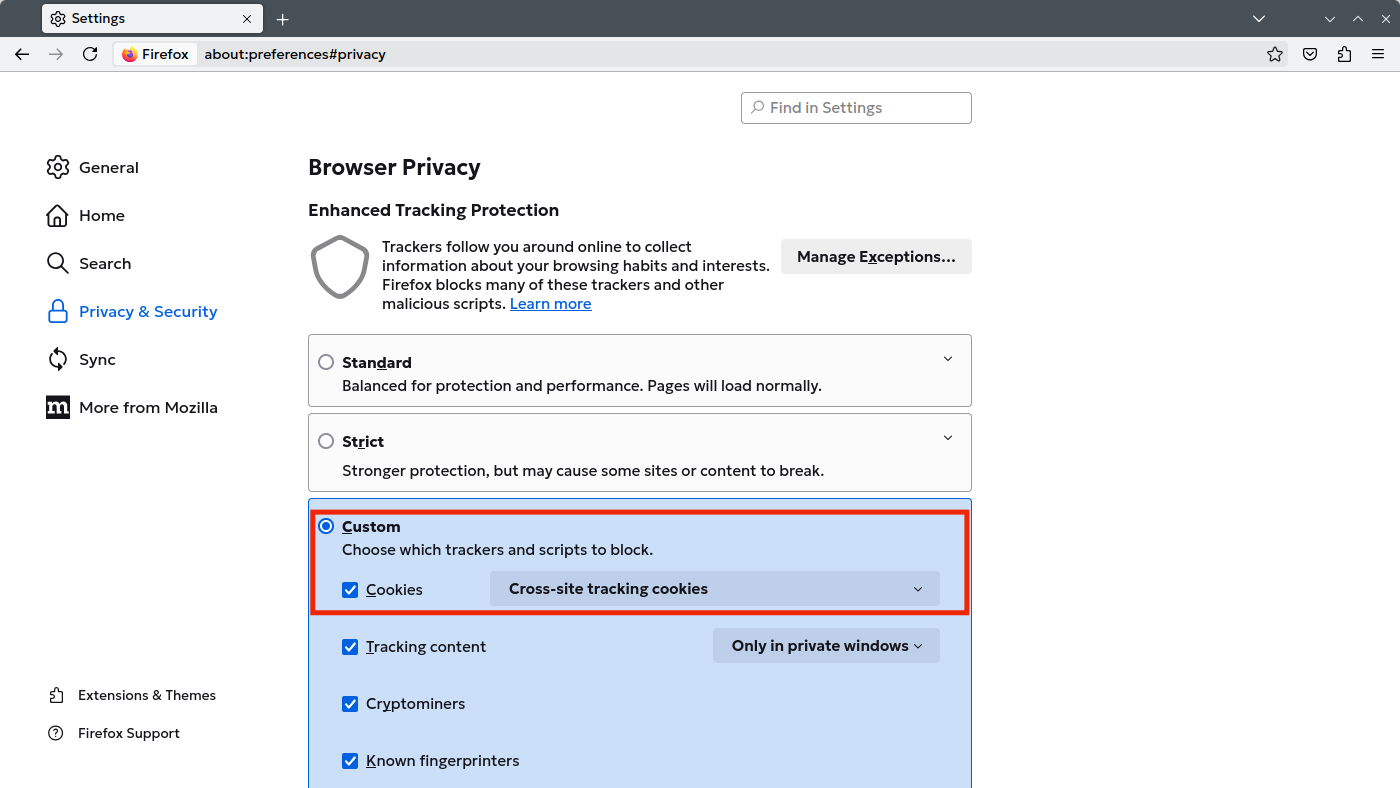
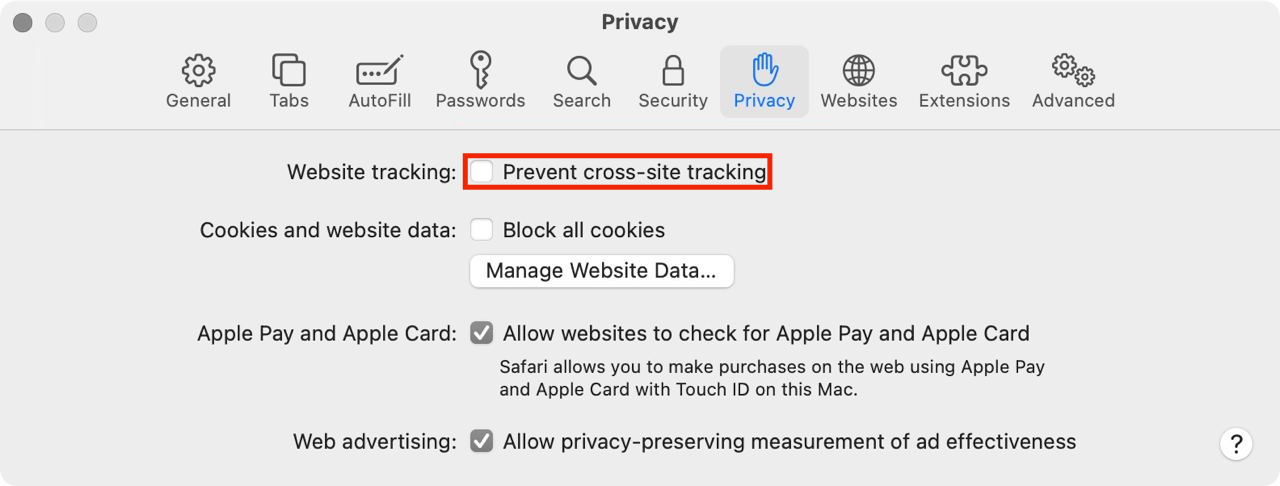
Each user who encounters this issue needs to apply the fix in their own browser.
The iFrame shows "Couldn't connect to Allure TestOps"
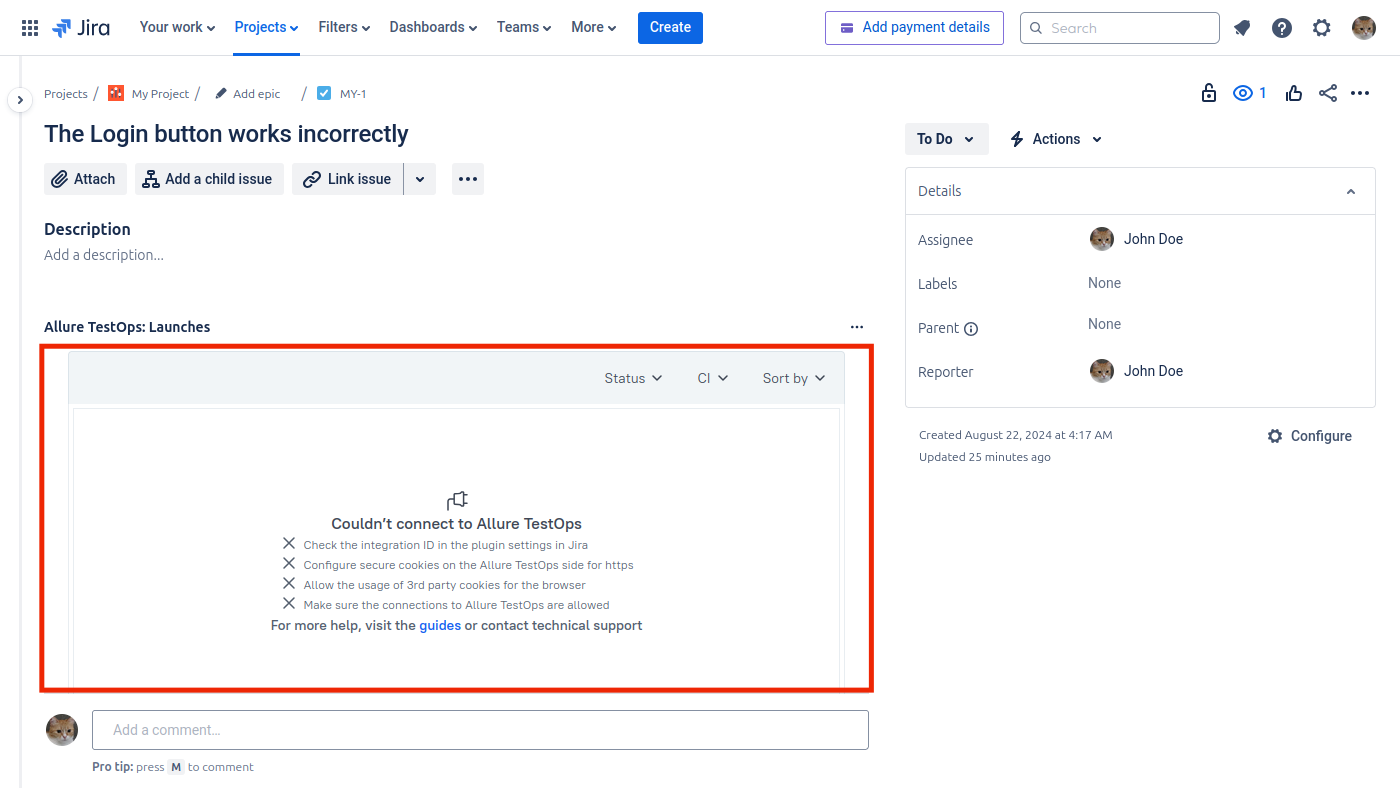
The integration ID in the Jira app configuration is incorrect. Find the correct integration ID in TestOps and update the value in the app settings.
The iFrame shows a connection failure or 502 error
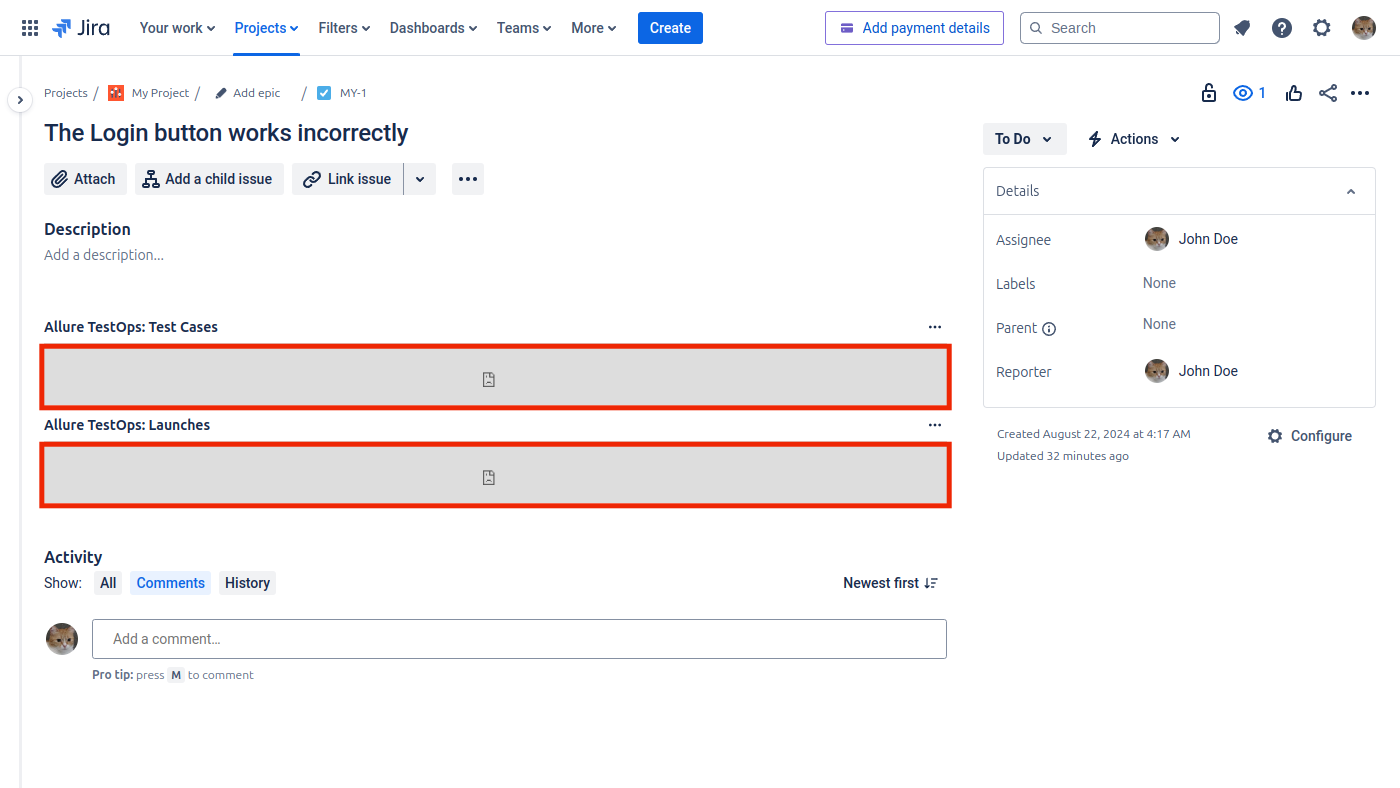
If the embedded panels show a connection failure icon or a 502 error instead of TestOps data, first check that the TestOps instance is available and reachable from the browser.
If TestOps is available but the problem persists, the Jira Software Cloud content security policy may be blocking requests from the TestOps domain. To investigate:
In Jira, open an issue where the TestOps content is expected.
Open browser developer tools and use the element inspector to locate the
<iframe>that corresponds to the TestOps panel.Copy the URL from the
srcattribute of that<iframe>.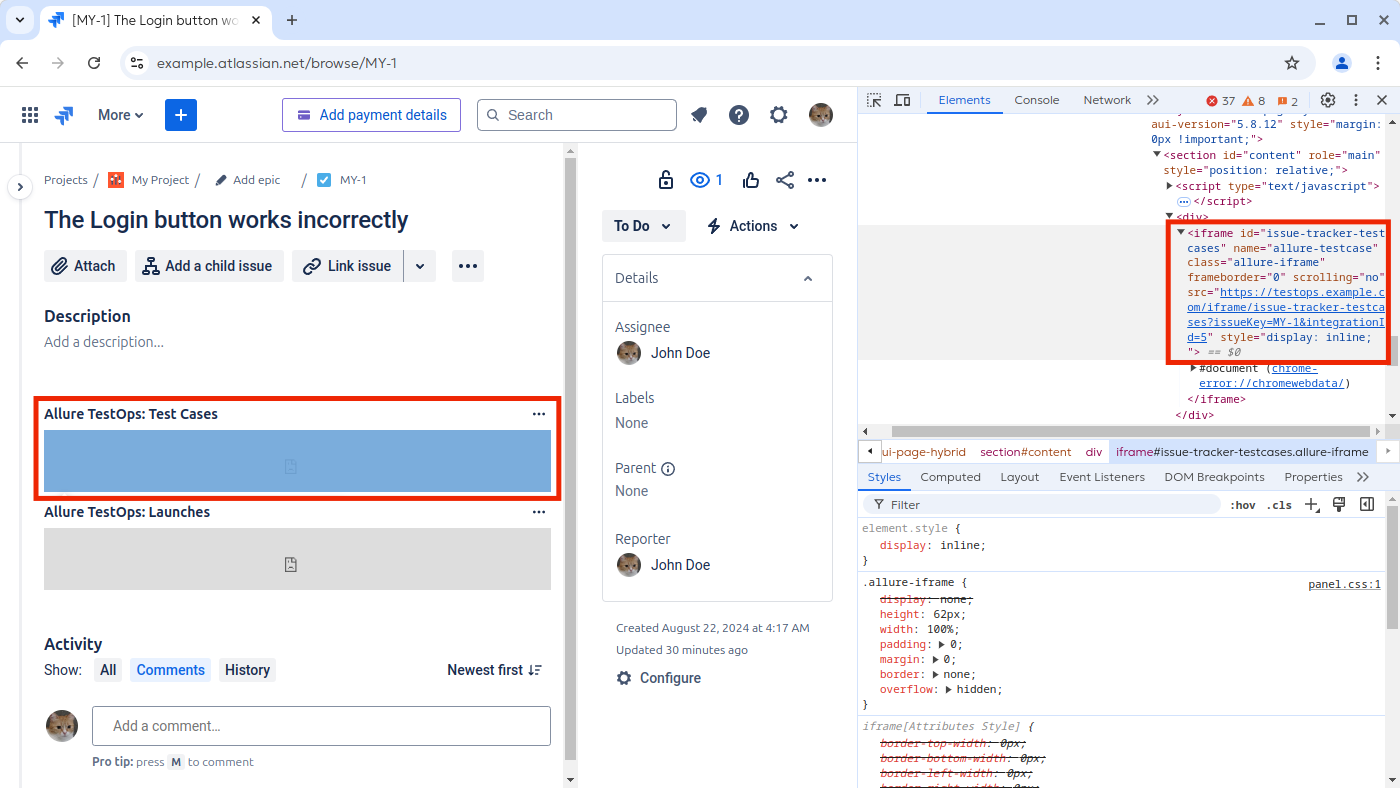
Contact Atlassian support with the iFrame URL and ask why requests to that domain are being blocked.
The integration stopped working after August 2025
Atlassian deprecated several Jira Software Cloud API endpoints in August–September 2025. If the integration was working before that period and then stopped, the cause is likely that the TestOps version in use relies on those deprecated endpoints.
To restore the integration, upgrade TestOps to version 25.3.1 or later, which adds support for the replacement Atlassian API.
Related pages
- Jira Data Center for the self-hosted Jira integration path.
- Defects for issue-linked defect workflows.
- Links, issues, and relations for how issue links appear in TestOps.
