TeamCity
TeamCity integration connects TeamCity build configurations with Allure TestOps: uploads test results during a build using the TeamCity plugin, lets TestOps trigger TeamCity builds, and maps TeamCity parameters to launch environments.
One job in Allure TestOps corresponds to one TeamCity build configuration. One launch corresponds to one TeamCity build.
During test execution, the plugin scans the results directory for new files, waits briefly to avoid uploading half-written files, then uploads each file to TestOps. TestOps can show partial launch results before the build finishes.
If you cannot install the plugin, see Upload results with allurectl at the bottom of this page.
The TeamCity plugin does not support Allure TestOps installations with self-signed SSL certificates. Before setting up the integration, make sure you use a properly signed certificate, or make Allure TestOps available to the TeamCity instance over unencrypted HTTP.
Before you begin
- Permission to install TeamCity plugins and manage TeamCity administration.
- The URL of the TestOps instance and the numeric TestOps project ID.
- A TestOps API token for the upload path.
- Either a TeamCity access token or TeamCity username and password for the trigger path.
1. Install the TeamCity plugin
Install from JetBrains Marketplace
- In TeamCity, go to Administration → Plugins and click Browse plugins repository.
- In the dialog that appears, click Proceed. Your browser opens JetBrains Marketplace.
- In the notification in the bottom-right corner, click Proceed to enable one-click installation from JetBrains Marketplace in your browser.
- Visit the Allure TestOps plugin page and click Get → Install to <hostname>.
- Click Install to confirm. Wait until the plugin is downloaded and installed.
- Click Enable uploaded plugin, then Enable in the confirmation dialog.
Install from a file
- Visit the Allure TestOps plugin page, click Get → Download, and save the ZIP archive.
- In TeamCity, go to Administration → Plugins and click Upload plugin zip.
- Select the downloaded ZIP archive and click Upload plugin zip.
- Wait until the plugin is uploaded and installed.
- Click Enable uploaded plugin, then Enable in the confirmation dialog.
2. Send results from TeamCity to TestOps
Create the TestOps token
- In Allure TestOps, click your avatar and open API Tokens.
- Click + Token.
- Enter a name for the token, for example
Token for TeamCity, and click Create. - Copy the generated token.
Register the TestOps server in TeamCity
For Kotlin DSL projects, see the Kotlin DSL reference below instead.
- On the TeamCity main page, go to your project's page.
- In the upper-right corner, click Edit project.
- In the left menu, click Allure Servers. If the link is not visible, click Show all.
- Click Add new server.
- Fill in the fields:
- Name — a recognizable name for the TestOps instance.
- URL — the URL of the TestOps instance.
- Token — the API token copied from TestOps.
- Threads count — maximum number of threads for uploading files.
- Batch size — maximum number of files per upload batch (per thread).
- Results depth — number of subdirectory levels to scan.
0means no subdirectories. - Process interval — minimum interval in seconds between sending batches (per thread).
- Indexing interval — interval in seconds between scans of the results directory.
- Delay interval — minimum interval in seconds before uploading a newly created file, to avoid uploading half-written files.
- Click Test connection. A "Successfully authorized as <username>" message confirms the credentials are correct.
- Click Save.
Add the upload feature to the build configuration
For Kotlin DSL projects, see the Kotlin DSL reference below instead.
- Go to your build configuration's page and click Edit configuration in the upper-right corner.
- In the left menu, click Build Features.
- Click Add build feature.
- In the drop-down list, select Allure: upload results.
- Fill in the fields:
- Allure Server — the server entry registered in TeamCity.
- Project ID — the numeric TestOps project ID.
- Launch name — a template for naming launches. You can use TeamCity predefined build parameters here.
- Launch tags — optional comma-separated tags.
- Test Results Directories — the path to the Allure results directory, for example
build/allure-results. For multiple directories, separate them with commas or newlines, or use a wildcard pattern, for examplemodules/*/build/allure-results. - Index existing files — if unchecked, the plugin ignores files that existed in the results directory before the build started.
- Enable full log — if checked, the plugin outputs additional diagnostic detail into the build log, useful for troubleshooting.
- Click Save.
Verify the upload
After the next build finishes:
- In TestOps, confirm that a new launch was created with results from the build.
- Open a single result and confirm it links back to the TeamCity build.
3. Let TestOps trigger TeamCity builds
Add the global TeamCity integration
An instance administrator should:
- Open Administration → Integrations.
- Click + Add integration.
- Select TeamCity.
- Fill in the fields:
- Name — a recognizable name, for example
TeamCity production. - Endpoint — the URL of the TeamCity instance, for example
https://teamcity.example.com/.
- Name — a recognizable name, for example
- If the TeamCity instance uses a self-signed SSL certificate, check Disable certificate validation.
- Click Add integration.
Create a TeamCity access token
You can use either a TeamCity access token or a TeamCity username and password for the project-level connection. For token-based access:
- In TeamCity, click your avatar and go to Profile.
- In the left menu, click Access Tokens.
- Click Create access token.
- Fill in the fields:
- Token name — a recognizable name, for example
allure-testops. - Permission scope — Limit per project.
- Project — the TeamCity project for which you are configuring the integration.
- Permissions — Run build, Comment build.
- Token name — a recognizable name, for example
- Click Create and copy the generated token.
Add TeamCity credentials to the TestOps project
- In TestOps, open the target project and go to Settings → Integrations.
- Under Available integrations, find the TeamCity integration and click Add integration.
- Enter the credentials:
- On the basic tab — enter the TeamCity username and password.
- On the token tab — enter the access token created in the previous step.
- Click Test connection. A "Connection established" message confirms the credentials are correct.
- Click Add integration.
Configure the TeamCity-backed job in TestOps
The recommended way is to run the TeamCity build once, let it upload results, and close the created launch. TestOps will create the job automatically from the upload.
To configure the auto-created job:
- Open Jobs in the project.
- Click
⋯next to the job and select Configure. - Fill in the fields:
- Name — a stable display name.
- Build server — the global TeamCity integration added by the administrator.
- Job can be used to run tests — enable to allow triggering from TestOps.
- Parameters — see Section 4.
- Click Submit.
Create the job manually
If the upload-first path cannot be used:
- Open Jobs and click + Job.
- Fill in the fields:
- Build server — the global TeamCity integration.
- Job — the TeamCity build configuration name.
- Can run tests — enable to allow triggering from TestOps.
- Parameters — see Section 4.
- Click Submit.
4. Pass parameters and branch values
TeamCity build parameters let TestOps pass runtime values such as branch, browser, or target environment.
Set default values in TeamCity
- Go to your build configuration's page and click Edit configuration.
- In the left menu, click Parameters. If not visible, click Show all.
- For each parameter, click Add new parameter and fill in:
- Name — the variable name.
- Kind — Environment variable. This automatically adds the
env.prefix to the name. - Value — the default value to use when not overridden for a specific launch.
- Click Save.
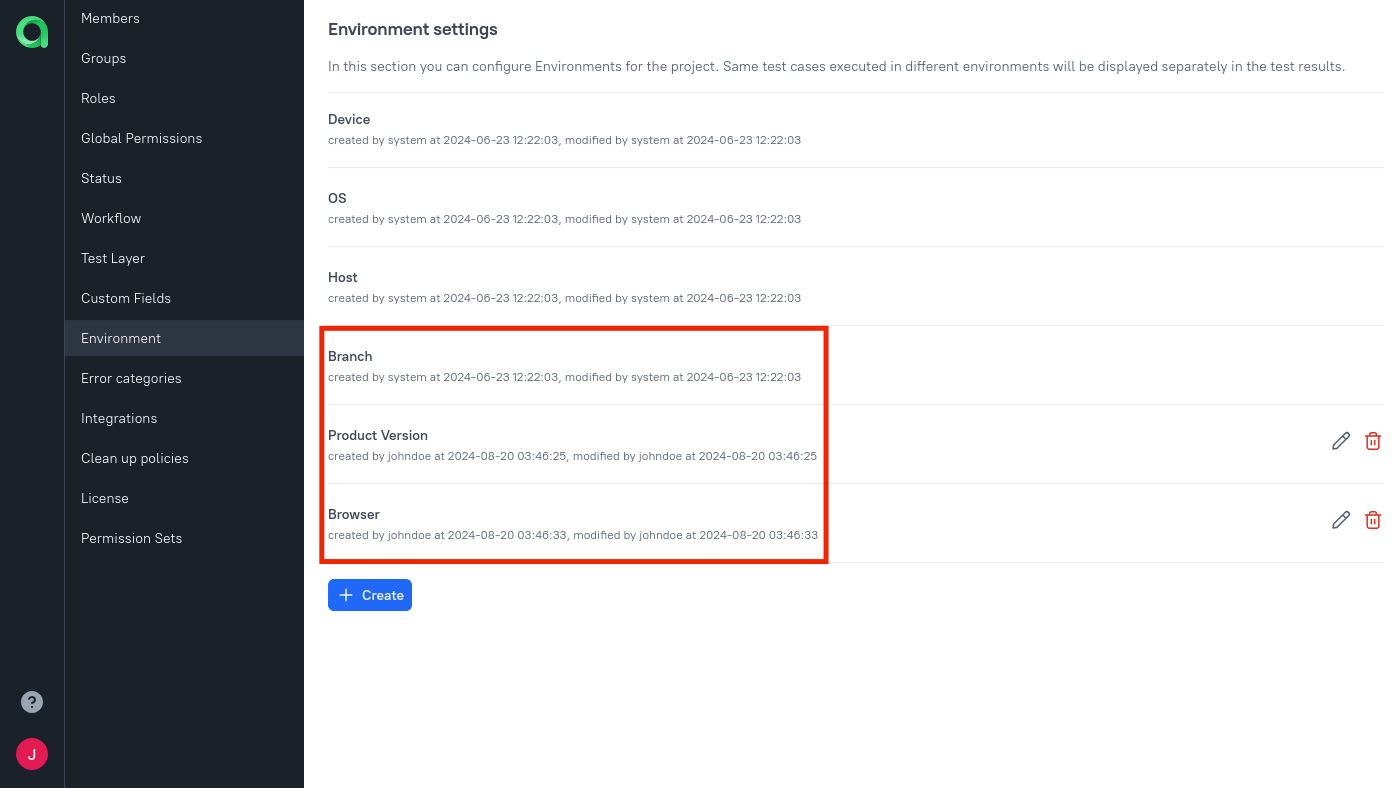
Add global environment names
An instance administrator should:
Open Administration → Environment.
For each parameter, click + Create, enter the name, and click Submit.
The name can be a human-readable label and does not have to match the TeamCity variable name.
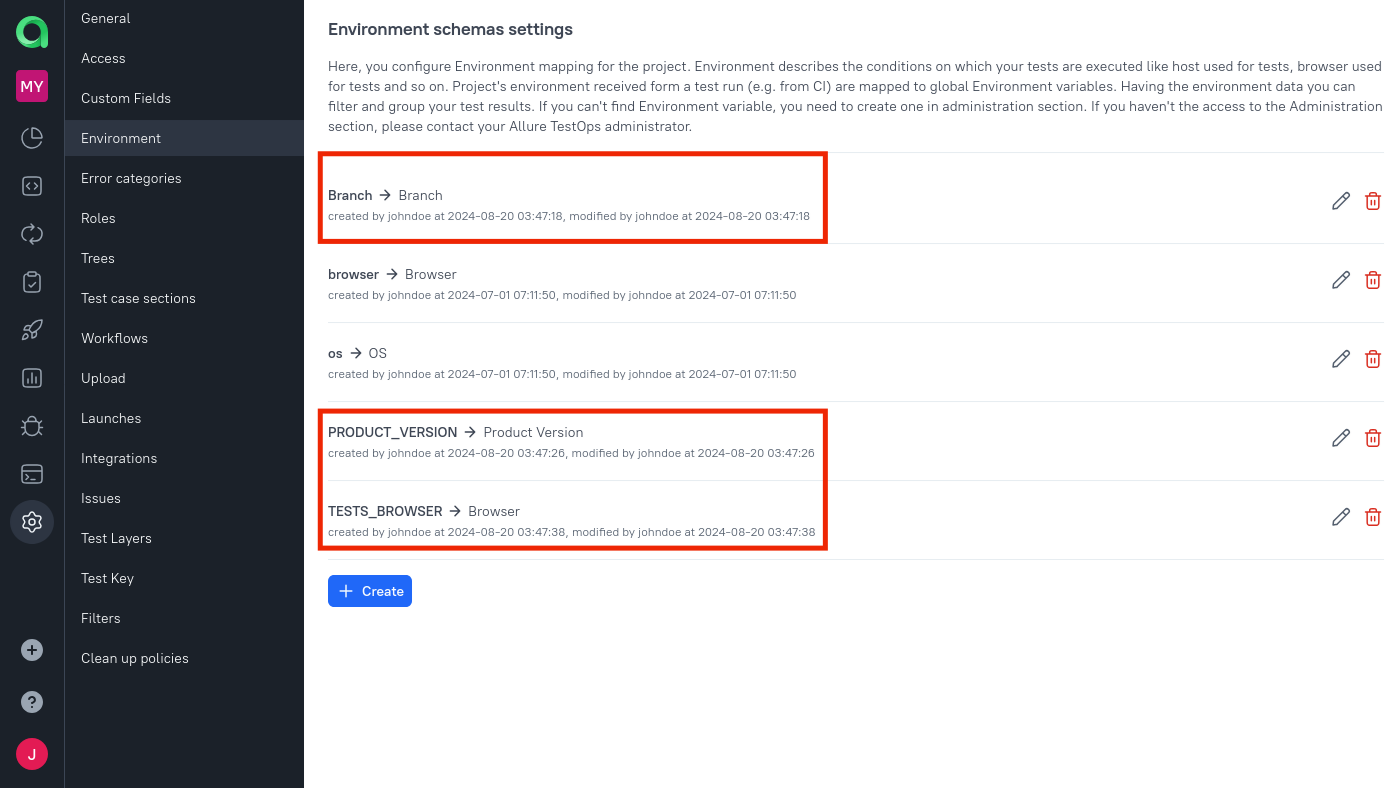
Map parameters in the project
In the project, open Settings → Environment.
For each parameter, click + Create (or the edit icon if it already exists):
- Mapping key — the TeamCity variable name from Step 1 (without the
env.prefix). - Environment variable — the global parameter name created by the administrator.
- Mapping key — the TeamCity variable name from Step 1 (without the
Click Submit.
Load parameters into the job
Open Jobs and click the Refresh button next to the job.
The parameter names and their default values from TeamCity appear in the job description.
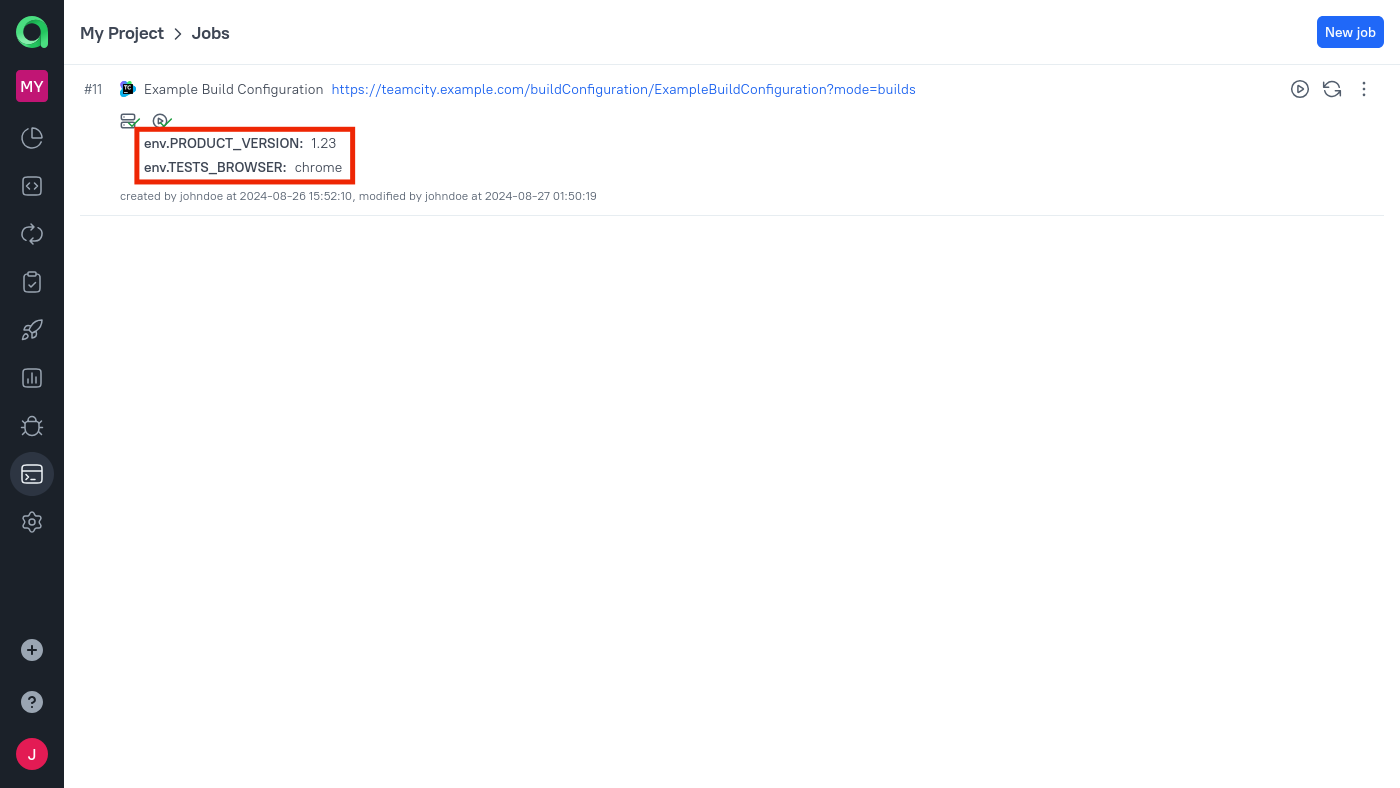
Click
⋯next to the job and select Configure.In the Parameters section, for each parameter select the corresponding global environment variable.

Click Submit.
If the project has multiple branches, add a Branch environment variable in Allure TestOps and map it to the TeamCity parameter that controls branch selection. This special name instructs TeamCity which branch to run when TestOps triggers the build.
Kotlin DSL reference
If you manage TeamCity configuration as code using Kotlin DSL, add the Allure TestOps settings to your .teamcity/settings.kts file.
Project-level settings
Use a feature block with type = "io.qameta.allure.teamcity.AllureServerConfig":
project {
    vcsRoot(ExampleProject_VcsRoot)
    buildType(ExampleBuildConfiguration)
    features {
        feature {
            type = "io.qameta.allure.teamcity.AllureServerConfig"
            param("allure.server.config.id", "7040a01f-dadf-4d3b-b449-f8f227cb2f79")
            param("allure.server.config.name", "Allure TestOps production")
            param("allure.server.config.url", "https://testops.example.com/")
            param("allure.server.config.token", "<your-token>")
            param("allure.server.config.threadsCount", "5")
            param("allure.server.config.batchSize", "10")
            param("allure.server.config.maxDepth", "1")
            param("allure.server.config.processInterval", "2")
            param("allure.server.config.indexInterval", "1")
            param("allure.server.config.delayInterval", "5")
        }
    }
}
Supported parameters:
allure.server.config.id— unique identifier for the instance. A UUID is recommended.allure.server.config.name— display name for the TestOps instance.allure.server.config.url— URL of the TestOps instance.allure.server.config.token— API token from TestOps.allure.server.config.threadsCount— maximum number of upload threads.allure.server.config.batchSize— maximum files per upload batch (per thread).allure.server.config.maxDepth— subdirectory levels to scan.0= no subdirectories.allure.server.config.processInterval— minimum interval in seconds between batches.allure.server.config.indexInterval— interval in seconds between directory scans.allure.server.config.delayInterval— minimum interval in seconds before uploading a new file.
Build configuration-level settings
Use a feature block with type = "allure.serverBuildFeature":
object ExampleBuildConfiguration : BuildType({
    id = AbsoluteId("ExampleBuildConfiguration")
    name = "Example Build Configuration"
    vcs {
        root(DslContext.settingsRoot)
    }
    steps {
        gradle {
            tasks = "clean test"
        }
    }
    triggers {
        vcs {}
    }
    features {
        feature {
            type = "allure.serverBuildFeature"
            param("allure.server.id", "7040a01f-dadf-4d3b-b449-f8f227cb2f79")
            param("project.id", "1")
            param("allure.server.launch.name", "%env.TEAMCITY_BUILDCONF_NAME% - #%env.BUILD_NUMBER%")
            param("allure.server.launch.tags", "tests,teamcity")
            param("allure.result.directory", "build/allure-results")
            param("allure.indexExistingFiles", "true")
            param("allure.debug.enable", "true")
        }
    }
})
Supported parameters:
allure.server.id— matchesallure.server.config.idfrom the project-level settings.project.id— numeric TestOps project ID.allure.server.launch.name— launch name template. Supports TeamCity predefined build parameters.allure.server.launch.tags— comma-separated launch tags.allure.result.directory— path to the Allure results directory. Supports commas, newlines, and wildcard patterns.allure.indexExistingFiles— iftrue, uploads files that existed before the build started.allure.debug.enable— iftrue, outputs additional diagnostic detail into the build log.
Troubleshooting
UnsupportedClassVersionError during upload
The TeamCity plugin version does not match the Java runtime on the build agent. Align the agent runtime with the plugin's Java requirements and retry.
TeamCity builds run from TestOps, but selective execution is ignored
If every test runs instead of the selected test plan, check that the adapter for your test framework consumes the TestOps plan and that the build runs through the normal plugin flow rather than a custom wrapper that bypasses the expected environment.
Upload results with allurectl
Use this path only when you cannot install the TeamCity plugin. It covers result upload via the allurectl CLI only — TestOps cannot trigger builds through this path.
Create the TestOps token
- In Allure TestOps, click your avatar and open API Tokens.
- Click + Token.
- Enter a name for the token, for example
Token for TeamCity, and click Create. - Copy the generated token.
Add environment variables in TeamCity
- In TeamCity, go to your project configuration page.
- In the left menu, click Parameters.
- Click Add new parameter and add the following environment variables:
| Name | Value |
|---|---|
env.ALLURE_CI_TYPE |
teamcity |
env.ALLURE_ENDPOINT |
URL of the TestOps instance |
env.ALLURE_JOB_NAME |
%system.teamcity.buildConfName% |
env.ALLURE_JOB_RUN_NAME |
%teamcity.build.id% |
env.ALLURE_JOB_RUN_UID |
%teamcity.build.id% |
env.ALLURE_JOB_RUN_URL |
https://teamcity.example.com/viewLog.html?buildId=%teamcity.build.id% |
env.ALLURE_JOB_UID |
%system.teamcity.buildType.id% |
env.ALLURE_LAUNCH_NAME |
Launch name template |
env.ALLURE_PROJECT_ID |
Numeric TestOps project ID |
env.ALLURE_RESULTS |
Path to the Allure results directory |
env.ALLURE_TOKEN |
TestOps API token |
ALLURE_JOB_UID and ALLURE_JOB_RUN_UID must remain stable across builds — they are the identifiers TestOps uses to attach repeated uploads to the same CI job.
Update the build step
- In TeamCity, go to your build configuration page.
- In the left menu, click Build Steps.
- Edit the step that runs the tests.
- Download
allurectland wrap the test command withwatch:
curl -fsSL https://github.com/allure-framework/allurectl/releases/latest/download/allurectl_linux_amd64 -o allurectl
chmod +x allurectl
./allurectl watch -- ./gradlew clean test
If build agents use a different OS or architecture, download the matching allurectl binary instead.
Troubleshooting allurectl path
No link back to TeamCity in test results — check env.ALLURE_JOB_RUN_URL. The value must be the real TeamCity build URL accessible to users, not an internal hostname.
TestOps creates a standalone launch instead of attaching to the job — one of the ALLURE_JOB_* variables is missing or empty. Recheck env.ALLURE_JOB_UID, env.ALLURE_JOB_RUN_UID, and the other ALLURE_JOB_* variables.
