TestRail
TestRail export sends test cases and launch data from Allure TestOps into TestRail. It is a one-way outbound sync, not an identity-linking path and not a migration workflow.
Allure TestOps only supports exporting to TestRail projects that use multiple test suites. See Projects and their types in the TestRail documentation to change the project type if necessary.
It covers:
- exporting test cases from TestOps to a TestRail project, suite, and section;
- exporting launch data for the selected test-case set;
- scoping the export with AQL;
- mapping TestOps fields and workflow statuses into TestRail.
Before you begin
- API access enabled in TestRail.
- A TestRail API key.
- The target TestRail project name, suite ID, and section ID.
- The AQL filters that define which test cases and launches should be exported.
1. Enable TestRail API access and create the API key
Enable the API
- In TestRail, go to Administration → Site Settings → API.
- Check Enable API and Enable session authentication for API.
- Click Save Settings.
Create the API key
- In TestRail, click your name in the top right corner and select My Settings.
- Go to the API Keys tab.
- Click Add Key.
- Enter a name to identify the key, for example
Key for Allure TestOps. - Click Generate Key and copy the generated key.
- Click Add Key, then Save Settings.
2. Add the global TestRail integration
An instance administrator should:
Open Administration → Integrations in TestOps.
Click + Add integration.
Select TestRail.
Fill in the fields:
- Name — a stable name for the integration, for example
TestRail production. - Endpoint — the URL of the TestRail instance, for example
https://example.testrail.io/. - TestRail version — 6.7 or later.
- Name — a stable name for the integration, for example
If the TestRail instance uses a self-signed certificate, check Disable certificate validation.
Click Add integration.
3. Enable TestRail in the TestOps project
In TestOps, open the target project.
Go to Settings → Integrations.
Under Available integrations, find the TestRail integration and click Add integration.
Fill in the fields:
- Username — the email address used to sign in to TestRail.
- API key — the API key from step 1.
Click Test connection. If the credentials are correct, a "Connection established" message appears.
Click Add integration.
4. Find the TestRail suite and section IDs
All test cases exported from Allure TestOps land in a single section of a single suite in TestRail. You need the suite ID and section ID before configuring the sync.
In TestRail, open the target project.
Note the project name — you will enter it in the Project field in step 5.
Go to the Test Suites & Cases tab and open the target suite (create one if needed).
The suite ID is shown next to the suite name.
In the tree view, click the target section (create one if needed).
The section ID appears as the
group_idparameter in the browser URL.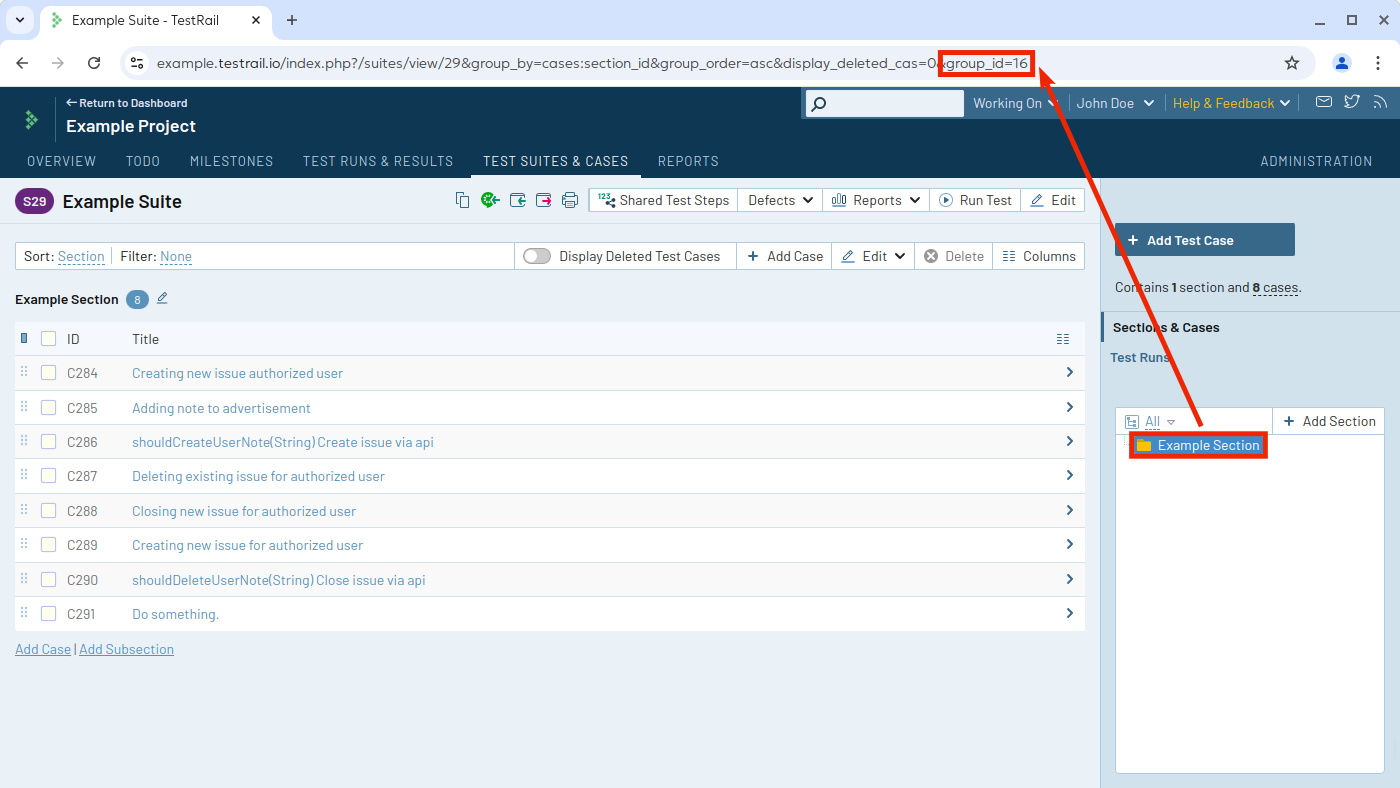
5. Create the TMS Sync export configuration
In the TestOps project, go to Settings → Integrations and open the TestRail integration.
Go to the TMS Sync tab and click Create.
Choose the destination Project.
Enter the Suite ID and Section ID from step 4. Use the numeric part only — for example, enter
29, notS29.Fill in the export scope:
- Test Case AQL — an AQL expression for the test cases to export. Leave empty to export all test cases.
- Launches AQL — an AQL expression for the launches to export. Leave empty to export all launches.
- Disable Test Case create — enable after the initial export if the destination should only receive updates for already exported cases.
- Disable Launches sync — enable if the job should export test cases without launch history.
- Disable export — enable to pause the configuration without deleting it.
Click Submit.
An empty Test Case AQL exports all test cases into the selected suite and section. An empty Launches AQL exports all launches for that scope.
The TMS sync is automatically disabled if the credentials are invalid, revoked, or have insufficient access. To restore sync, update the project integration credentials and re-enable the export.
6. Map fields when you need more than the default export
TestRail does not expose every TestOps field as a standard destination field. For fields such as description, precondition, expected result, or scenario, you need to create matching custom fields in TestRail first.
Create custom fields in TestRail
In TestRail, go to Administration → Customizations.
For each field to export, click Add Field and fill in:
- Label — the display name in TestRail, for example
DescriptionorPrecondition. - System Name — the unique identifier used by Allure TestOps, for example
descriptionorpreconds. - Type — Steps for the scenario field if you want it step-structured; Text for all other fields.
- Label — the display name in TestRail, for example
Click Add Projects & Options, go to the Selected Projects tab, select your project, and click OK.
Click Add Field.
Configure mapping in Allure TestOps
- In the TestOps project, open the TestRail integration.
- On the TMS Sync tab, click Edit.
- For each field to export, enter
custom_followed by the system name you set in TestRail, for examplecustom_description. - Click Submit.
7. Map workflow statuses when needed
If exported test cases should preserve TestOps workflow status, create a corresponding dropdown field in TestRail and map the status IDs.
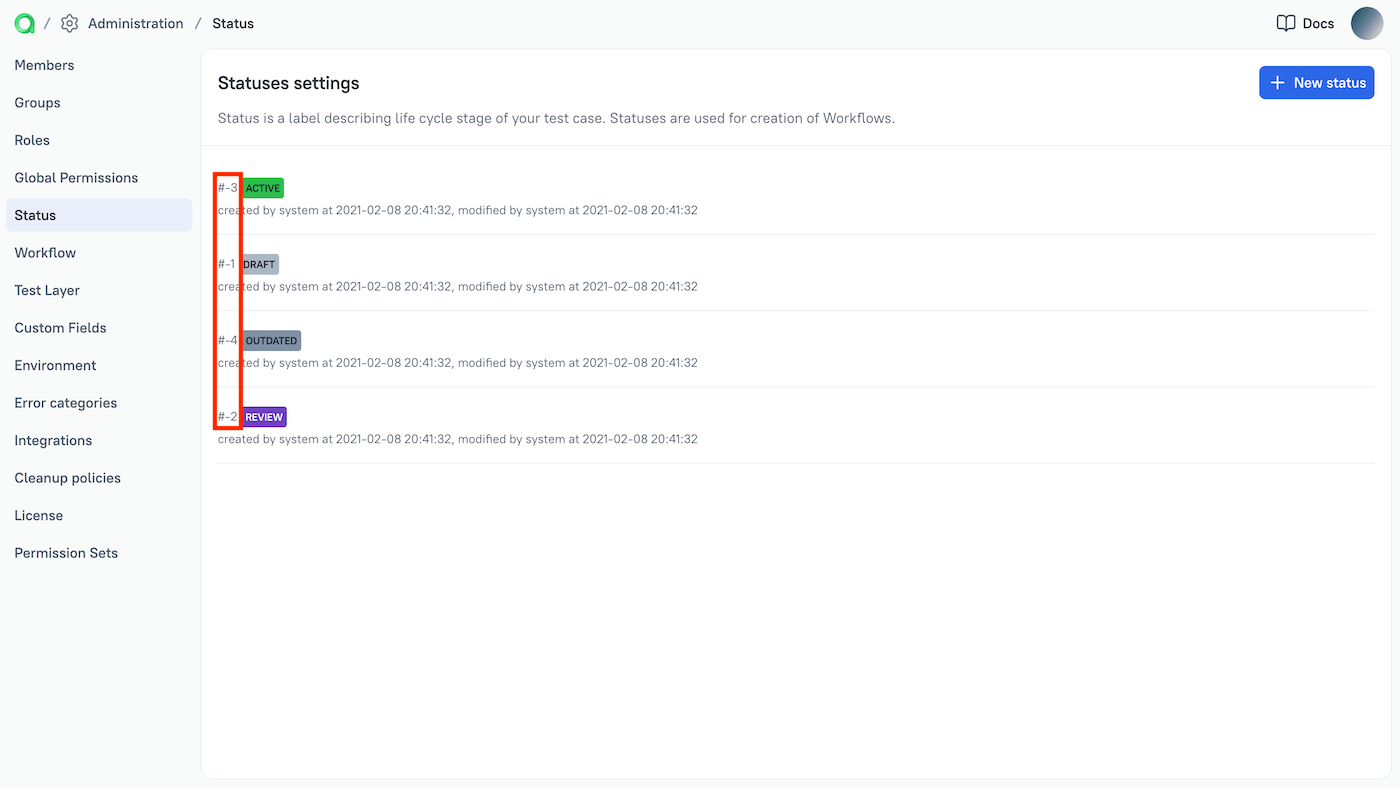
Get TestOps status IDs
In TestOps, go to Administration → Status.
Note the numeric ID of each status.
Create the status field in TestRail
In TestRail, go to Administration → Customizations.
Click Add Field and fill in:
- Label — for example
Status. - System Name — for example
status. - Type — Dropdown.
- Label — for example
Click Add Projects & Options.
On the Options tab, enter one status per line in the format
identifier, Name, for example1, Passed. The identifiers must be unique positive integers. Note each identifier — you will use them in the next step.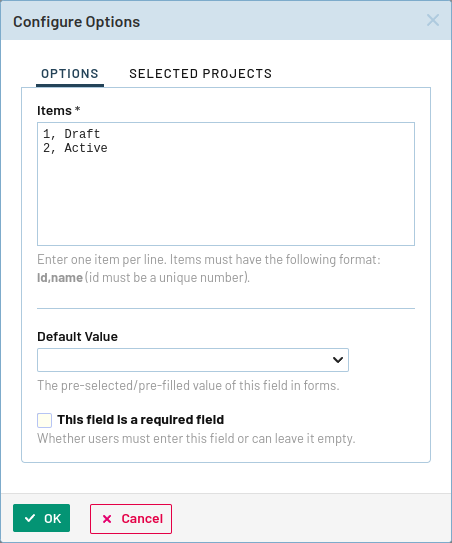
On the Selected Projects tab, select your project.
Click OK, then Add Field.
Configure status mapping in Allure TestOps
In the TestOps project, open the TestRail integration.
On the TMS Sync tab, click Edit.
Under Status Mapping, fill in:
- Field name — the system name of the TestRail dropdown field, for example
status. - Default value —
custom_followed by a TestRail status identifier, for examplecustom_1. Used when no mapping row applies.
- Field name — the system name of the TestRail dropdown field, for example
For each TestOps status, click Add and fill in:
- Source ID — the TestOps status ID from Administration → Status.
- Target ID — the matching TestRail status identifier.
Click Submit.
Verify the integration
- Run the export configuration.
- Open the destination TestRail project and confirm that the expected test cases appear in the selected suite and section.
- If launch export is enabled, confirm that the expected execution data arrives for the exported cases.
- Check a mapped field or status on the TestRail side and confirm it uses the expected value.
Troubleshooting
The export configuration disables itself
The TestRail credentials are invalid, revoked, or no longer have sufficient access to the target project. Update the project integration and re-enable the export.
The test cases land in the wrong place
Recheck the Project, Suite ID, and Section ID in the TMS Sync
configuration. TestRail expects numeric identifiers — enter 29, not S29.
Related pages
- Test management sync and export for the broader exchange model.
- Test keys and Allure IDs for identity linking instead of outbound sync.
- Workflows and statuses for the source-side status model in TestOps.
