Jenkins
Jenkins integration connects Jenkins jobs with Allure TestOps: uploads test results during a build using the Jenkins plugin, lets TestOps trigger Jenkins builds, and maps Jenkins parameters to launch environments.
The plugin is required for both directions: it handles result upload via the withAllureUpload() wrapper and enables the TestOps-to-Jenkins trigger path. Without the plugin installed, TestOps cannot start Jenkins pipelines.
Before you begin
- Permission to install plugins and manage global settings in Jenkins.
- The URL of the TestOps instance and the numeric TestOps project ID.
- A Jenkins user account that can create an API token for the trigger path.
1. Install the Jenkins plugin
The Allure TestOps Jenkins plugin comes in two release lines. Choose based on your Jenkins version and Java runtime:
- Plugin v4 — for Jenkins 2.361.1 and later, requires Java 17 on Jenkins agents.
- Plugin v3 — for Jenkins earlier than 2.361.1, requires Java 11.
If the plugin version and the Java runtime on an agent do not match, the plugin will not start and result upload will fail on that agent.
Download both release lines from dl.qameta.io.
Install from a URL
- Open dl.qameta.io and copy the URL of the HPI file for the plugin version that matches your environment.
- In Jenkins, go to Manage Jenkins → Manage Plugins → Advanced settings.
- Under Deploy Plugin, paste the copied URL.
- Click Deploy and wait until each status on the Download progress page is Success.
Install from an HPI file
- Download the HPI file for the matching plugin version from dl.qameta.io.
- In Jenkins, go to Manage Jenkins → Manage Plugins → Advanced settings.
- Under Deploy Plugin, click Browse and select the downloaded HPI file.
- Click Deploy and wait until each status on the Download progress page is Success.
2. Send results from Jenkins to TestOps
Create the TestOps token
- In Allure TestOps, click your avatar and open API Tokens.
- Click + Token.
- Enter a name for the token, for example
Token for Jenkins, and click Create. - Copy the generated token.
Register the TestOps server in Jenkins
- In Jenkins, go to Manage Jenkins → System.
- Under Allure, click Add Allure Server → Allure Server.
- Fill in the fields:
- ID — a recognizable name for the TestOps instance.
- Endpoint — the URL of the TestOps instance.
- Next to the Credentials field, click Add → Jenkins.
- In the dialog that appears, fill in the fields:
- Kind — Secret text
- Secret — the API token copied from TestOps
- ID — a recognizable credential name, for example
testops-credentials
- Click Add to close the dialog.
- In the Credentials drop-down, select the credential you just created.
- If your TestOps instance uses a self-signed SSL certificate, uncheck Enable certificate validation.
- Click Test connection. A "Successfully authorized as <username>" message confirms the credentials are correct.
Advanced uploader settings
Click Advanced in the server entry to configure these parameters:
- Threads count — maximum number of threads for uploading files.
- Batch size — maximum number of files per upload batch (per thread).
- Results depth — number of subdirectory levels to scan.
0means no subdirectories. - Process interval — minimum interval in seconds between sending batches (per thread).
- Indexing interval — interval in seconds between scans of the results directory.
- Delay interval — minimum interval in seconds before uploading a newly created file, to avoid uploading half-written files.
- Delay before upload finish — interval in seconds to wait after the job finishes before assuming no more files will appear, for test runners that spawn asynchronous file writers.
Start from the defaults and tune only the specific bottleneck you can observe in build logs or upload timing.
- Click Save at the bottom of the page.
Configure a freestyle job
In Jenkins, select the job and click Configure.
Under Build Environment, check Allure: upload results.
Fill in the fields:
- Server — the TestOps server registered in Jenkins.
- Project — the numeric TestOps project ID.
- Launch name — a template for naming the launch. You can use any Jenkins environment variable (see
/env-vars.htmlon your Jenkins instance for the full list). - Launch tags — optional comma-separated tags.
Click Add results → Results.
In the Path field, specify the path to the Allure results directory, for example
build/allure-results. For multiple directories, click Add again for each additional path.The Jenkins plugin does not support wildcards or glob patterns in the Path field.
Click Advanced to configure additional parameters:
- Silent mode — if checked, a connection failure when uploading results will not fail the job. Use only if you have another way to view test results.
- Index Existing Files — if checked, TestOps uploads all files in the results directory, even those not modified during this run.
Click Save.
Configure a pipeline job
Use Pipeline Syntax to generate a withAllureUpload() snippet:
- In Jenkins, select the job and click Pipeline Syntax.
- In the Sample Step drop-down, select withAllureUpload: Allure: upload results.
- Fill in the same fields as for a freestyle job (Server, Project, Launch name, Launch tags, Results path).
- Click Generate Pipeline Script and copy the generated snippet.
- In the
Jenkinsfileor inline pipeline script, wrap the test command with the generated block.
The withAllureUpload() block must surround the command that actually runs the tests. If placed outside the test step, Jenkins may build successfully while TestOps receives no results.
Verify the upload
After the next build finishes:
In Jenkins, open Build History and click the latest build.
In the build menu and at the bottom of the build page there should be links to the TestOps launch.
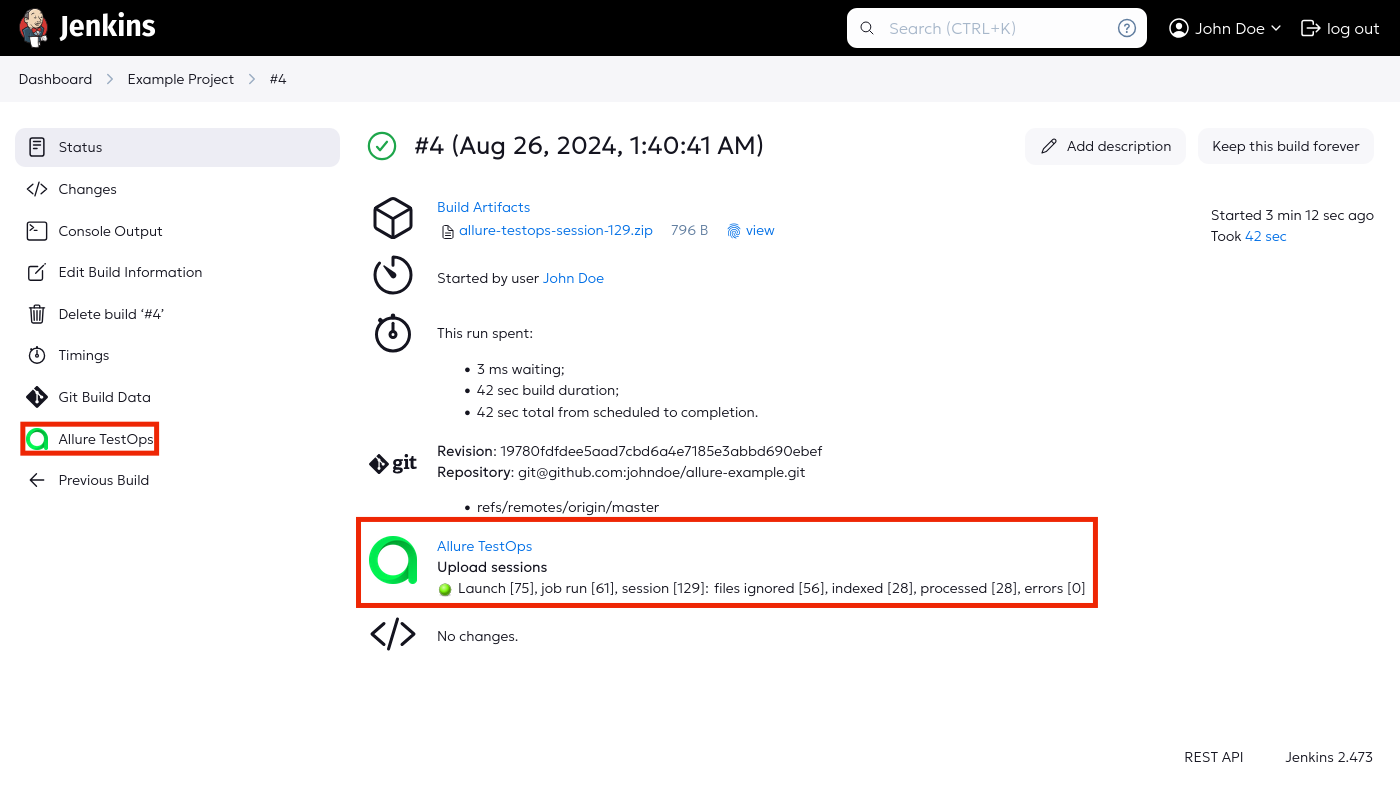
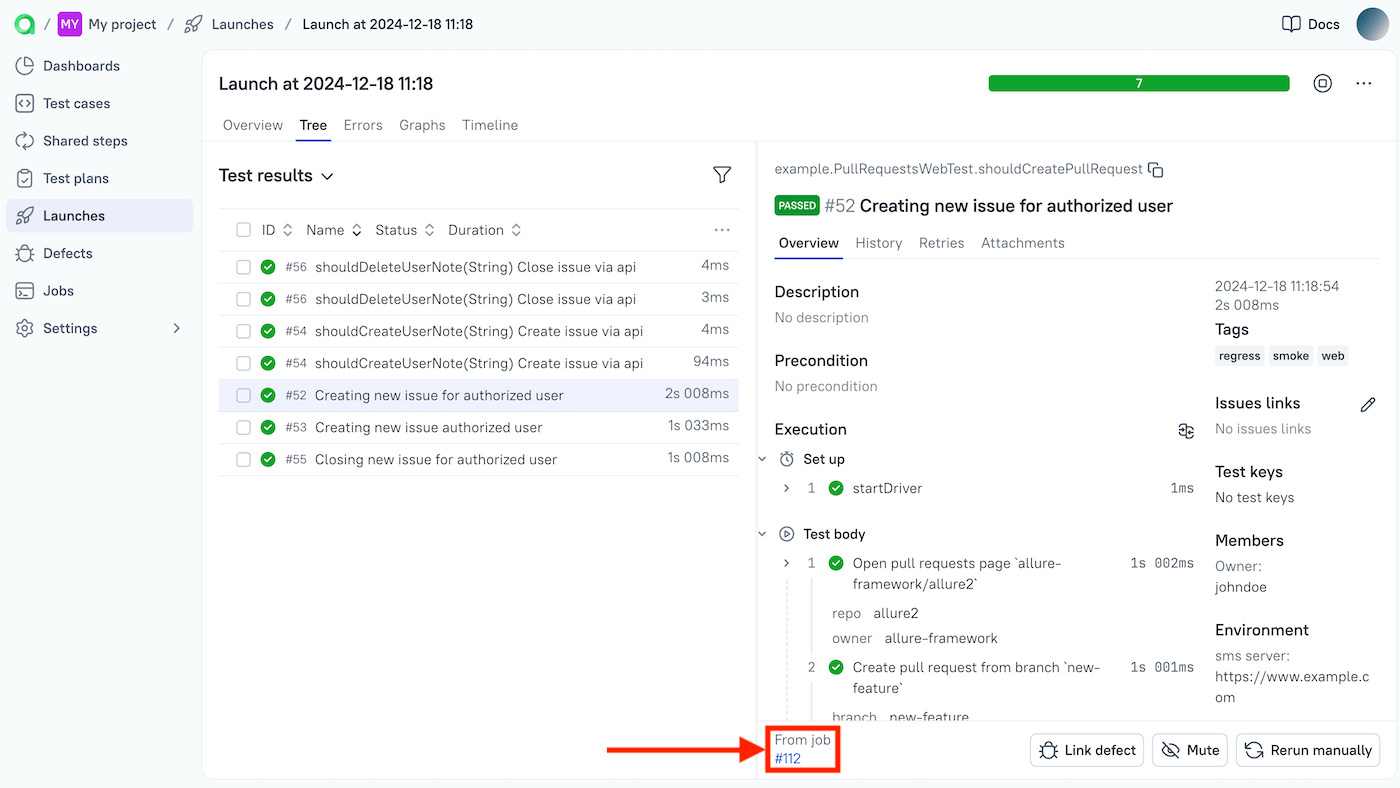
Open that launch in TestOps and confirm test results are present.
Open a single result and confirm it links back to the Jenkins build.
3. Let TestOps trigger Jenkins builds
Add the global Jenkins integration
An instance administrator should:
- Open Administration → Integrations.
- Click + Add integration.
- Select Jenkins.
- Fill in the fields:
- Name — a recognizable name, for example
Jenkins production. - Endpoint — the URL of the Jenkins instance, for example
https://jenkins.example.com/.
- Name — a recognizable name, for example
- If the Jenkins instance uses a self-signed SSL certificate, check Disable certificate validation.
- Click Add integration.
Create a Jenkins API token
- In Jenkins, click your username and go to Security.
- Under API Token, click Add new Token.
- Enter a recognizable name, for example
Token for Allure TestOps, and click Generate. - Click the Copy icon to copy the generated token.
Add Jenkins credentials to the TestOps project
- In TestOps, open the target project and go to Settings → Integrations.
- Under Available integrations, find the Jenkins integration and click Add integration.
- Fill in the fields:
- Username — your Jenkins username.
- API token — the token generated in Jenkins.
- Click Test connection. A "Connection established" message confirms the credentials are correct.
- Click Add integration.
Configure the Jenkins-backed job in TestOps
After the first successful upload, TestOps creates the Jenkins-backed job automatically:
Open Jobs in the project.
Click
⋯next to the job and select Configure.Fill in the fields:
- Name — a stable display name.
- Build server — the global Jenkins integration added by the administrator.
- Job can be used to run tests — enable to allow triggering from TestOps.
- Parameters — see Section 4.
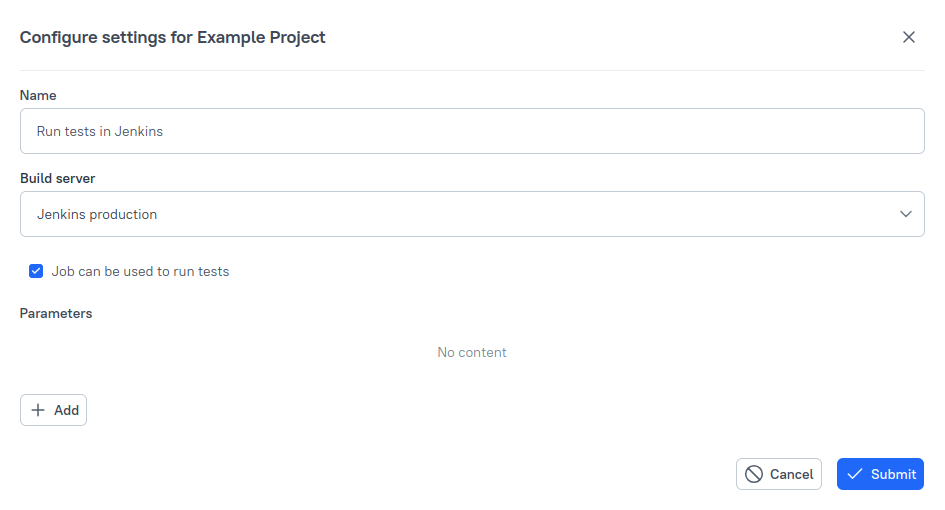
Click Submit.
4. Pass parameters and branch values
Jenkins parameterized builds let TestOps pass runtime values such as branch, browser, or target environment, and make those values visible on launches triggered outside TestOps.
Set default values in Jenkins
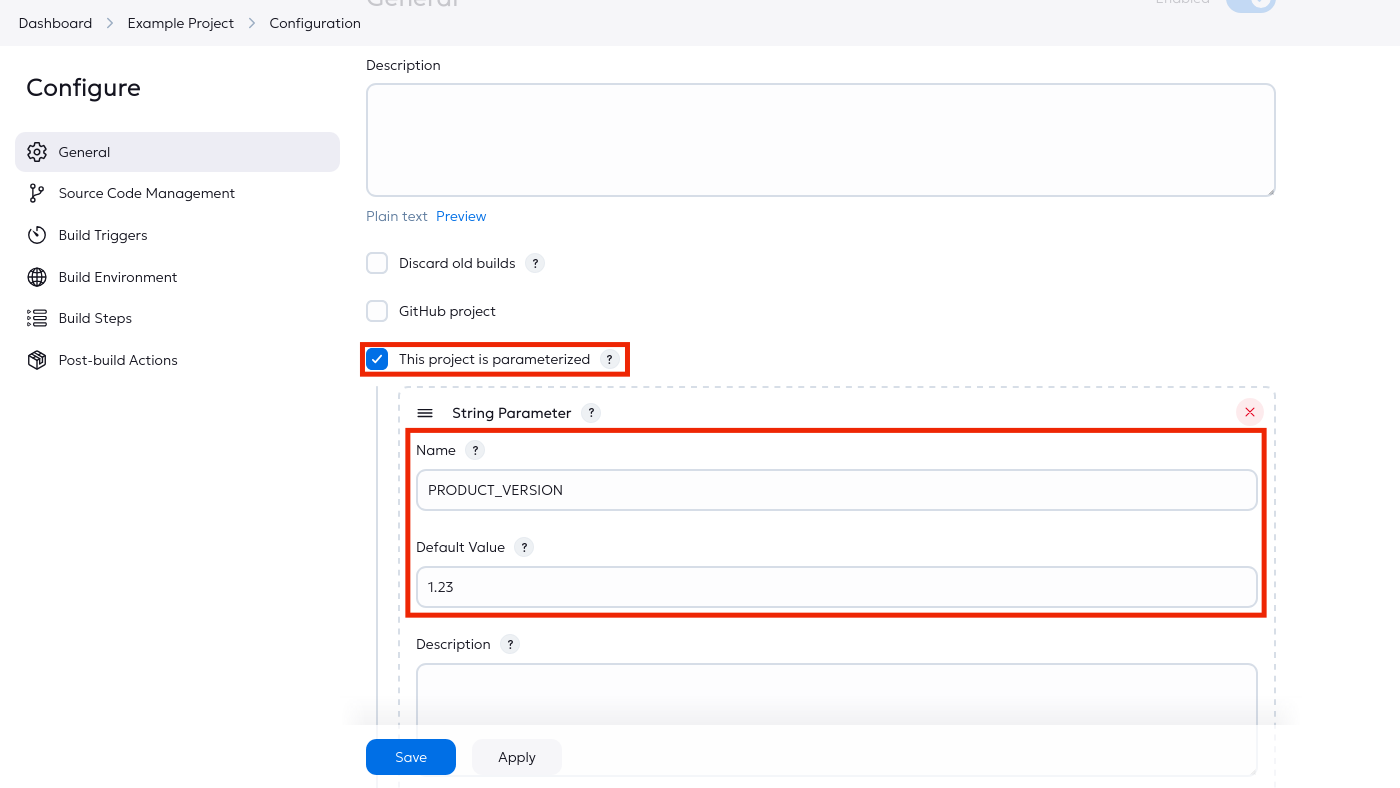
In Jenkins, select the job and click Configure.
Under General, check This project is parameterized.
For each parameter, click Add Parameter → String Parameter and fill in:
- Name — the variable name.
- Default Value — the value to use when not overridden for a specific launch.
Click Save.
Add global environment names
An instance administrator should:
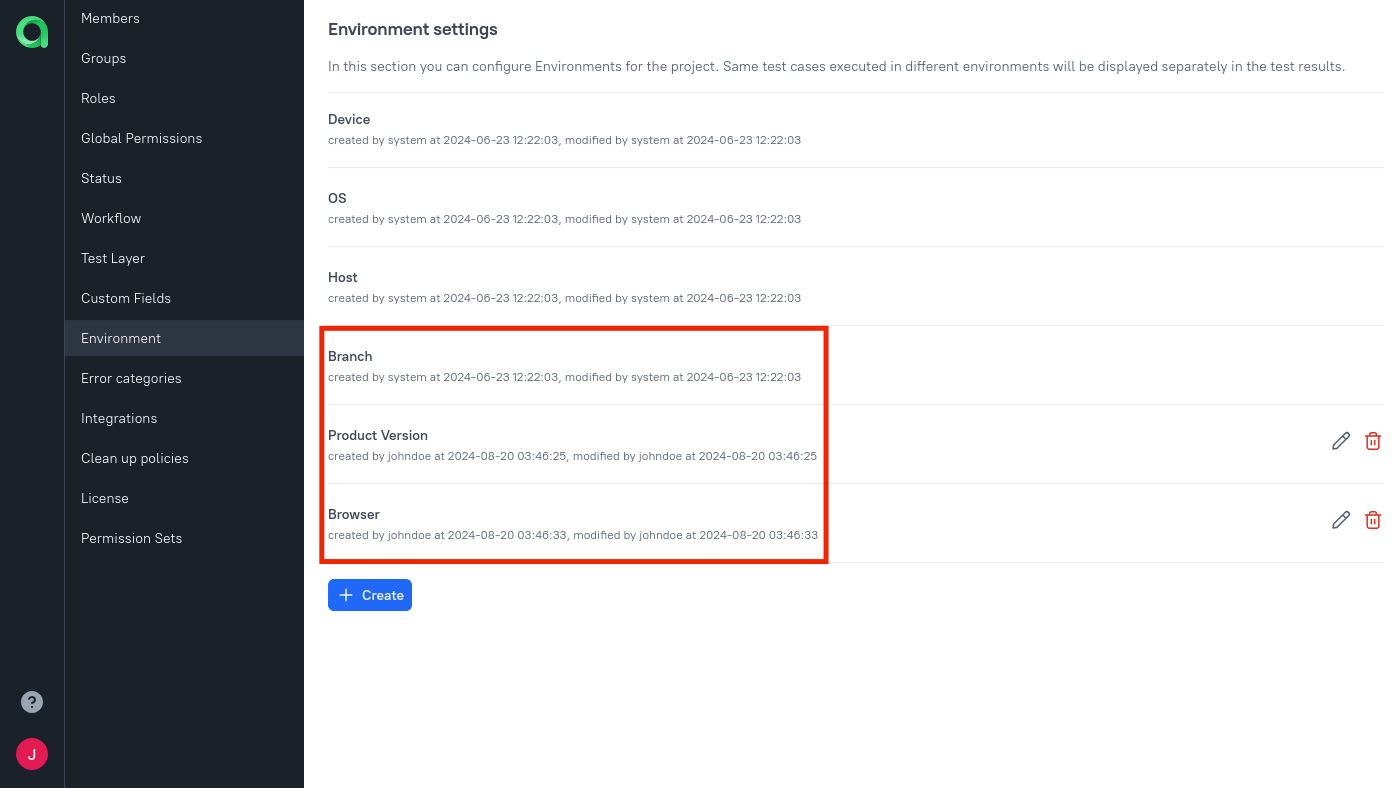
Open Administration → Environment.
For each parameter, click + Create, enter the name, and click Submit.
Map parameters in the project
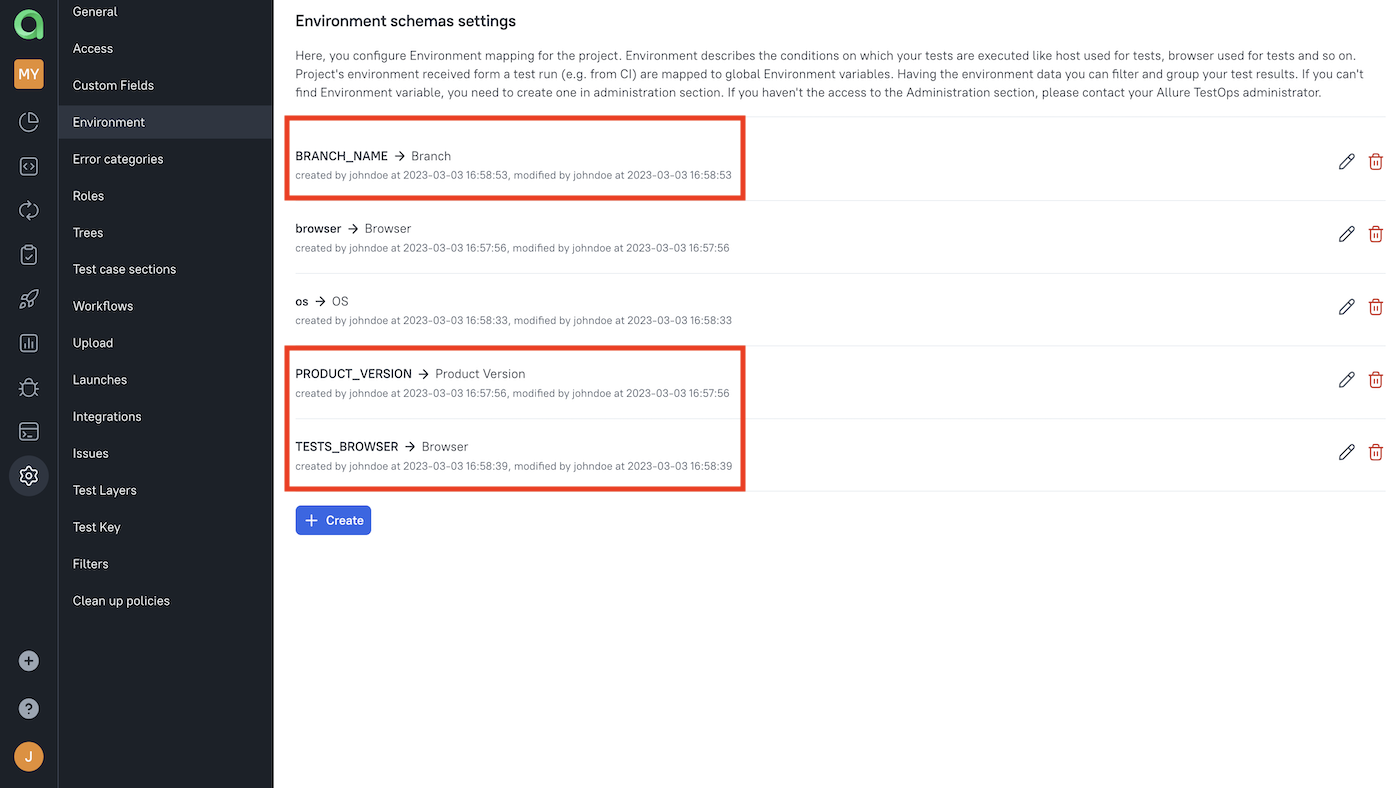
In the project, open Settings → Environment.
For each parameter, click + Create (or the edit icon if it already exists):
- Mapping key — the Jenkins parameter name from Step 1.
- Environment variable — the global parameter name created by the administrator.
Click Submit.
Add parameters to the job
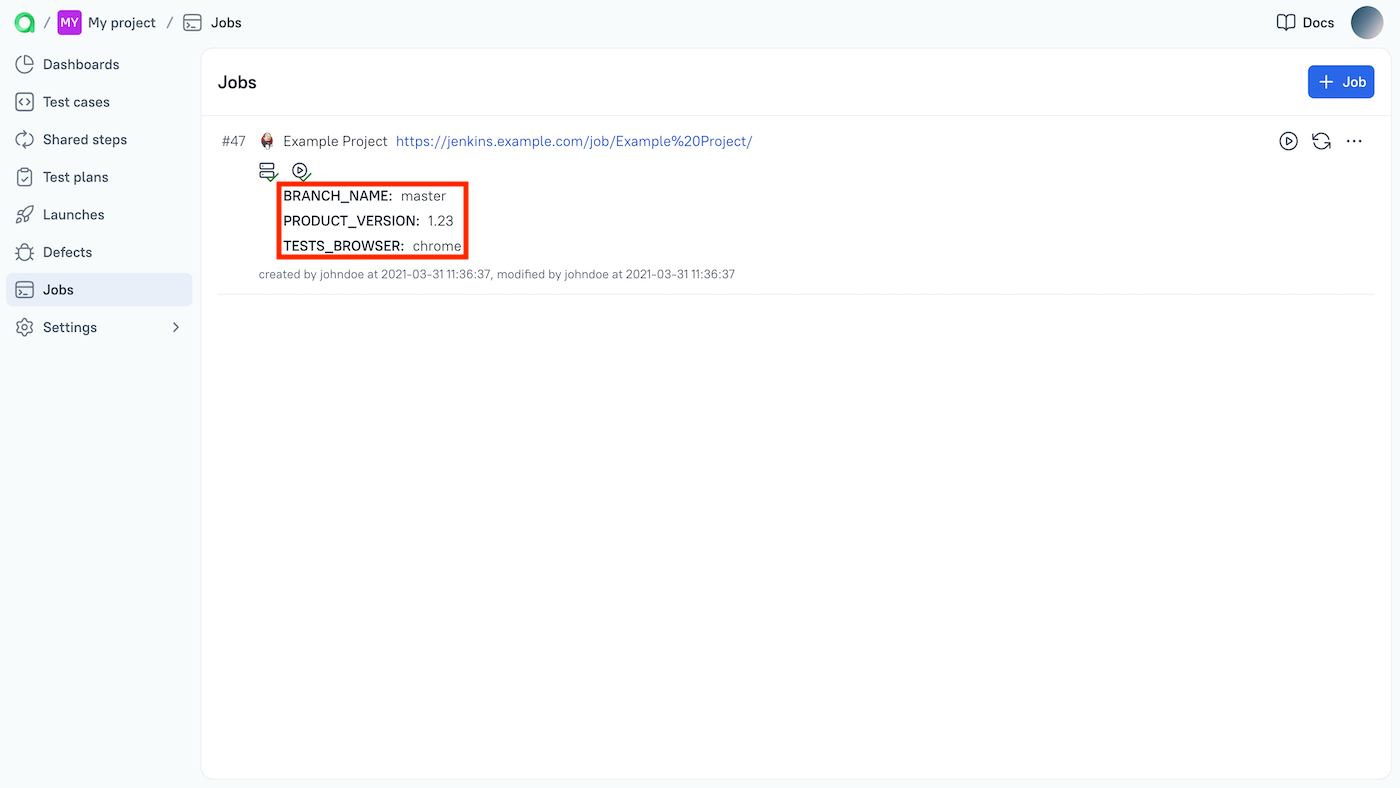
Open Jobs and click the Refresh button next to the job.
The parameter names and their default values from Jenkins should appear in the job description.
Click
⋯next to the job and select Configure.In the Parameters section, for each parameter select the corresponding global environment variable.
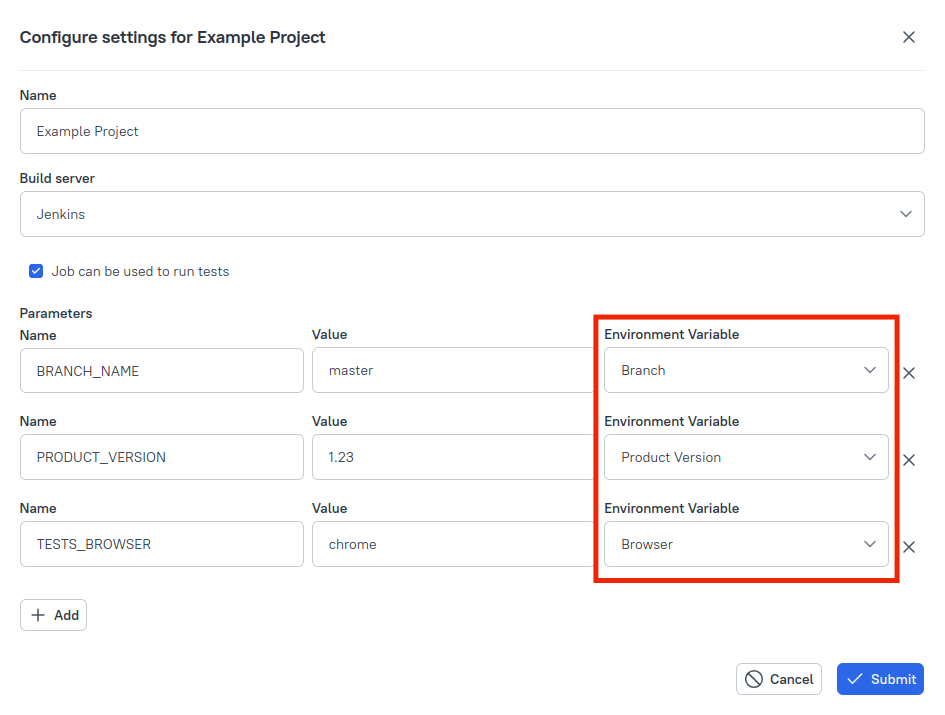
Click Submit.
If the project has multiple branches, add a Branch environment variable in Allure TestOps and map it to the Jenkins parameter that controls branch selection. This special name instructs Jenkins which branch to use when TestOps triggers the build.
Troubleshooting
"Could not create session for closed launch" in the log
Jenkins pipeline jobs have no unique identifier beyond their name. If a pipeline is deleted and recreated with the same name, the plugin cannot upload results because that name is already associated with a closed launch in TestOps.
Rename the recreated pipeline to a new unused name, then run the upload again.
UnsupportedClassVersionError during upload
Problem: The build log contains an error similar to:
java.lang.UnsupportedClassVersionError: .../jenkins/callable/UploadResultsCallable has been
compiled by a more recent version of the Java Runtime (class file version 61.0),
this version of the Java Runtime only recognizes class file versions up to 55.0
Followed by:
Caused: hudson.remoting.ProxyException: .../jenkins/AllurePluginException: Could not stop uploader
Reason: The installed plugin version does not match the Java runtime on the Jenkins agent. Plugin v4 requires Java 17 (class file version 61). Plugin v3 requires Java 11 (class file version 55).
Solution: Install the plugin version that matches the Java runtime on your agents. For Jenkins 2.361.1 and later, use plugin v4 with Java 17 on all agents. Make sure the Java version on agents matches the Jenkins controller.
