Run an automated test
Automated tests execution data becomes shared evidence in Allure TestOps. The first goal is simple: upload one set of results, create a launch, and close it so the project has real automated history to review.
Automated test cases are created or updated from uploaded test results. If you use an official adapter, the results usually appear in a folder like allure-results, build/allure-results, target/allure-results – depending on the used test framework and configuration made for Allure Framework integration.
Choose how to upload the first results
For a first evaluation, manual upload is the fastest proof. Once that works, you can move to CI plugins or allurectl for repeatable ingestion.
Manual upload
To upload test results manually:
Open your project.
Go to Launches.
In the upper-right corner of the screen, click Import.
A window will appear in which you can select files for the upload. To do this, click the upload area on the right side and select the files or drag and drop them to the upload area.
Test results can be uploaded either as individual files or as a ZIP archive.
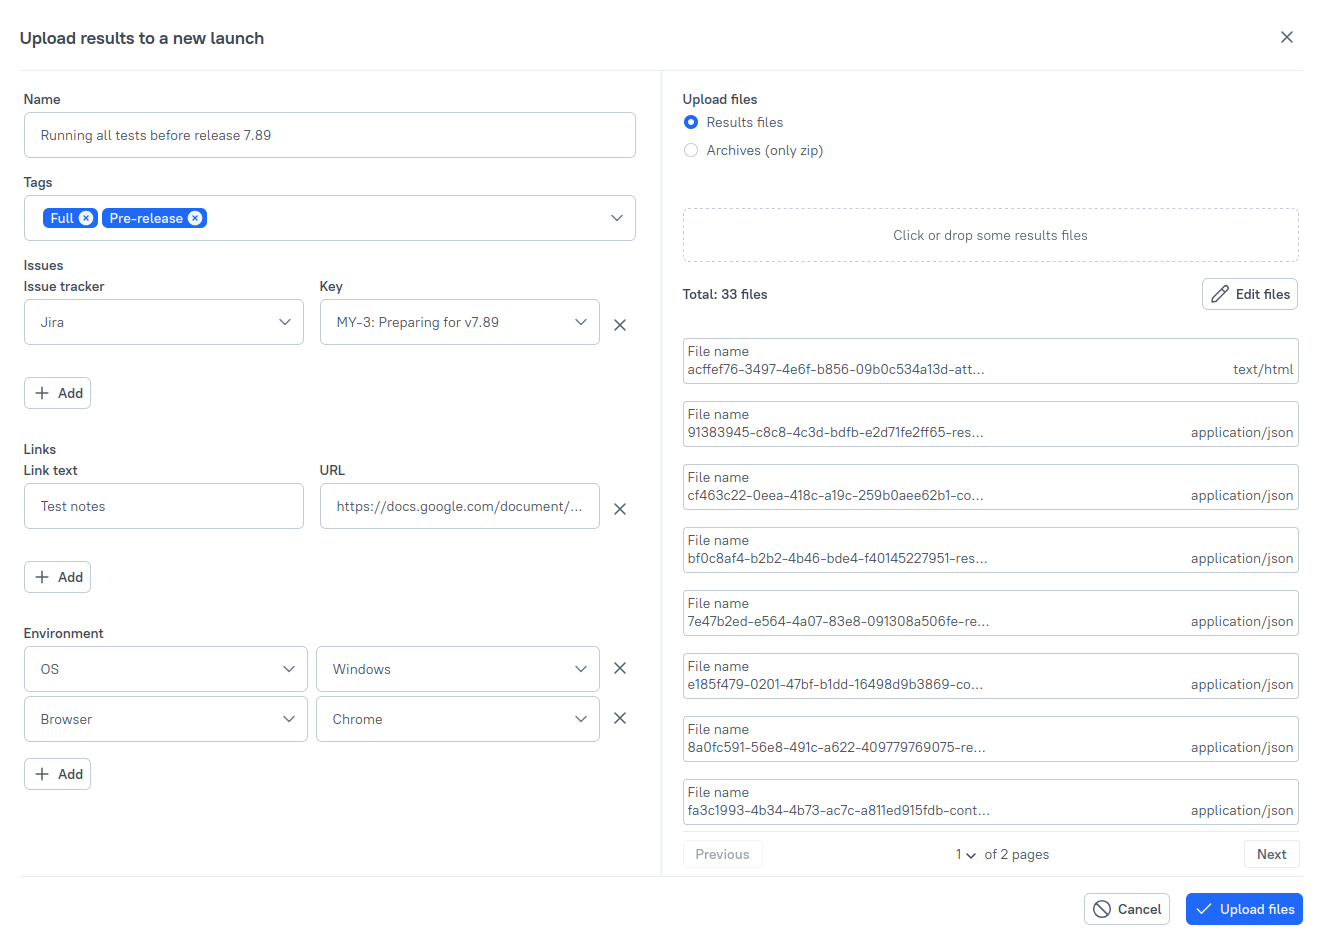
Optionally, you can change the name and other attributes of the launch. See Launches for more information.
Click Upload files.
After a few moments, a new launch should appear in the list with an Open status. Open launches can still be changed. When you are ready to finalize the upload, click the Close launch icon. Closed launches are the ones that update automated test cases and analytics.
Automatic upload
If you want the first evaluation to resemble a production flow, automate the upload through a CI integration and allurectl.
- Use a supported CI system plugin when you want launches to be triggered or uploaded from the CI system itself. The list of supported systems and installation instructions is covered in Integrations with external systems.
- Use allurectl when you need a universal uploader or your CI system does not have a plugin.
To start using allurectl:
- Download the file for your platform.
- Create an API token for allurectl in Allure TestOps.
Then run the tests and call allurectl to upload the results:
allurectl watch -- /command/to/run/tests
Make sure you are providing all required information for allurectl to be authenticated in Allure TestOps.
After uploading the test results, close the launch.
Trigger a CI job from Allure TestOps
If you have integrated your CI system with Allure TestOps, you can run whole CI pipeline directly from Allure TestOps:
Open your project.
Go to Jobs.
Click three dots icon and select Configure.
Make sure it shows the correct CI system in Build server section and Job can be used to run tests is checked.
Save the configuration.
Click Sync button to get the information.
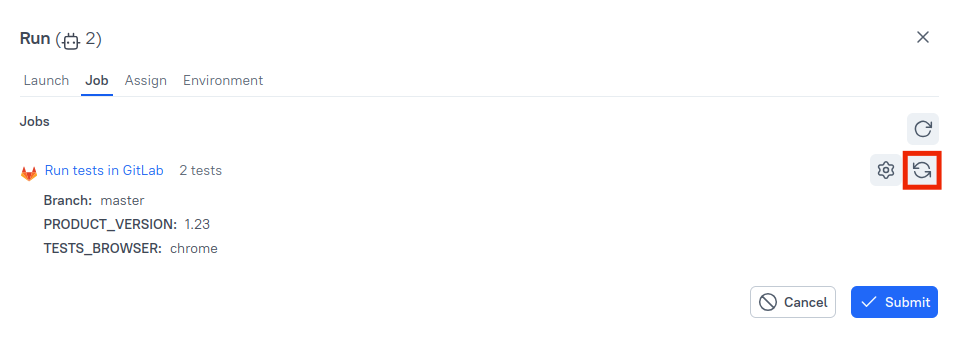
Click Submit.
Go to Launches and open the newly created launch after the CI job finishes.
What's next?
- Review the first launch to confirm the results are useful to the team.
- Create a combined launch if you want manual and automated evidence together.
- Connect CI if you want to turn the first automated run into a repeatable pipeline flow.
