Integration with Zephyr Scale
Integration with Zephyr Scale allows you to automatically export test cases and launches from Allure TestOps to Zephyr Scale. You can use Allure Query Language to select the required set of data to be exported.
To enable this integration, you need to:
- Add Zephyr Scale integration in the Allure TestOps administration panel.
- Create two API tokens in your Jira settings.
- Enable the integration in Allure TestOps project settings using the created API tokens.
- Create one or more export configurations in the integration settings.
Adding new integration
Allure TestOps provides two separate integration types for Zephyr Scale:
- Zephyr Scale for Jira Data Center (the self-hosted version of Jira)
- Zephyr Scale Cloud for Jira Software Cloud
Log in to Allure TestOps using an administrator account.
Go to Administration → Integrations.
Click + Add integration in the top right corner of the page.
In the resulting window, select Zephyr Scale.
Fill in the fields:
- Name — a name to help you recognize this integration later.
- Endpoint — a URL of your Jira Data Center instance.
- Linked issue tracker — if you want to retain information about Jira issues linked to test cases when exporting them to Zephyr Scale, select your Jira integration here.
If your Jira Data Center instance uses a self-signed SSL certificate, select the Disable certificate validation checkbox.
Click Add integration.
Log in to Allure TestOps using an administrator account.
Go to Administration → Integrations.
Click + Add integration in the top right corner of the page.
In the resulting window, select Zephyr Scale Cloud.
Fill in the fields:
- Name — a name to help you recognize this integration later.
- Endpoint — a URL in the form of
https://<yourcompany>.atlassian.net.
Click Add integration.
Getting API tokens
In order for Allure TestOps to be able to create test cases in Zephyr Scale, you need to create two API tokens: one for Jira and one for Zephyr Scale. Additionally, remember the Jira username (email address) under which you are logged in, it will be used later.
Jira API token
- Go to Account settings → Security → API tokens (or click here).
- Click Create API token.
- Enter a name to recognize this token later and click Create.
- Click Copy to clipboard and save the token in a secure place.
Zephyr Scale access token
- Click your Jira profile icon and select Zephyr Scale API Access Tokens (or go to
https://<yourcompany>.atlassian.net/plugins/servlet/ac/com.kanoah.test-manager/api-access-tokens). - Click Create access token.
- Click Copy and save the token in a secure place.
Enabling integration for project
- In Allure TestOps, open your project.
- Go to Settings → Integrations.
- Find the Zephyr Scale integration and click Add integration.
- Enter the username of the account that was used to create the API tokens.
- Enter the Jira API token and the Zephyr Scale access token you previously created.
- Click Add integration.
If you want to link your test results to Zephyr Scale test cases by specifying Zephyr Scale IDs in your code, you need to add a test key mapping in your project settings:
- Go to Settings → Test key.
- Enter the name of the label whose value will be used as a Zephyr Scale test case ID.
- Select the Zephyr Scale integration as a test management system.
- Click Submit.
Creating export configuration
In Allure TestOps, open your project.
Go to Settings → Integrations.
Click the previously added Zephyr Scale integration.
Go to the TMS Sync tab at the top.
A list of export configurations will be shown where you can edit and delete previously created rules.
To create a new export configuration, click Create.
In the resulting window, you will be able to select the Zephyr Scale project to which to export the data, and filter your Allure TestOps project's test cases using Allure Query Language to limit the set of test cases and launches that will be exported:
In the Project list, select the Zephyr Scale project to which you want to export data.
In the Test Case AQL box, enter an AQL query to select the test cases you want to export.
If you leave this field blank, all test cases will be exported.
Optionally, in the Launches AQL box, enter an AQL query to limit the set of launches to be exported for the selected test cases.
If you leave this field blank, all launches will be exported.
You can also disable exporting launches completely by selecting the Disable Launches sync checkbox.
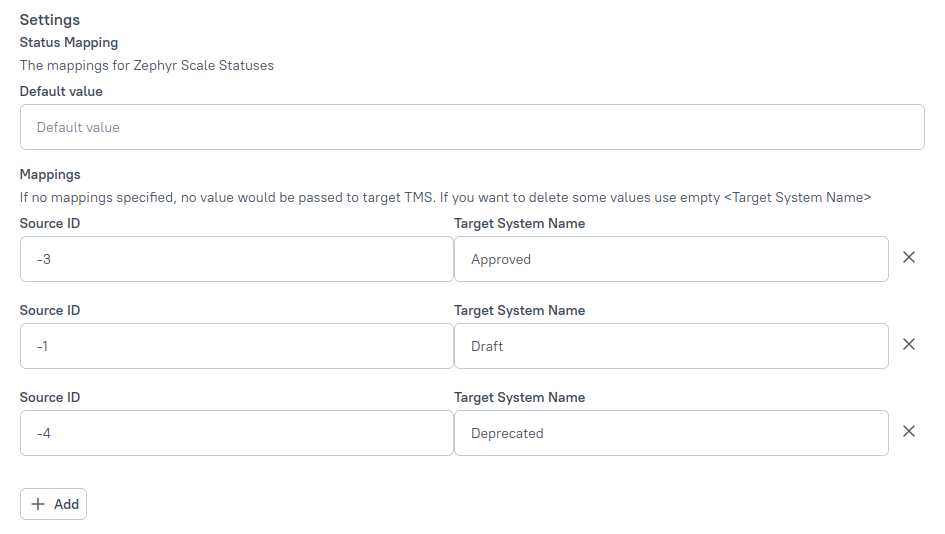
Additionally, you can specify mapping settings to correctly match test case statuses between Allure TestOps and Zephyr Scale (see Mapping test case statuses for more information).
Сlick Submit to create the export configuration.
After the configuration has been created and the test cases have been successfully exported, you can disable the export of new test cases that match that configuration by selecting the Disable Test Case create checkbox. If this checkbox is selected, only the changes and launches of the previously exported test cases will be exported.
To disable the export configuration without deleting it, select the Disable export checkbox.
The TMS sync will be automatically disabled if the provided API credentials are invalid, have been revoked, or have insufficient level of access. To restore the TMS sync, enter valid credentials with sufficient level of access.
Mapping test case statuses
Since Allure TestOps and Zephyr Scale may use different statuses for test cases, you can create mapping rules in the integration settings in Allure TestOps to match them.
Each mapping rule links two values: the status in Allure TestOps (Source) and the status in Zephyr Scale (Target). For example, you can create a rule that links the Outdated status in Allure TestOps to the Deprecated status in Zephyr Scale.
You can also set a default value to be used if a status is missing in the mapping rules. If you specify a source status but no target status, the status will be deleted on export.

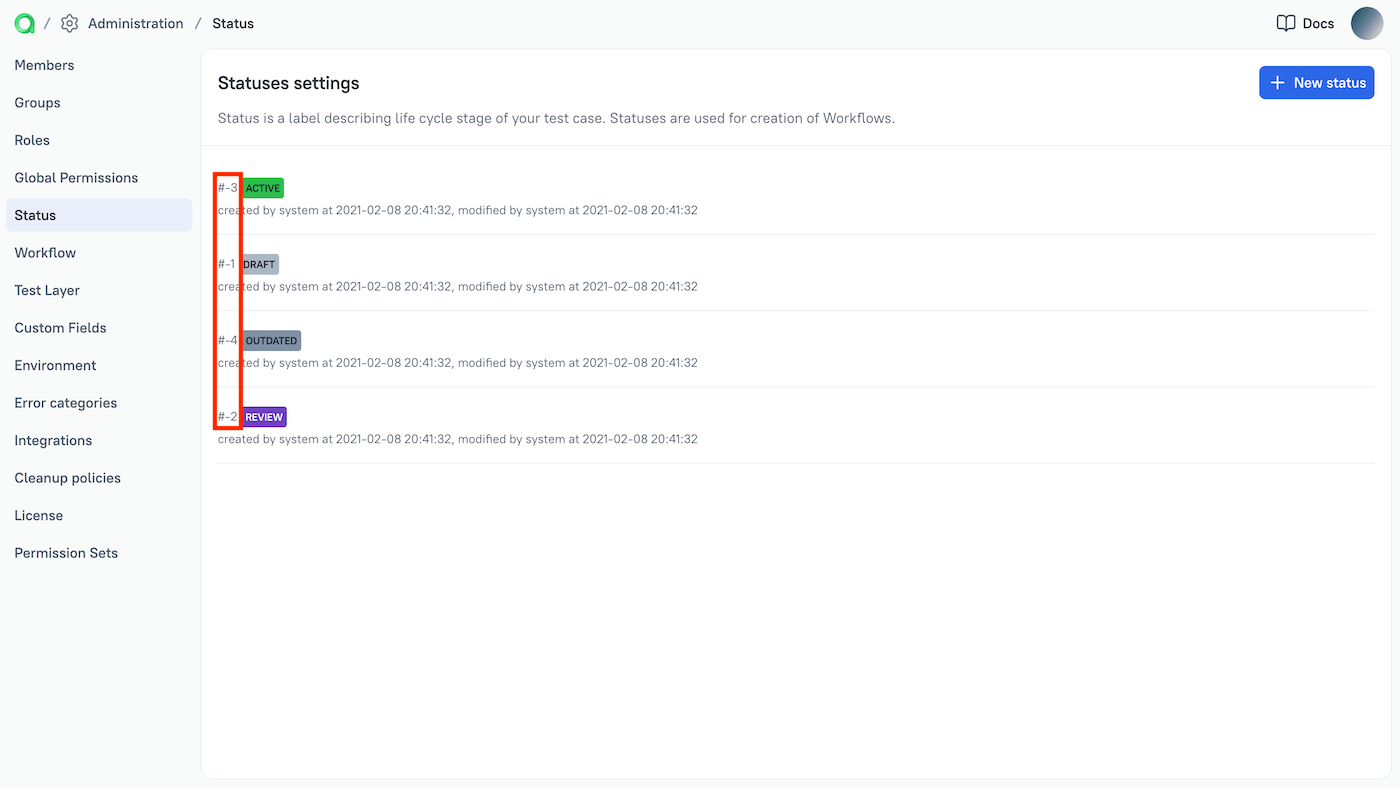
Please note that you need to specify the IDs of Allure TestOps statuses instead of their names.
To get the IDs:
- Log in to Allure TestOps as administrator.
- Go to Administration → Status. You can find the ID on the left side of the status.
