Test results upload from Bitbucket
You need to use allurectl to upload the test results of you tests from the Bitbucket. In this article we provide basic templates ensuring the expected work with Allure TestOps.
For proper functioning with Bitbucket pipeline reruns on the Allure TestOps side, it is necessary to use allurectl version 2.15.3.
This chapter covers the following:
- Authentication of Bitbucket pipeline in Allure TestOps to upload the test results.
- Simple pipeline configuration to allow the understanding of the workflows involving allurectl.
Authentication token
You need to create an API token on Allure TestOps side. This API token will be used by allurectl for authentication on Allure TestOps instance.
Steps
Log in to Allure TestOps with the account you are going to use to upload test results.
Click your avatar and go to API Tokens.
Click + Token.
Enter a name for the token (e.g., "Token for Bitbucket") and click Create.
Allure TestOps will generate the token and display it in a modal window.
Click the Copy icon to copy the token into clipboard. You will need this token in the next step.
Test results upload from Bitbucket
Preconditions
You need to read end-to-end the manual for allurectl. In vast majority of the use cases you need watch routine to be used.
We recommend using the environment variables instead of the command-line switches to configure allurectl, this approach allows having clearer command line.
Variables needed for allurectl
Specify the following parameters according to the allurectl manual:
ALLURE_ENDPOINT(mandatory) — the URL of Allure TestOps instance, e.g.https://testops.example.com.ALLURE_TOKEN(mandatory) — the API token used for the authentication.ALLURE_PROJECT_ID(mandatory) — the system ID of a project where you are going to upload test results.ALLURE_LAUNCH_NAME(mandatory) — the template for the launch name.ALLURE_RESULTS(mandatory) — the folder where allurectl should look for the test results.ALLURE_LAUNCH_TAGS(optional) — tags that will be assigned to the created launch.
In the next sections we'll explain where these are could be used.
ALLURE_ENDPOINT in the workspace vars
This is an option, not mandatory placement of this very variable. You can define this variable in the pipeline description as well.
Usually, you have just one instance of Allure TestOps. This means the variable ALLURE_ENDPOINT could be defined on a higher level of Bitbucket entities: for example, in the workspace settings. To open them, use similar path and change {ORGNAME} to the name of your organisation: https://bitbucket.org/{ORGNAME}/workspace/settings/addon/admin/pipelines/account-variables.
Add the variable ALLURE_ENDPOINT and its value to your Bitbucket settings.
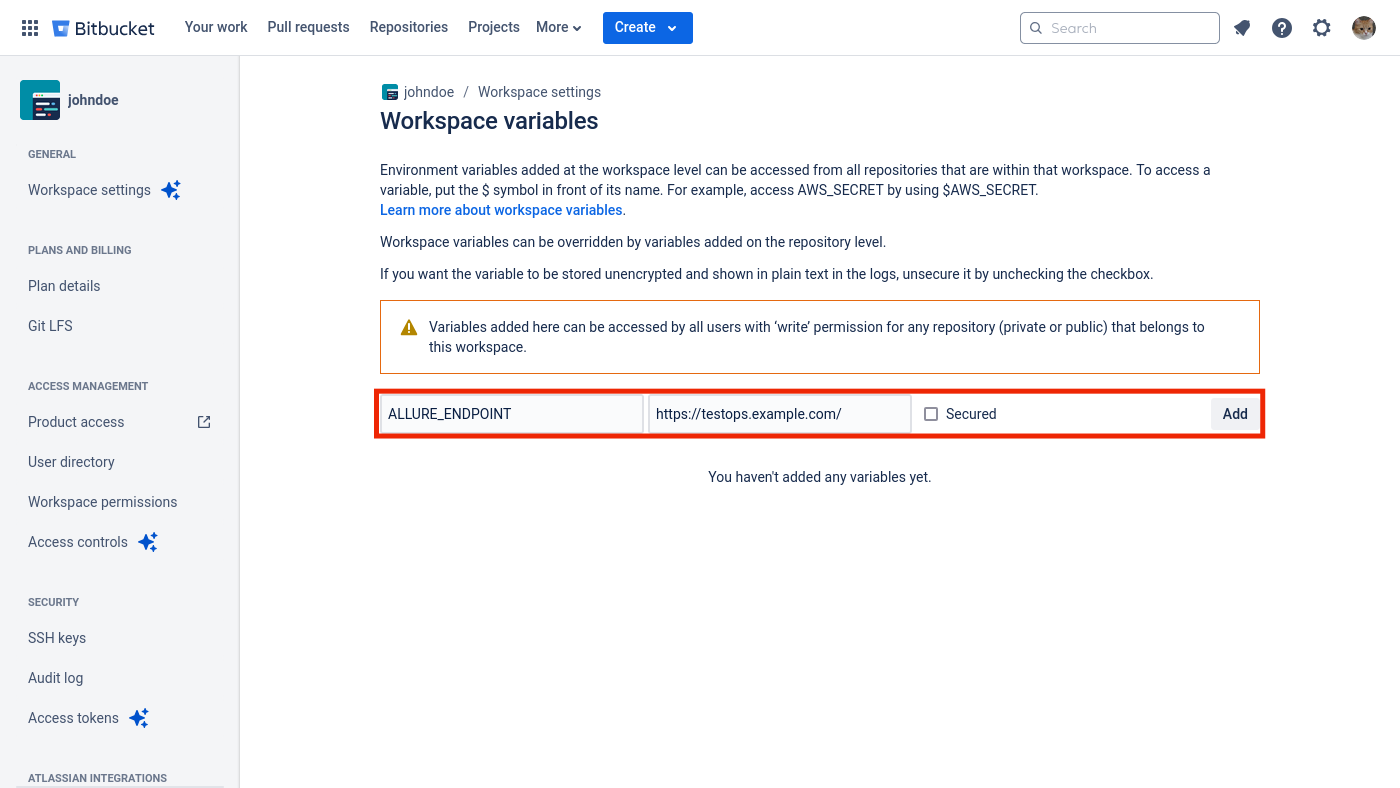
You can also use this variable alongside with the others in a pipeline (explained below).
Simple pipeline
The pipeline logic is described in bitbucket-pipelines.yml file by default. As an example, we will give the simplest pipeline using allurectl.
Pipeline example
image: gradle:8.10-jdk21

pipelines:
  custom:
    test:
      - variables:
          - name: ALLURE_LAUNCH_NAME
            default: ""
          - name: ALLURE_LAUNCH_TAGS
            default: "bitbucket, junit5"

      - step:
          name: Run tests
          script:
            - printenv
            - wget https://github.com/allure-framework/allurectl/releases/latest/download/allurectl_linux_amd64 -O ./allurectl
            - chmod +x ./allurectl
            - ALLURE_LAUNCH_NAME="${BITBUCKET_REPO_FULL_NAME} - $BITBUCKET_BUILD_NUMBER"
            - ./allurectl watch -- gradle --no-daemon clean test
Comments
This part is mandatory for the integration with Allure TestOps as these need to be present in the whole pipeline context and we need to be able to redefine the values of these variables in the runtime of the pipeline.
  custom:
    test:
      - variables:
All the variables from the example need to be added to this very part.
ALLURE_LAUNCH_NAMEALLURE_LAUNCH_TAGS
Configure pipeline - Add variables
In previous sections we said, there are variables used by allurectl to send test results to Allure TestOps instance.
ALLURE_ENDPOINTALLURE_TOKENALLURE_PROJECT_ID
The variable ALLURE_ENDPOINT can be added either to the workspace variables, or it can be added the same way as the other two – on the pipeline configuration level.
To do this:
- Select Source section.
- Click
bitbucket-pipelines.yml. - Click Edit.
- Then click Edit again.
- You will see the Configure tab and Add variables settings you need to expand.
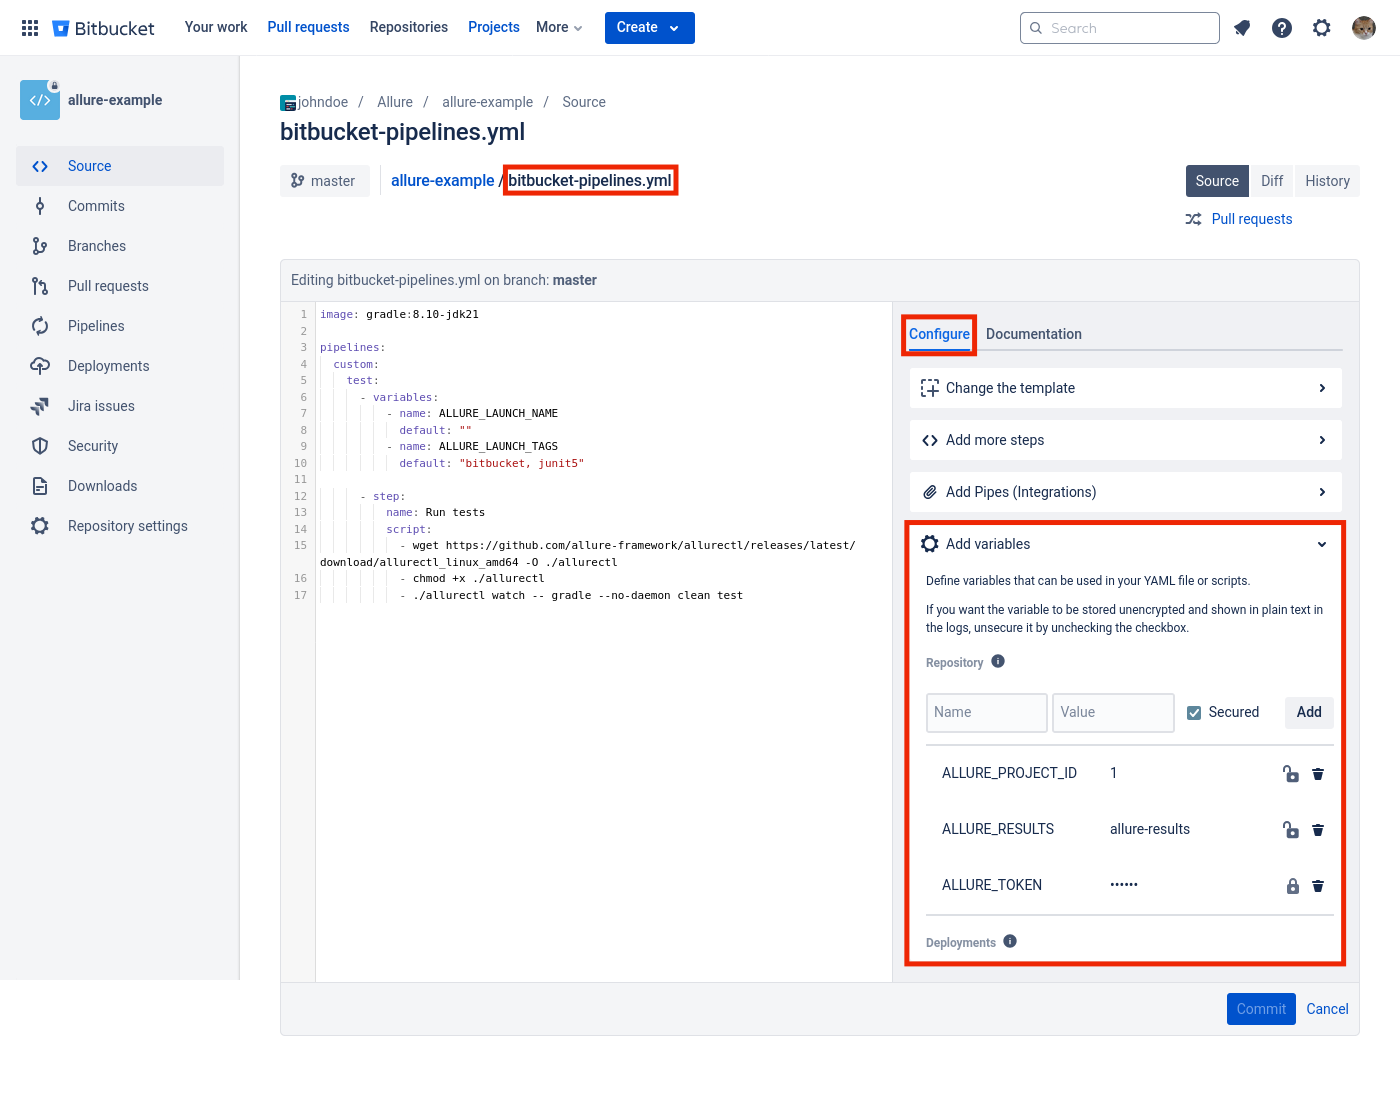
Add the following variables to the section you just opened
ALLURE_ENDPOINT— not secured;ALLURE_TOKEN— secured;ALLURE_PROJECT_ID— not secured;ALLURE_RESULTS— not secured.
We did not mention ALLURE_RESULTS before, but this is a mandatory variable which needs to be visible globally and it won't be changed during the run-time, so it's better to add it here.
After the variables are added, close the window and now you can run your pipeline.
Collecting the information about tests environment
Why?
It is quite a rare situation when tests run without any parameters which define different conditions to run the tests. These conditions could be for instance:
- different hosts to run the tests on, e.g. QA instance, staging instance, etc;
- different browsers to run the tests on for web UI tests;
- VCS branch to test changes before they appear in master branch.
When Allure TestOps collects this information, it will allow you starting the build jobs with the environment of your choice right from its UI.
How?
Add environment variables to a pipeline on Bitbucket side
Env variables can be added to this section where we added vars needed for allurectl:
  custom:
    test:
        - variables:
Let's add the information on the product version under test and the browser the tests use:
PRODUCT_VERSIONTESTS_BROWSER
Update the pipeline like this
    test:
      - variables:
          - name: ALLURE_LAUNCH_NAME
            default: ""
          - name: ALLURE_LAUNCH_TAGS
            default: "bitbucket, junit5"
          - name: PRODUCT_VERSION
            default: "1.23"
          - name: TESTS_BROWSER
            default: "chrome"
The run pipeline command now will have the following modal dialogue
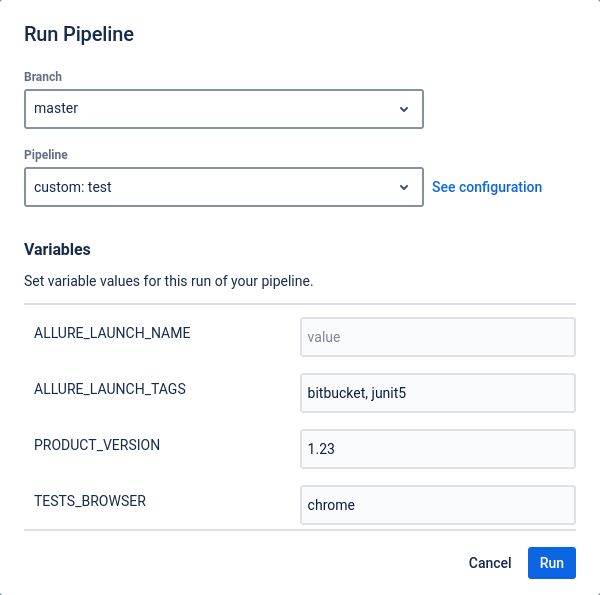
Please ensure the ALLURE_LAUNCH_NAME variable is not left empty. Use code like the following in your pipeline to fill the variable value, which will then pass this information to the Allure TestOps UI:
- ALLURE_LAUNCH_NAME="${BITBUCKET_REPO_FULL_NAME} - $BITBUCKET_BUILD_NUMBER"
Setting up Allure TestOps to process environment variables from Bitbucket
allurectl sends whole set of environment variables from a pipeline to Allure TestOps. This data also includes added environment parameters.
Now, let's set up Allure TestOps project settings for this environments information processing.
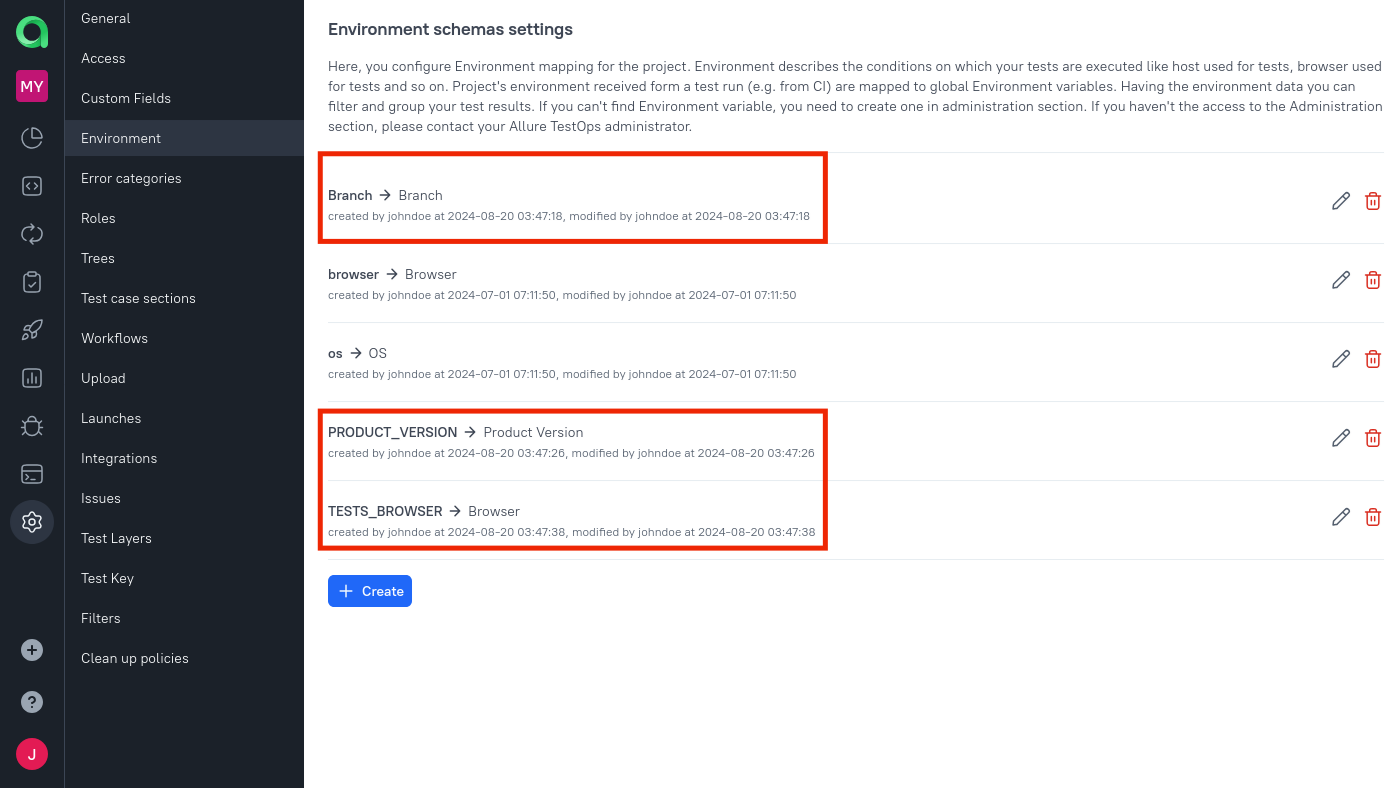
In Allure TestOps, open your project.
Go to Settings → Environment.
For each variable:
- Click + Create.
- Add env variable name to Mapping key.
- Select global environment variable from the list (these are managed by Allure TestOps administrators).
- Click Submit.
Run the build job from Bitbucket's UI again.
When the launch appears in the Launches list in Allure TestOps, the variables should be displayed.
Trigger pipelines from Allure TestOps
To trigger pipelines on a CI system, you need to add a specific integration at both the global and project levels. This integration will then be used in the job settings.
This section covers:
- Integration recap.
- Job settings.
The process of the configuration of the integrations with external systems is described here.
Integration recap
- Create credentials on an external system to use their API.
- Add the required integration on Allure TestOps global level (you need to be an administrator).
- Add the required integration on the project level and provide credentials you got on the step 1.
Global level
You need to have administrator permissions to configure Allure TestOps instance at the global level.
- Go to Administration → Integrations.
- In the upper-right corner click + Add integration.
- Search for Bitbucket.
- Click the Bitbucket logo.
- Provide the name of the integration.
For example, you can use the Bitbucket instance URL without
http(s)://. - Provide Bitbucket's URL to Endpoint field.
For example,
https://bitbucket.org. - Click Add integration.
On the next screen, you can test the connection, update the parameters, or delete the integration.
Project level
On the level of a project you need to add the created integration to the project you work in, and provide the credentials to authorize Allure TestOps to trigger the pipelines.
Bitbucket credentials
To integrate with Bitbucket, you need the username and application password.
You can either use your account, or alternatively you can create a new service account.
- Go to the account configuration https://bitbucket.org/account/settings/.
- Copy your username (under Bitbucket profile settings)
- Go to App passwords settings https://bitbucket.org/account/settings/app-passwords/.
- Click Create app password.
- Name the App password.
- Provide the required permissions:
- Account read (needed to test the connection);
- Issues > Write (if you are going to link the issues Bitbucket to Allure TestOps entities);
- Pipeline > Edit variables (to allow setting the values for the variables);
- Repositories > Read (to read pipeline file).
- Create the App password.
- Copy the created password.
Setup the integration in your Allure TestOps project
You need to be a project owner to configure these settings.
- In Allure TestOps, open your project.
- Go to Settings → Integrations.
- Locate the Bitbucket integration you want to add.
- Click Add integration.
- In the modal window enter the credentials – the username and App password we generated on the previous step.
- Test the connection.
- Click Add integration.
Now, we are ready to configure the job.
Allure TestOps job settings
A job in Allure TestOps is an entity linked to a CI system pipeline. The process of uploading test results is called a job run. All job run parameters are managed by Allure TestOps and the CI plugin (allurectl).
Pipeline has parameters (passed as env variables) which can be used to trigger a pipeline from Allure TestOps side. To do so, you need to finalise the settings for a job and create an integration allowing you to trigger the jobs in a CI system.
To be able triggering the associated pipelines, you need to have the configured CI system (just done on the previous step).
Also, to start using a job for creating launches and triggering CI pipelines from Allure TestOps UI, you need to configure such a job:
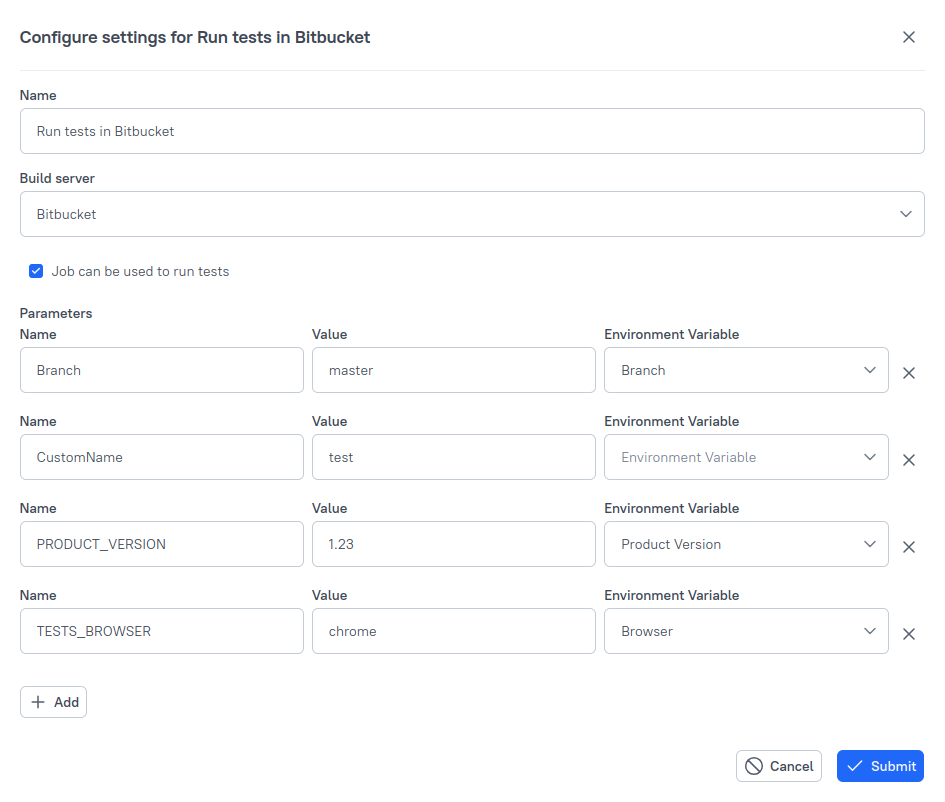
- Select the correct CI system configured at the project level with correct access permissions provided in CI.
- Mark the job as available for running tests on it.
- Link the environment variables received from the job to the global environment variables.
- Click Submit.
As you can see, there are 2 special variables: Branch and CustomName.
Branch on the left needs to be linked to the global environment variable Branch on the right. In the middle you have the default branch value to run on.
CustomName does not need any matching variable on the right, but requires a default value to be set. This value is your custom pipeline name from
bitbucket-pipelines.yml
Trigger a pipeline
Triggering of a pipeline (that'll create a launch in Allure TestOPs) can be done in the following sections of Allure TestOps:
- List of the test cases – select and use bulk operation Run.
- List of test results – select and use bulk operation ReRun.
- Test plans – click Run button of a test plan.
- Jobs – click Run button of a test job.
All the said actions will result in the modal window with the parameters of a launch Allure TestOps creates for such actions.
Trigger a pipeline on an alternative environment
Alternative means, you want to use the parameters which differ from the ones used in a pipeline by default.
In the job editing dialog in Allure TestOps, click Add environment.
Set the required values for the environment variables you need to alter, and click Save environment.
You can add several sets of the environments, in this case Allure TestOps will create several pipeline executions with different parameters' set and all of them will upload the test results in the same launch.
Complete pipeline example
Here is a very simple Bitbucket pipeline file example providing the general idea of the requirements for the working with Allure TestOps:
# bitbucket-pipelines.yml
image: python:3.8

pipelines:
  custom:
    pytest python tests:
      - variables:
        - name: ALLURE_LAUNCH_NAME
          default: ""
        - name: ALLURE_LAUNCH_TAGS
          default: "bitbucket, pytest"
        - name: ALLURE_RESULTS
          default: "allure-results"
        - name: TESTS_ENDPOINT
          default: "https://testops.testing.com"
        - name: TESTS_BROWSER
          default: "firefox"
        - name: ALLURE_PROJECT_ID
          default: "830"
        - name: ALLURE_ENDPOINT
          default: "https://testops.example.com"

      - step:
          name: pytest tests
          script:
            - /usr/local/bin/python -m pip install --upgrade pip
            - pip install pytest allure-pytest
            - ALLURE_LAUNCH_NAME="${BITBUCKET_REPO_FULL_NAME} - $BITBUCKET_BUILD_NUMBER"
            - wget https://github.com/allure-framework/allurectl/releases/download/2.15.6/allurectl_linux_amd64 -O ./allurectl
            - chmod +x ./allurectl
            - ./allurectl watch -- pytest test --alluredir=${ALLURE_RESULTS}
where pytest python tests: is the mandatory custom pipeline name required for triggering the pipeline via API call.
ALLURE_LAUNCH_NAME, ALLURE_LAUNCH_TAGS, ALLURE_RESULTS, ALLURE_PROJECT_ID, and ALLURE_ENDPOINT are the variables required by allurectl to upload the test results to Allure TestOps.