Integration with TeamCity
Allure TestOps integration with TeamCity allows you to set up the following relations:
- one job in Allure TestOps corresponds to one TeamCity build configuration,
- one launch of an Allure TestOps job corresponds to one TeamCity build.
A new TeamCity build can be triggered by either Allure TestOps or TeamCity itself, with both parties displaying its status in their web interfaces.
During the tests execution, the Allure TestOps plugin for TeamCity regularly scans for new files in the test results directory (e.g., “build/allure-results”, see Allure Report → How it works). For each new file created, the plugin waits a bit (to avoid uploading half-written files), then uploads the file to the Allure TestOps instance. This way, Allure TestOps receives the test results as soon as possible and is able to show a launch's partial results even before the job is finished.
To add Allure TestOps support on your TeamCity instance:
- Install the plugin for TeamCity.
- Enable sending data from TeamCity.
- Enable triggering TeamCity builds.
- Parametrize TeamCity jobs (if necessary).
Currently, the plugin for TeamCity does not support Allure TestOps installations with self-signed certificates.
Before setting up the integration, please make sure that you use a properly signed certificate or consider making Allure TestOps available to your TeamCity instance via unencrypted HTTP.
1. Install the plugin for TeamCity
The recommended method of installing the Allure TestOps plugin is to use the one-click installation feature in the JetBrains Marketplace. However, if your TeamCity configuration does not have access to the internet, you can install the plugin by uploading a ZIP archive to TeamCity manually. The selected installation method does not affect the functionality of the plugin.
Install from JetBrains Marketplace
In the TeamCity web interface, go to Administration → Plugins and click Browse plugins repository.
In the dialog that appears, click Proceed.
Your browser will be redirected to JetBrains Marketplace.
In the notification in the bottom right corner, click Proceed.
This will enable the one-click installation feature for the JetBrains Marketplace in your browser.
Visit the Allure TestOps plugin page in JetBrains Marketplace and click Get → Install to ⟨hostname⟩.
Click Install to confirm the installation.
Wait until the plugin is downloaded and installed.
Click Enable uploaded plugin.
In the dialog that appears, click Enable to confirm the plugin activation.
Install from a file
Visit the Allure TestOps plugin page in JetBrains Marketplace and click Get → Download. Save the ZIP archive to a local directory on your device.
In the TeamCity web interface, go to Administration → Plugins and click Upload plugin zip.
In the dialog that appears, select the ZIP archive from your device.
Click the Upload plugin zip button to confirm the installation.
Wait until the plugin is uploaded and installed.
Click Enable uploaded plugin.
In the dialog that appears, click Enable to confirm the plugin activation.
2. Enable sending data from TeamCity
This section describes the second part of the two-way communication: sending job statuses and test results from TeamCity back to Allure TestOps. To configure this, any Allure TestOps user needs to create an authentication token and use it in project-level settings in TeamCity, so that TeamCity can perform actions with that user's permissions. Then, various other options need to be set in the TeamCity build configuration that runs tests.
2.1. Create a token in Allure TestOps
In Allure TestOps, click your avatar and go to API Tokens.
Click + Token.
Enter a name for the token (e.g., "Token for TeamCity") and click Create.
Allure TestOps will generate the token and display it in a modal window.
Click the Copy icon to copy the token into clipboard. You will need this token in the next step.
2.2. Specify the instance parameters in TeamCity
For a Kotlin DSL project, see the Kotlin DSL reference below instead.
On the TeamCity main page, go to your project's page.
In the upper-right corner, click Edit project.
In the menu on the left, click Allure Servers.
(If the link is not visible, click Show all to reveal it.)
Click Add new server.
In the dialog that appears, fill in the fields:
- Name — a name to help you recognize the Allure TestOps instance.
- URL — the URL of the Allure TestOps instance.
- Token — the API token that you got on step 2.1.
- Threads count — maximum number of threads for uploading files to the instance.
- Batch size — maximum number of files to upload to the instance at a time (by one thread).
- Results depth — number of subdirectory levels in the test results directory to scan and upload. “0” means no subdirectories will be uploaded.
- Process interval — minimum interval (in seconds) to wait between sending sets of files (by one thread).
- Indexing interval — interval (in seconds) to wait between scans of the test results directory.
- Delay interval — minimum interval (in seconds) to wait before uploading a newly created file (to avoid uploading half-written files).
Click Test connection. If the credentials are correct, a "Successfully authorized as ⟨USERNAME⟩" message will appear within a few seconds. Click OK to close the message.
Click Save.
2.3. Edit the build configuration
For a Kotlin DSL project, see the Kotlin DSL reference below instead.
On the TeamCity main page, go to your build configuration's page.
In the upper-right corner, click Edit configuration.
In the menu on the left, click Build Features.
Click Add build features.
In the drop-down list, select Allure: upload results.
Fill in the fields:
- Allure Server — the name of the instance that you added on step 2.2.
- Project ID — the identifier of the project in Allure TestOps.
- Launch name — a template for naming test launches. You can use TeamCity's predefined build parameters here.
- Launch tags — comma-separated list of tags that should be assigned to the test launch.
- Test Results Directories — the path to the test results directory, e.g., “build/allure-results”. If there are multiple test result directories in your project, you can separate them with commas or newlines or use a wildcard pattern, e.g., “modules/*/build/allure-results”.
- Index existing files — if unchecked, the plugin will not upload any files that were created before the build execution. This means that if any files already exist in the
allure-resultsfolder before the plugin starts working, they will be ignored by the plugin. - Enable full log — if checked, the plugin will output more details into the build log. Such a log can be useful for troubleshooting.
Click Save.
3. Enable triggering TeamCity builds
Integration with TeamCity needs to be configured on two levels.
First, the administrator needs to specify the URL of the TeamCity instance.
Then, any project owner needs to create a token in TeamCity, add the TeamCity credentials to an Allure TestOps project, and register jobs in Allure TestOps.
3.1. Specify TeamCity instance in Allure TestOps
Log into Allure TestOps using an administrator account.
Go to Administration → Integrations.
Click + Add integration in the upper-right corner of the screen.
In the dialog that appears, select TeamCity.
Fill in the fields:
- Name — a name to help you recognize the TeamCity instance, e.g., “TeamCity production”.
- Endpoint — the URL of the TeamCity instance, e.g., “https://teamcity.example.com/”.
If your TeamCity instance uses a self-signed SSL certificate, check the Disable certificate validation checkbox.
Click Add integration.
3.2. Create access token in TeamCity
Skip this if you decide to use your username and password as the credentials on the next step.
In TeamCity, click your avatar and go to Profile.
In the menu on the left, click Access Tokens.
Click Create access token.
In the dialog that appears, fill in the fields:
- Token name — a name to help you recognize the token, e.g., “allure-testops”.
- Permission scope — “Limit per project”.
- Project — the TeamCity project for which you are configuring the integration.
- Permissions — “Run build”, "Comment build".
Click Create.
Next to the Token value, click the Copy icon to copy the token into clipboard.
You will need this token on the next step.
3.3. Add the TeamCity credentials to Allure TestOps
In Allure TestOps, open your project.
Go to Settings → Integrations.
Under the Available integrations, find the TeamCity integration and click Add integration next to it.
A dialog for entering credentials will appear.
Enter the credentials for connecting to the TeamCity instance. There are two ways to do it:
Basic authentication
On the basic tab, enter the username and password of the TeamCity user.
Token authentication
On the token tab, enter the token that you got on step 3.2.
Click Test connection. If the credentials are correct, a "Connection established" message will appear within a few seconds.
Click Add integration to save the settings.
3.4. Add new job to Allure TestOps
The easiest and most reliable way to create a Job in Allure TestOps is to execute a TeamCity build once, upload the test results to Allure TestOps, and then close the created launch.
Allure TestOps will automatically create a job for the TeamCity build configuration. You’ll then need to configure the attributes described in the step 4 below.
Create new job manually
In Allure TestOps, open your project.
Go to Jobs.
Click + Job in the upper-right corner of the page.
In the dialog that appears, fill in the fields:
- Build server — the name of the TeamCity instance that you added on step 3.1.
- Can run tests — if checked, users will be able to trigger this job from the Test cases interface.
- Job — the name of the TeamCity build configuration. Note that you cannot add the same build configuration to Allure TestOps twice.
- Parameters — parameters that should be passed to TeamCity via environment variables, see Environment.
Click Submit.
4. Parametrize TeamCity jobs
TeamCity builds can accept build parameters. Allure TestOps integrates this feature with its own Environment concept, which lets you both set parameters for new jobs and see parameters set for jobs that were started outside Allure TestOps.
Note that it is recommended to set the same default values both in Allure TestOps and TeamCity. This means that a TeamCity build will get the same environment regardless of what triggered it.
If your project's repository has multiple branches, make sure to create a Branch environment variable in Allure TestOps and pass it to your job. This special name will instruct TeamCity which of the plan's branches it should run.
4.1. Set the default values in TeamCity
On the TeamCity main page, go to your build configuration's page.
In the upper-right corner, click Edit configuration.
In the menu on the left, click Parameters.
(If the link is not visible, click Show all to reveal it.)
For each parameter that you want to add, click Add new parameter and fill in the fields:
- Name — the name of the variable.
- Kind — “Environment variable”. Note that this automatically adds the
env.prefix to the Name. - Value — the default value that should be used unless overriden for a specific launch.
Click Save to save the new parameter.
4.2. Add global parameter names in Allure TestOps
Log into Allure TestOps using an administrator account.
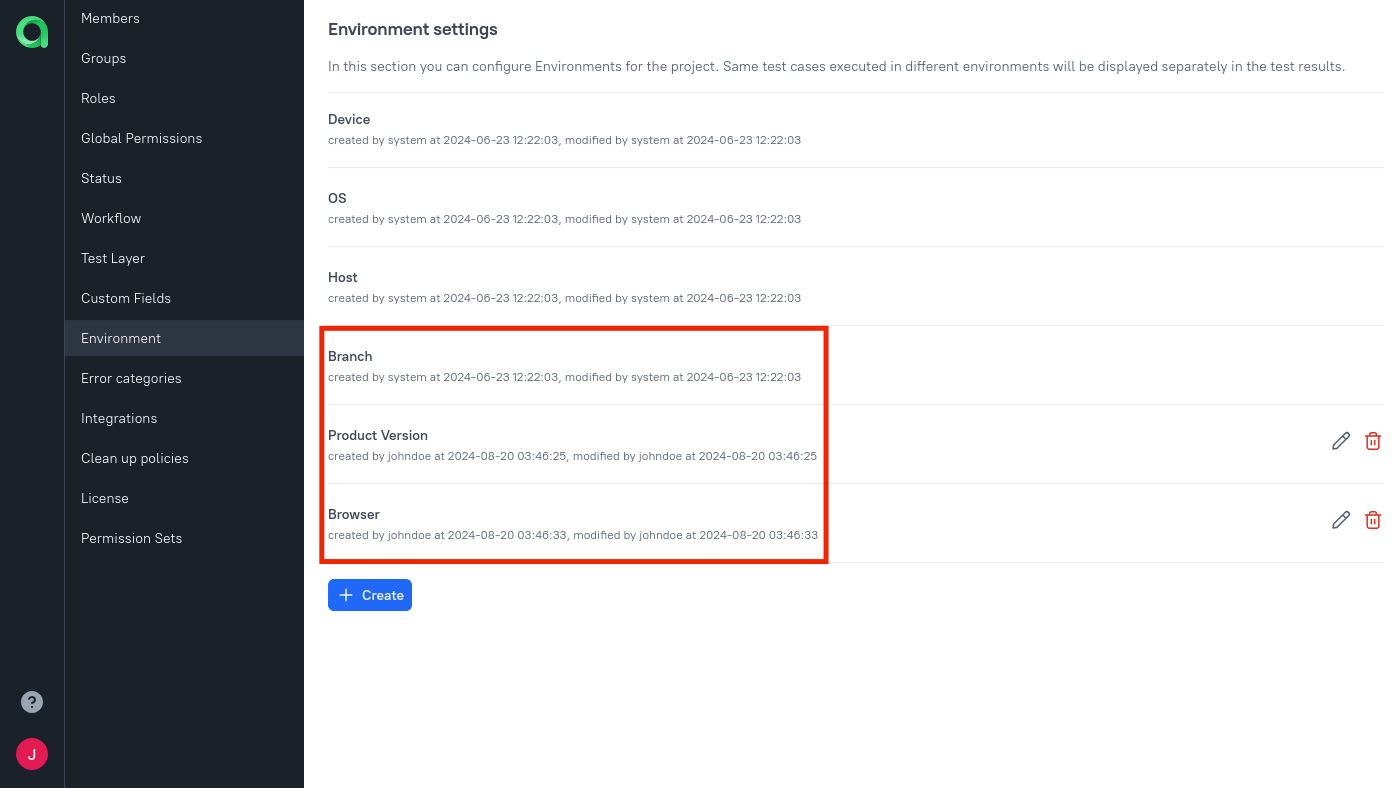
Go to Administration → Environment.
For each parameter name that you want to add, click + Create, enter the name of the new parameter and click Submit.
Note that this name can be a human-readable label and does not have to be equal to the name from step 4.1.

4.3. Map parameters to environment variables in Allure TestOps
In Allure TestOps, open your project.
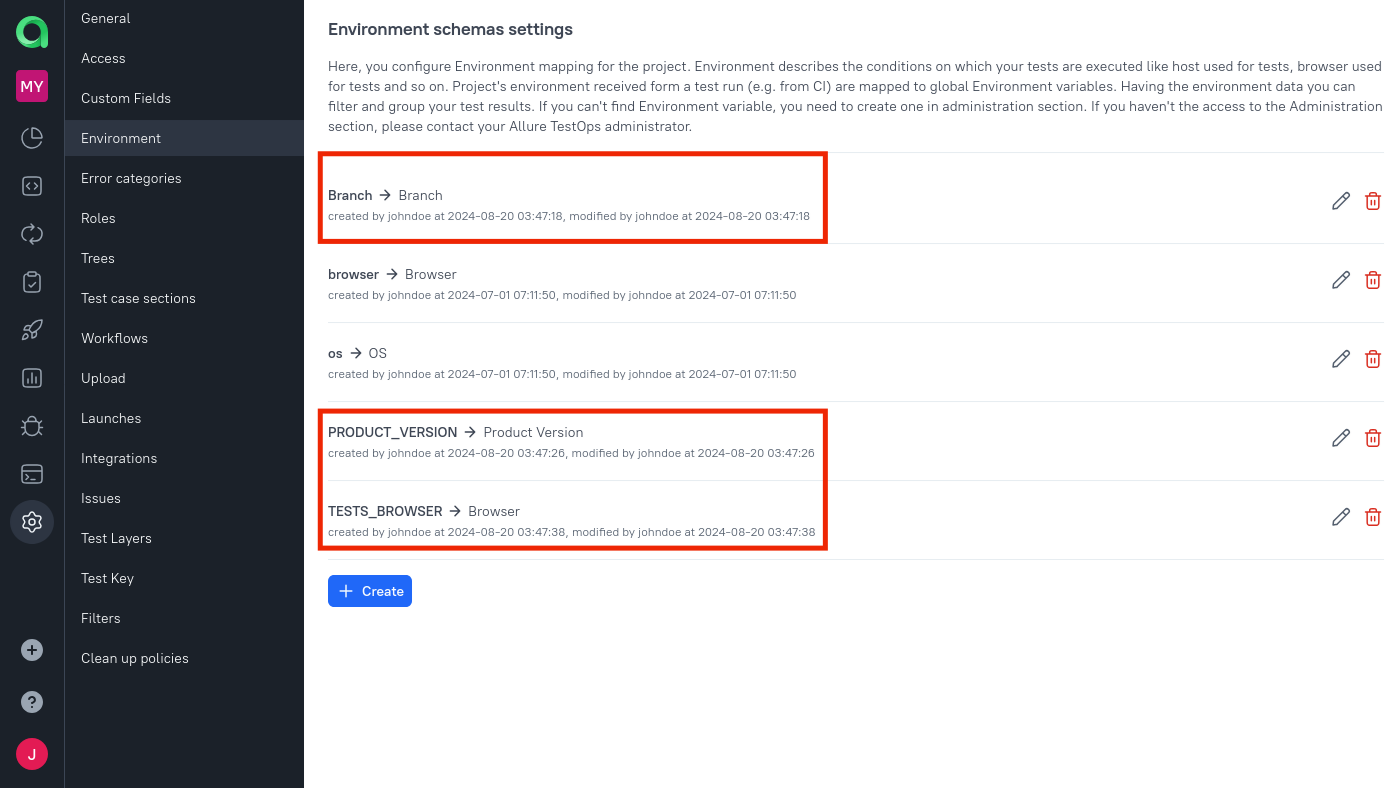
Go to Settings → Environment.
For each parameter name that you want to use:
Click + Create if the parameter is not in the list. Otherwise, click the Edit icon next to its name.
In the Mapping key field, specify the name of the environment variable name from step 4.1.
In the Environment variable field, select the global parameter name from step 4.2.
Click Submit.

4.4. Load the parameters into the Allure TestOps job
In Allure TestOps, open your project.
Go to Jobs.
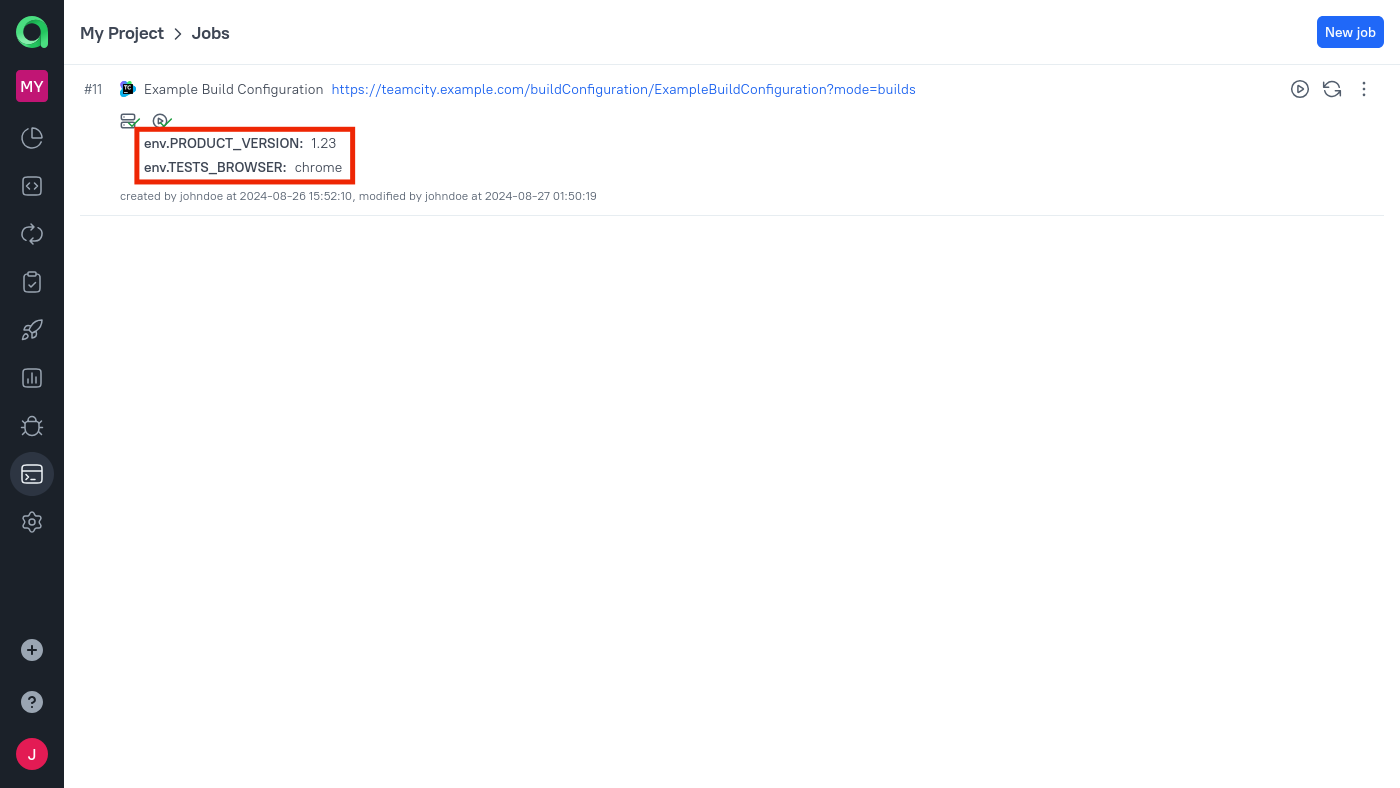
Find the job which you want to parametrize. Click the Refresh button to the right of it.
The parameter names and their default values should appear in the job description.

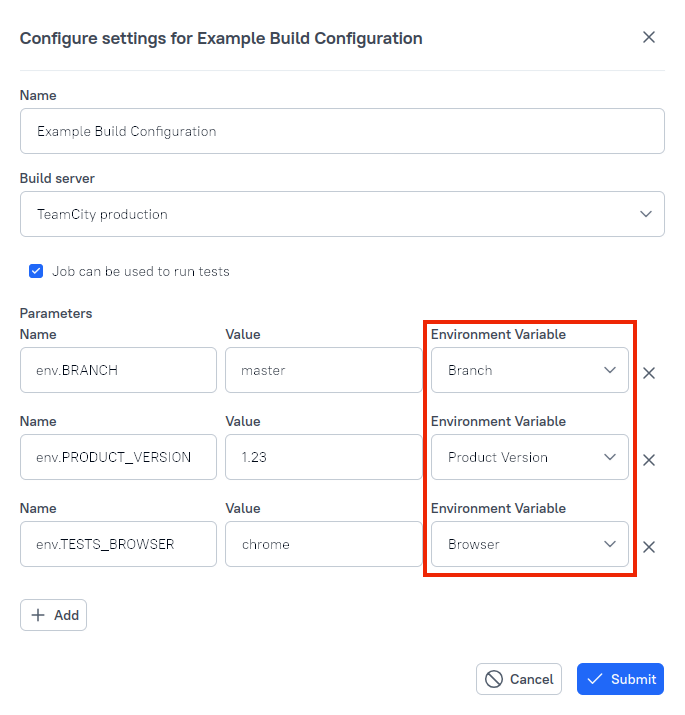
Click
⋯next to the job name, then select Configure.The job settings dialog will appear, containing the Parameters section.
For each parameter that you want to use, select the corresponding Environment variable from step 4.2.

Click Submit.
Kotlin DSL reference
If you use the Configuration as Code approach and store the build configuration in a Kotlin DSL script, you need to add the settings for the Allure TestOps integration into your .teamcity/settings.kts file.
Project-level settings
Project-level settings must be included in the feature block with the type property set to io.qameta.allure.teamcity.AllureServerConfig. All other settings in the block are set via the param() function.
The supported settings:
- allure.server.config.id — a unique identifier of the instance. Using a UUID is recommended.
- allure.server.config.name — a name to help you recognize the Allure TestOps instance, e.g., “Allure TestOps production”.
- allure.server.config.url — the URL of the Allure TestOps instance, e.g., “https://testops.example.com/”.
- allure.server.config.token — the API token that you got on step 2.1.
- allure.server.config.threadsCount — maximum number of threads for uploading files to the instance.
- allure.server.config.batchSize — maximum number of files to upload to the instance at a time (by one thread).
- allure.server.config.maxDepth — number of subdirectory levels in the test results directory to scan and upload. “0” means no subdirectories will be uploaded.
- allure.server.config.processInterval — minimum interval (in seconds) to wait between sending sets of files (by one thread).
- allure.server.config.indexInterval — interval (in seconds) to wait between scans of the test results directory.
- allure.server.config.delayInterval — minimum interval (in seconds) to wait before uploading a newly created file (to avoid uploading half-written files).
Here's an example of a project with a valid configuration:
project {
    vcsRoot(ExampleProject_VcsRoot)
    buildType(ExampleBuildConfiguration)
    features {
        feature {
            type = "io.qameta.allure.teamcity.AllureServerConfig"
            param("allure.server.config.id", "7040a01f-dadf-4d3b-b449-f8f227cb2f79")
            param("allure.server.config.name", "Allure TestOps production")
            param("allure.server.config.url", "http://testops.example.com/")
            param("allure.server.config.token", "8d7e66eb-0bac-4dcf-9828-446a818f4d8c")
            param("allure.server.config.threadsCount", "5")
            param("allure.server.config.batchSize", "10")
            param("allure.server.config.maxDepth", "1")
            param("allure.server.config.processInterval", "2")
            param("allure.server.config.indexInterval", "1")
            param("allure.server.config.delayInterval", "5")
        }
    }
}
Build configuration-level settings
Build configuration-level settings must be included in the feature block with the type property set to allure.serverBuildFeature. All other settings in the block are set via the param() function.
The supported settings:
- allure.server.id — the identifier of the instance (same as allure.server.config.id in the Project-level settings).
- project.id — the identifier of the project in Allure TestOps.
- allure.server.launch.name — a template for naming test launches. You can use TeamCity's predefined build parameters here.
- allure.server.launch.tags — comma-separated list of tags that should be assigned to the test launch.
- allure.result.directory — the path to the test results directory, e.g., “build/allure-results”. If there are multiple test result directories in your project, you can separate them with commas or newlines or use a wildcard pattern, e.g., “modules/*/build/allure-results”.
- allure.indexExistingFiles — if checked, the plugin will not upload any files that were not created or modified by the job.
- allure.debug.enable — if checked, the plugin will output more details into the build log. Such a log can be useful for troubleshooting.
Here's an example of a BuildType with valid settings:
object ExampleBuildConfiguration : BuildType({
    id = AbsoluteId("ExampleBuildConfiguration")
    name = "Example Build Configuration"
    vcs {
        root(DslContext.settingsRoot)
    }
    steps {
        gradle {
            tasks = "clean test"
        }
    }
    triggers {
        vcs {
        }
    }
    features {
        feature {
            type = "allure.serverBuildFeature"
            param("allure.server.id", "7040a01f-dadf-4d3b-b449-f8f227cb2f79")
            param("project.id", "1")
            param("allure.server.launch.name", "%env.TEAMCITY_BUILDCONF_NAME% - #%env.BUILD_NUMBER%")
            param("allure.server.launch.tags", "tests,teamcity")
            param("allure.result.directory", "build/allure-results")
            param("allure.indexExistingFiles", "true")
            param("allure.debug.enable", "true")
        }
    }
})