Integration with TestRail
Integration with TestRail is a one-way integration (export only) that regularly sends data about test cases and launches to a specified TestRail instance. The integration supports Allure Query Language to select the scope of data to be exported, i.e., you can only copy test cases with a specific tag.
Allure TestOps only supports exporting to the TestRail projects that use multiple test suites. See Projects and their types in the TestRail documentation to change your project type if necessary.
1. Enable basic sync
1.1. Enable API in TestRail
In TestRail, go to Administration → Site Settings → API.
Select checkboxes Enable API and Enable session authentication for API.
Click Save Settings.
1.2. Create API key in TestRail
In TestRail, click your name in the top right corner and select My Settings.
Go to the API Keys tab.
Click Add Key.
In the dialog that appears, enter a name to help you recognize the API key, e.g., “Key for Allure TestOps”.
Click Generate Key.
The create key will appear in the dialog. Select and copy it.
You will need this key in one of the next steps.
Click Add Key, then Save Settings to save the created key.
1.3. Add TestRail instance in Allure TestOps
Log in to Allure TestOps using an administrator account.
Go to Administration → Integrations.
Click + Add integration in the top right corner of the page.
In the dialog that appears, select TestRail.
Fill in the fields:
- Name — a name to help you recognize the TestRail instance, e.g., TestRail production.
- Endpoint — the URL of the TestRail instance, e.g., https://example.testrail.io/.
- TestRail version — 6.7 or later.
If your TestRail instance uses a self-signed SSL certificate, check the Disable certificate validation checkbox.
Click Add integration.
1.4. Add TestRail integration to Allure TestOps project
In Allure TestOps, open your project.
Go to Settings → Integrations.
Under the Available integrations, find the TestRail integration and click Add integration next to it.
In the dialog that appears, fill in the fields:
- Username — the email address that you use to log in to TestRail.
- API key — the API key that you got in step 1.2.
Click Test connection. If the credentials are correct, a "Connection established" message will appear within a few seconds.
Click Add integration to save the settings.
1.5. Get required details from TestRail project
All the test cases exported from Allure TestOps will be placed within a single section of a single test suite in TestRail. In this step, you will find out the suite and section identifiers that you will have to specify in Allure TestOps for the integration to work correctly.
On the TestRail dashboard, click the project you want to enable export to.
Remember the name of the project. You will need this name in the next step for the Project field.
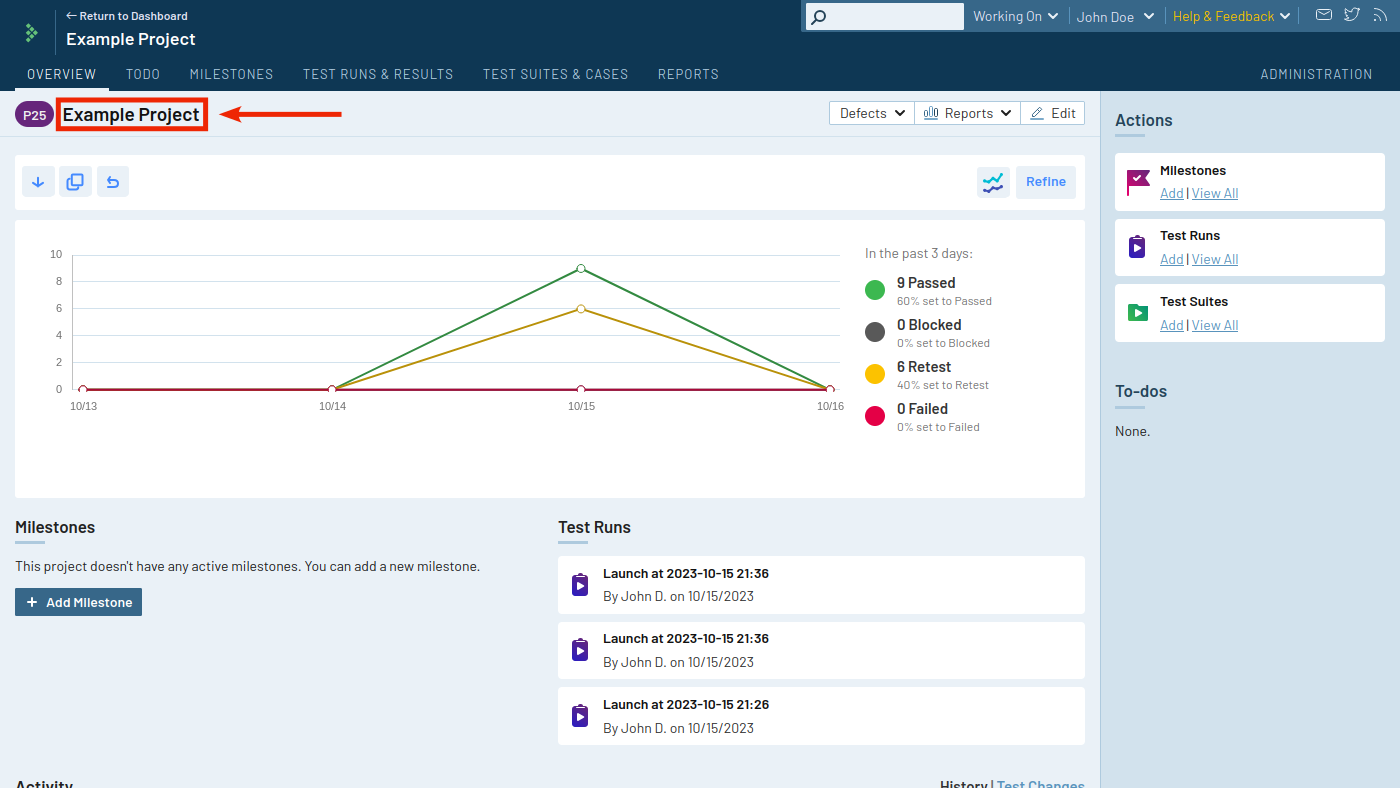
Go to the Test Suites & Cases tab.
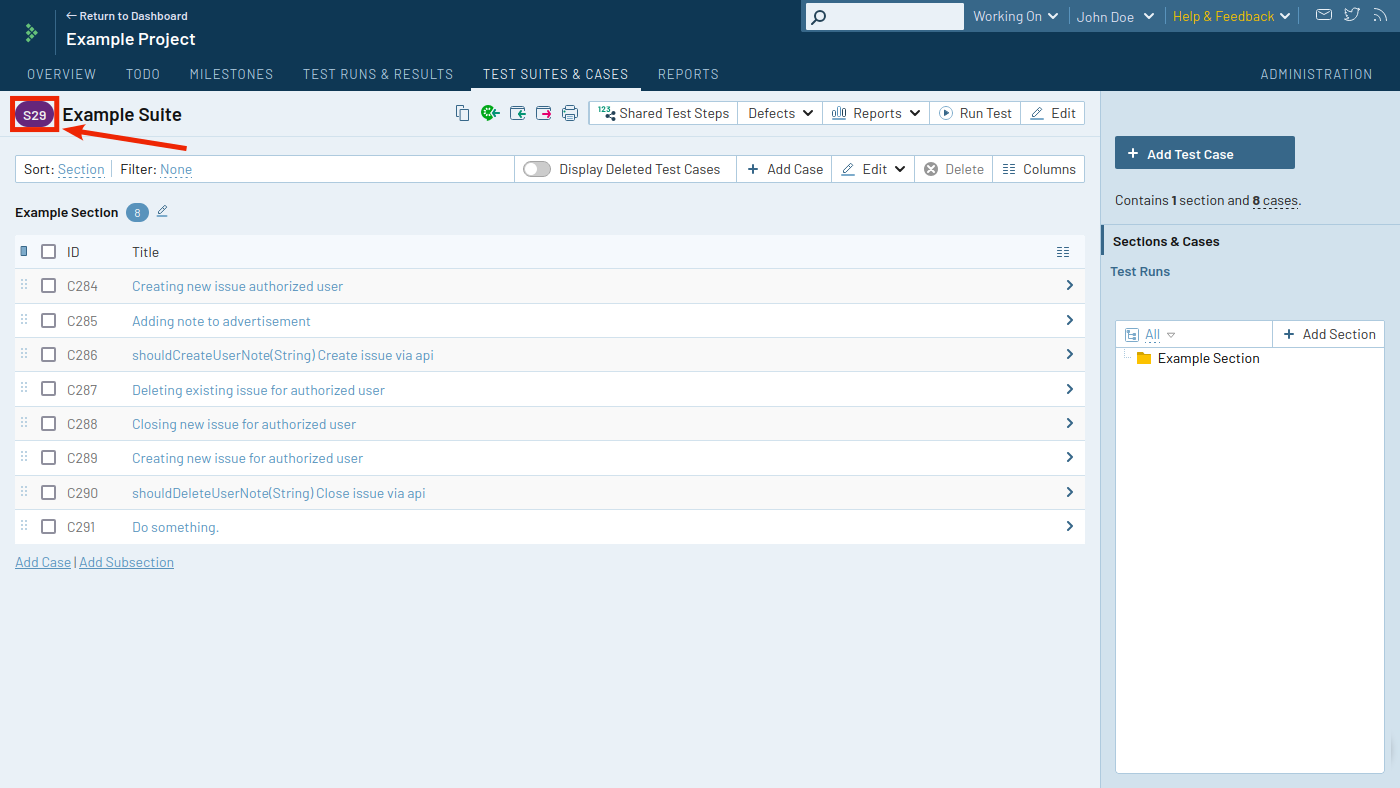
Click the suite that you want to enable export to. You may create a new suite if necessary.
Notice the identifier near the title. This is the Suite ID that you will need in the next step.
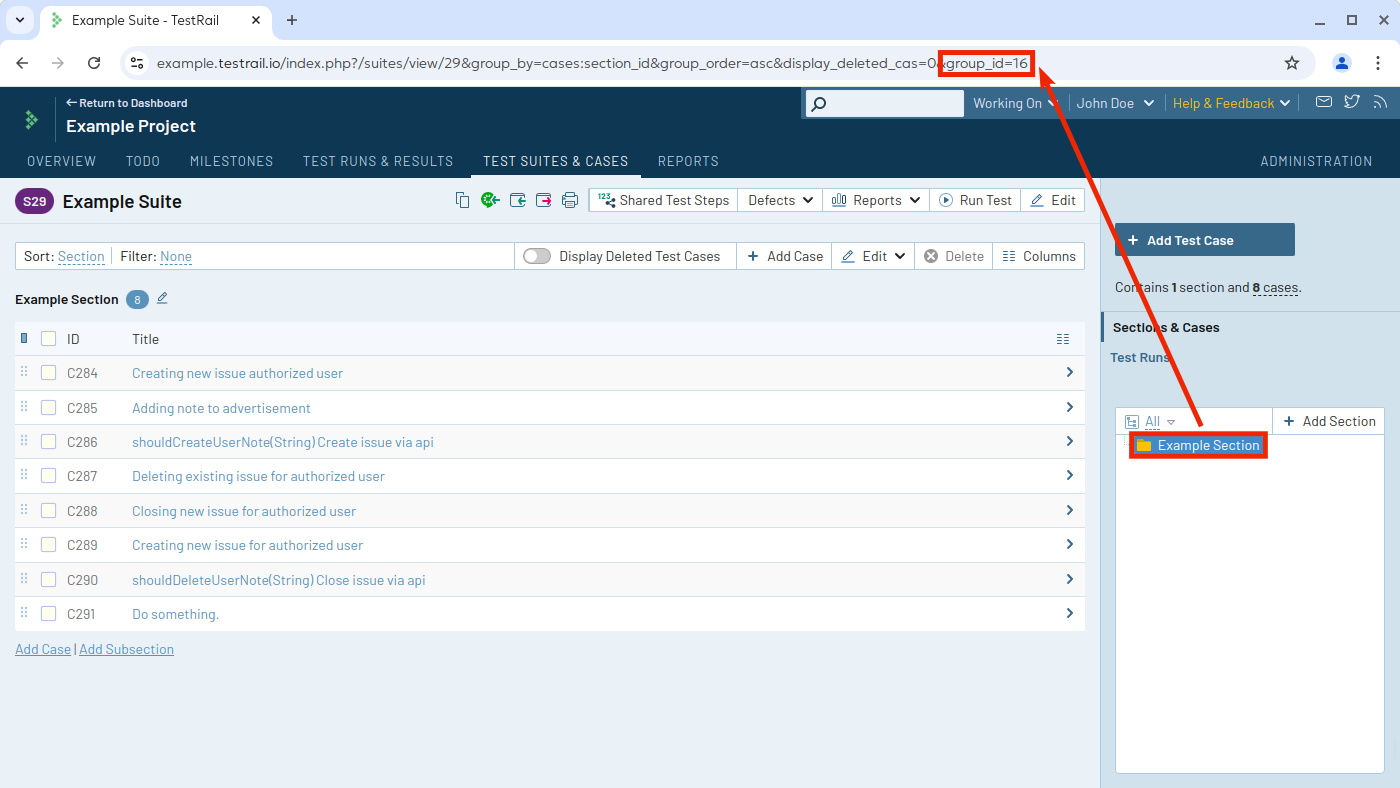
In the tree view on the right, click the section that you want to enable export to. You may create a new suite if necessary.
Notice the group_id parameter that will appear in the web browser's location bar. This is the Section ID that you will need in the next step.
1.6. Enable synchronization
In Allure TestOps, open your project.
Go to Settings → Integrations.
Click the integration that you added in step 1.4.
On the TMS Sync tab, click Create.
Specify the Project, Suite ID and Section ID that you got in the previous step. Use only the numeric parts of the identifiers, e.g., “S29” must be specified as “29”.
Specify which data Allure TestOps should export to TestRail:
- Test Case AQL — an AQL expression for selecting the test cases that will be synced, e.g.,
automation = false. Leave empty to sync all test cases. - Launches AQL — an AQL expression for selecting the launches that will be synced, e.g.,
name ~= "Release". Leave empty to sync all launches. - Disable export — check to completely disable the TestRail integration.
- Disable Test Case create — check to disable exporting information about new test cases.
- Disable Launches sync — check to disable exporting information about test launches.
- Test Case AQL — an AQL expression for selecting the test cases that will be synced, e.g.,
Click Submit to apply the changes.
The TMS sync will be automatically disabled if the provided API credentials are invalid, have been revoked, or have insufficient level of access. To restore the TMS sync, enter valid credentials with sufficient level of access.
2. Configure fields mapping
Some of the test cases' exported fields are not standardized in TestRail, namely:
- description,
- precondition,
- expected result,
- scenario.
You can create the fields in TestRail and specify their names in Allure TestOps.
2.1. Create custom fields in TestRail
In TestRail, go to Administration → Customizations.
The Case Fields list should appear.
For each field that you want to export to TestRail:
Click Add Field.
In the form that appears, fill in the fields:
- Label — the label under which the field should be displayed in test case's details in TestRail. For example, “Description”, “Precondition”, “Expected”, etc.
- System Name — the unique identifier of the field. It will be used by Allure TestOps when exporting the field. For example, “description”, “preconds”, “expected”, etc.
- Type — “Steps” for the field that will store the test scenario as separate steps, “Text” for all other fields. If you prefer to export the scenario in plain text, then choose “Text” for all the fields.
At the bottom of the form, click Add Projects & Options.
In the dialog that appears, go to the Selected Projects tab, select These options apply to the following projects only and check your project. Then click OK to close the dialog.
Click Add Field to close the form and apply the changes.
2.2. Configure mapping in Allure TestOps
In Allure TestOps, open your project.
Go to Settings → Integrations.
Click the integration that you added in step 1.4.
On the TMS Sync tab, click Edit.
For each field that you want to export to TestRail, enter the
custom_prefix, followed by the identifier that you specified as the System Name in TestRail in step 2.1.Click Submit to apply the changes.
3. Configure statuses mapping
Both Allure TestOps and TestRail have customizable test status systems. When configuring the synchronization, it is recommended to create in TestRail the same set of statuses that you have in your Allure TestOps workflow, then map ones to the others.
3.1. Get statuses from Allure TestOps
Log in to Allure TestOps using an administrator account.
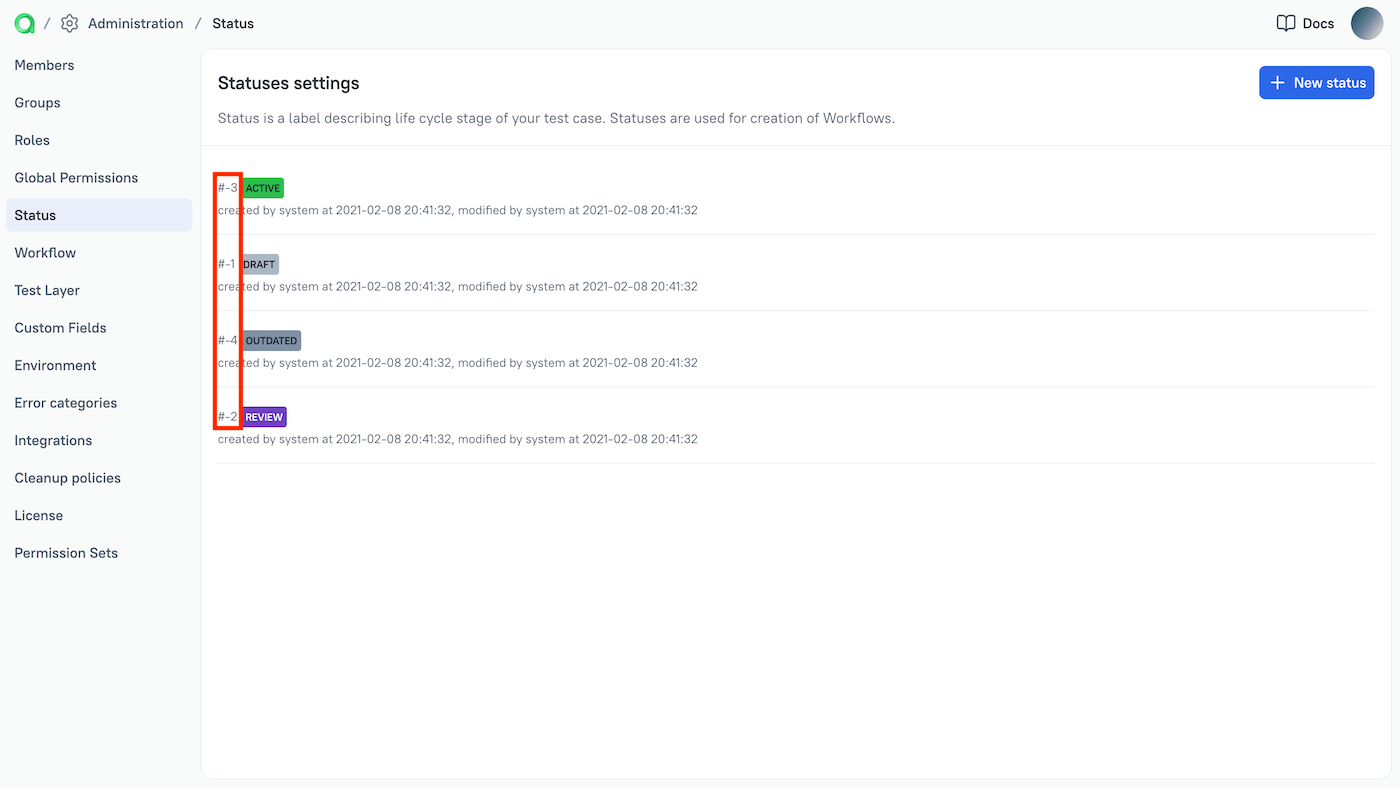
Go to Administration → Status.
Remember the identifier of each status. You will need these identifiers in step 3.3.
3.2. Add custom statuses to TestRail
In TestRail, go to Administration → Customizations.
The Case Fields list should appear.
Click Add Field to create a new field that will store the test case status. Alternatively, you can reuse an existing field of a Dropdown type.
In the form that appears, fill in the fields:
- Label — the label under which the field should be displayed in a test case's details in TestRail, e.g., “Status”.
- System Name — the unique identifier of the field, e.g., “status”. It will be used by Allure TestOps when exporting the field.
- Type — Dropdown.
At the bottom of the form, click Add Projects & Options.
A dialog should appear with the Options and Selected Projects tabs.
On the Options tab, enter identifiers and names for statuses that you want to add to TestRail. The identifiers must be positive numbers and must be unique. Each line must contain one identifier and one name, separated with a comma and a space.
Remember the identifier of each status. You will need these identifiers in step 3.3.
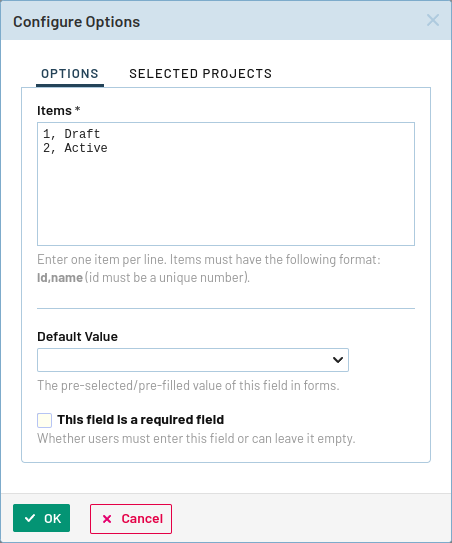
On the Selected Projects tab, select These options apply to the following projects only and check your project.
Click OK to close the dialog, then click Add Field to close the form and apply the changes.
3.3. Configure mapping
In Allure TestOps, open your project.
Go to Settings → Integrations.
Click the integration that you added in step 1.4.
On the TMS Sync tab, click Edit.
Under the Status Mapping section, fill in the fields:
- Field name — the system name of the field that you configured in TestRail in step 3.2.
- Default value — enter the
custom_prefix, followed by the identifier of a status in TestRail. This value will be used when there is no other mapping applicable.
For each status that you have in your Allure TestOps workflow, click Add and fill in the fields:
- Source ID — the identifier of a status in Allure TestOps that you found in step 3.1.
- Target ID — the identifier of a status in TestRail that you specified in step 3.2.
Click Submit to apply the changes.