Integration with Allure TestOps
Integration with Allure TestOps allows you to automatically export test cases and launches from one Allure TestOps project to another, including exporting to projects located on a different instance of Allure TestOps. You can use Allure Query Language to select the required set of data to be exported.
To enable this integration, you need to:
- Add Allure TestOps integration in the Administration section.
- Request an API token to authenticate API calls to recipient Allure TestOps instance.
- Enable the integration in the project settings using the received API token.
- Create one or more export configurations in the integration settings.
Add new integration
Log in to Allure TestOps using an administrator account.
Go to Administration → Integrations.
Click + Add integration in the top right corner of the page.
In the opened up window, select Allure TestOps.
Fill in the fields:
- Name — a name to help you recognize this integration later (e.g., "Allure TestOps production").
- Endpoint — a URL of the Allure TestOps instance to which you want to export the data (e.g., "https://testops.example.com").
If the specified Allure TestOps instance uses a self-signed SSL certificate, select the Disable certificate validation checkbox.
Click Add integration.
Get API token
If you want to export data to another Allure TestOps instance, you need to get an API token from an administrator of this instance.
If you are the administrator and want to grant access to receive the data from another instance (or if you are exporting data to the same instance), follow the steps below to create an API token:
Log in to Allure TestOps using an administrator account.
Click your avatar and go to API Tokens.
Click + Token.
Enter a name for the token (e.g., "Allure TestOps integration") and click Create.
Allure TestOps will generate the token and display it in a modal window.
Click the Copy icon to copy the token into clipboard. Save the token in a secure location, as it cannot be retrieved through Allure TestOps.
Enable integration for project
- In Allure TestOps, open your project.
- Go to Settings → Integrations.
- Find the Allure TestOps integration and click Add integration.
- Enter the API token you received from the administrator (see Getting an API token).
- Click Add integration.
Creating export configuration
In Allure TestOps, open your project.
Go to Settings → Integrations.
Click the previously added Allure TestOps integration.
Go to the TMS Sync tab at the top.
A list of export configurations will be shown where you can edit and delete previously created configurations.
To create a new export configuration, click Create.
In the resulting window, you will be able to select the project to which to export the data, and filter your project's test cases using Allure Query Language to limit the set of test cases and launches that will be exported:
In the Project list, select the project to which you want to export data.
In the Test Case AQL box, enter an AQL query to filter the test cases you want to export.
If you leave this field blank, all test cases will be exported.
Optionally, in the Launches AQL box, enter an AQL query to limit the set of launches to be exported for the selected test cases.
If you leave this field blank, all launches will be exported.
You can also disable exporting launches completely by selecting the Disable Launches sync checkbox.
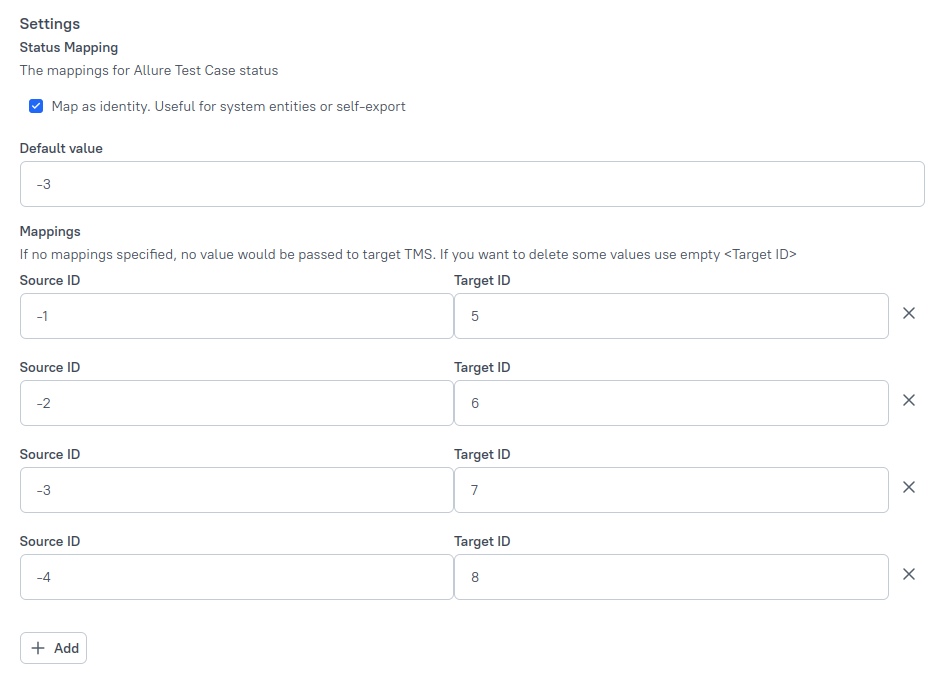
Additionally, you can specify mapping settings if you need to export test case attributes (such as workflow statuses). Please refer to Mapping test case attributes for more information.
If you don't specify mapping settings, no attributes will be exported.
Сlick Submit to create the export configuration.
After the configuration has been created and the test cases have been successfully exported, you can disable the export of new test cases that match that configuration by selecting the Disable Test Case create checkbox. If this checkbox is selected, only the changes and launches of the previously exported test cases will be exported.
To disable the export configuration without deleting it, select the Disable export checkbox.
The TMS sync will be automatically disabled if the provided API credentials are invalid, have been revoked, or have insufficient level of access. To restore the TMS sync, enter valid credentials with sufficient level of access.
Mapping test case attributes
Test cases on different Allure TestOps instances may have different sets of attribute values. In other words, if you create, for example, a custom workflow status for your test cases, it will exist only on your instance. If you try to export a test case that uses that status, the other instance will not know what to do with it.
The default behavior is to ignore all attribute values, including built-in values such as Draft, Review, etc. To change that, you can create mapping rules to specify how attributes from your instance should be handled on the other instance.
Each mapping rule links two values: the value on your instance (Source) and the value on the other instance (Target). For example, if you create a rule that links the Review status to the Review status, all test cases that have the Review status will retain it on export. If you link Review to some other status, it will be replaced with that status during export.

- As was mentioned above, all built-in values are ignored by default. You can select the Map as identity checkbox to export them without the need to create mapping rules manually (i.e., all Drafts will be exported as Drafts, Reviews as Reviews, etc.).
- You can set a default value that will be used if some attribute value is missing in the mapping rules. For example, if you set Review as the default status and don't specify any mapping rules, all exported test cases will have the Review status. Please note that you need to enter the ID of the value, not its name (see the next step for more info).
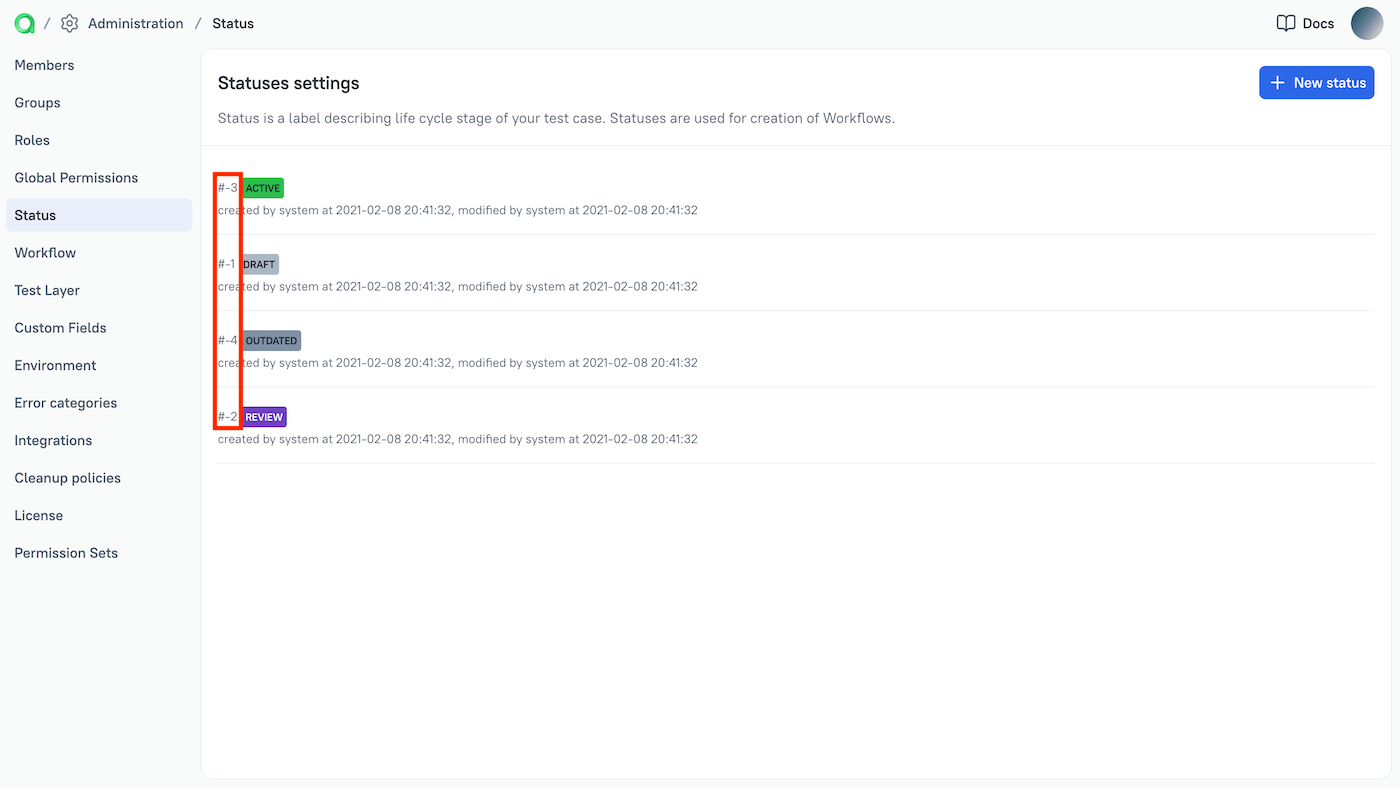
- To create a new mapping, click Add and enter Source ID (ID of a value on your instance) and Target ID (ID of a value on the other instance). You can find these IDs in the Administration panel of Allure TestOps (see the image below). If you don't specify Target ID, the source attribute value will be deleted on export.
To get the IDs of values:
- Log in to Allure TestOps as administrator.
- Go to Administration.
- Select the required section. For example, you can find the ID of the Draft status (-1) under Status.
