Integration with Jira Software Cloud
Jira Software Cloud is the cloud edition of the popular Jira issue tracker. This instruction describes how to configure the integration between Jira Software Cloud and Allure TestOps instances.
Integration with Jira Software Cloud allows you to:
- link Allure TestOps entities (test cases, launches, test results, defects, mutes) with Jira Software Cloud issues;
- create Jira Software Cloud issues directly from the defect view in Allure TestOps (see Linking defects to issues for more details);
- view and manage linked test cases from Allure TestOps within Jira Software Cloud issues;
- view linked launches and test results from Allure TestOps in Jira Software Cloud issues.
Lists of launches and test results from Allure TestOps are added to Jira issues using an iFrame component. For this to work, Allure TestOps does not have to be accessible from Jira Software Cloud, but it must be accessible from the user's device. This also means that the integration may be affected by the user's web browser settings, especially if your Allure TestOps instance uses HTTP instead of HTTP. If your users will report any problems anyway, please consult the Troubleshooting section or contact our support team.
For adding an issue to a test case manually, Jira must be accessible from the Allure TestOps server.
To use automatic linking between test cases and issues, a test author needs to define a relation using an Allure Report adapter for their test framework. An example of such a definition:
import { test } from "@playwright/test";
import { allure } from "allure-playwright";

test("Some test", async ({ page }) => {
  allure.label("jira", "BUG-123");
  // ...
});
This code defines a relation between the test and the “BUG-123” issue in the “jira” issue tracker. To make this an actual link in the web interface, Allure TestOps will use an issue mapping for “jira”, as configured in step 1.4.
Note that while the example above works, in a real project we recommend to define your own wrapper function instead of specifying the key in
allure.label()every time. Please consult the Allure Report documentation for your test framework.
Configuring the integration
To configure the integration in Allure TestOps, you need to have access to the sections:
- Administration — requires instance administrator permissions;
- Settings of a specific project — requires the project owner role.
To configure the integration with Jira:
Create a token in Jira.
At the Allure TestOps instance level, add the integration with Jira by providing:
- integration name;
- Jira URL.
At the instance or project level in Allure TestOps, enable the added integration for a project by providing Jira credentials.
Configure issue mapping in Allure TestOps.
Configure data embedding from Allure TestOps into Jira by installing the Allure TestOps plugin.
Enable issue lifecycle synchronization by configuring webhooks between Jira and Allure TestOps.
1. Enable Jira links in Allure TestOps
After completing this step, you’ll be able to add links to Jira issues in Allure TestOps entities.
1.1. Create token in Jira
- In Jira, click your avatar and go to Profile.
- Click Manage your account.
- In the top navigation menu, go to the Security tab.
- Under the API tokens section, click Create and manage API tokens.
- Click Create API token.
- Enter a name to help you recognize the token, for example, Token for Allure TestOps.
- Click Create, then click Copy to copy the token into clipboard.
Save the token in a secure place. You’ll need it to enable the integration in the Allure TestOps project.
1.2. Add Jira integration in Allure TestOps
Go to your Allure TestOps instance.
Go to Administration → Integrations.
In the upper-right corner, click + Add integration.
From the list of available integrations, select Jira Software Cloud.
Fill in the fields
- Name — name to help you recognize the integration, for example, Jira production.
- Endpoint — URL of your Jira instance, for example, https://example.atlassian.net/.
Click Add integration.
1.3. Enable integration for Allure TestOps project
To enable the integration in the specific Allure TestOps project, use one of the two methods below:
1.4. Configure issue mapping
In Allure TestOps, open your project.
Go to Settings → Issues.
Click + Create.
Fill in the fields:
- Key — short integration identifier that you are going to use when writing the tests, for example, jira.
- Issue tracker — name of the integration that you added in step 1.2.
Click Submit.
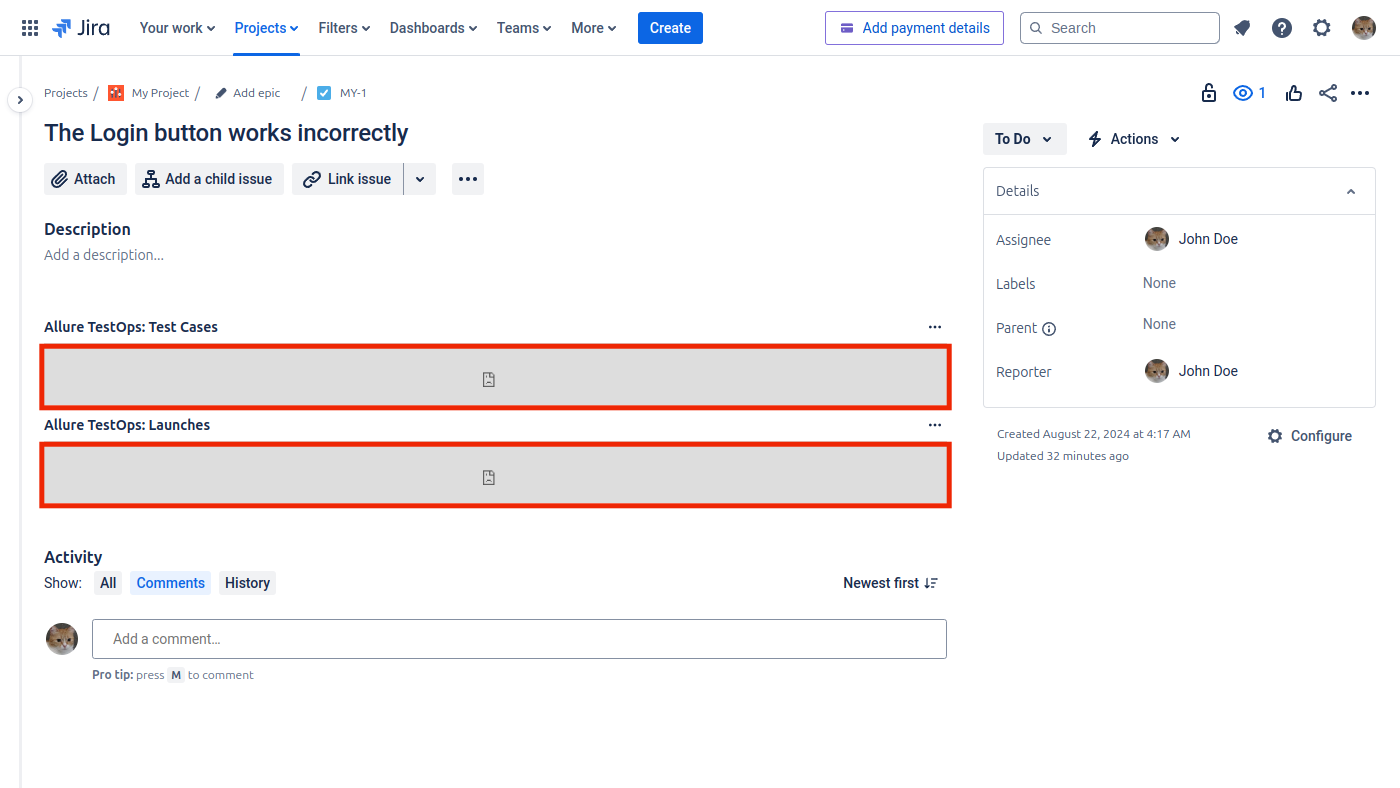
2. Viewing Allure TestOps test cases and launches in Jira Cloud issues
To see linked Test Cases and Launches linked to Jira issues, you need to install Allure TestOps plugin for Jira Software cloud.
After completing of the following steps, you’ll be able to view the list of linked Allure TestOps entities in Jira issues.
2.1. Enable secure cookies in Allure TestOps
For security reasons, a user's web browser may block sharing cookies between two different websites, such as Allure TestOps and Jira. This may prevent the embedding in the Jira issue details page.
To fix this, make sure that the “secure cookie” setting is enabled for your Allure TestOps instance.
2.2. Find out integration ID in Allure TestOps
To find the ID of the added integration, use one of the two methods below:
2.3. Enable Allure TestOps plugin for Jira
Then configure the application as follows.
- Enabled — must be selected.
- Endpoint — URL of your Allure TestOps instance, for example, https://testops.example.com. Make sure there’s no tailing slash in the URL, as it may cause plugin issues.
- Version — Version 4.x.x is to be selected if you have deployed Allure TestOps of version 4 and the following ones.
- Integration ID — Jira Software Cloud integration ID you copied in step 2.2.
Parameter Panels location:
- Test Cases — Show in main issue panel.
- Launches — Show in main issue panel.
To complete the settings Click Save.
3. Enabling synchronization of the defects lifecycle with issues statuses
For defects created in Allure TestOps and linked to Jira Software Cloud issues, you can manage their status (Open/Closed) automatically based on the life cycle stage of the linked Jira issue.
Allure TestOps uses incoming webhooks to manage defects lifecycles. Jira supports triggering webhooks to notify external systems when an issue status changes. When Allure TestOps receives such notification, it finds all defects linked to the issue and updates their status accordingly.
3.1. Create webhook in Allure TestOps
- Go to your Allure TestOps instance.
- Go to Administration → Integrations.
- From the list of configured integrations, find and open your Jira Software Cloud integration.
- Go to the Webhooks tab.
- Click + Create webhook, then click Confirm creation.
- In the dialog that appears, click the Copy icon to copy the webhook URL into clipboard.
You’ll need this URL in the next step.
3.2. Add webhook from Allure TestOps to Jira
In Jira, click the Settings icon in the upper-right corner and select System.
In the sidebar on the left, under Advanced, click WebHooks.
Click Create a WebHook.
Fill in the fields:
- Name — name to help you recognize the webhook.
- Status — Enabled.
- URL — webhook URL that you saved in step 3.1.
- Issue related events — select Issue → updated.
Click Create at the bottom of the page.
Troubleshooting
In Jira issues, viewing and managing Allure TestOps entities is done through an iFrame component. Below are examples of possible errors that may appear in the iFrame, along with recommendations for resolving them.
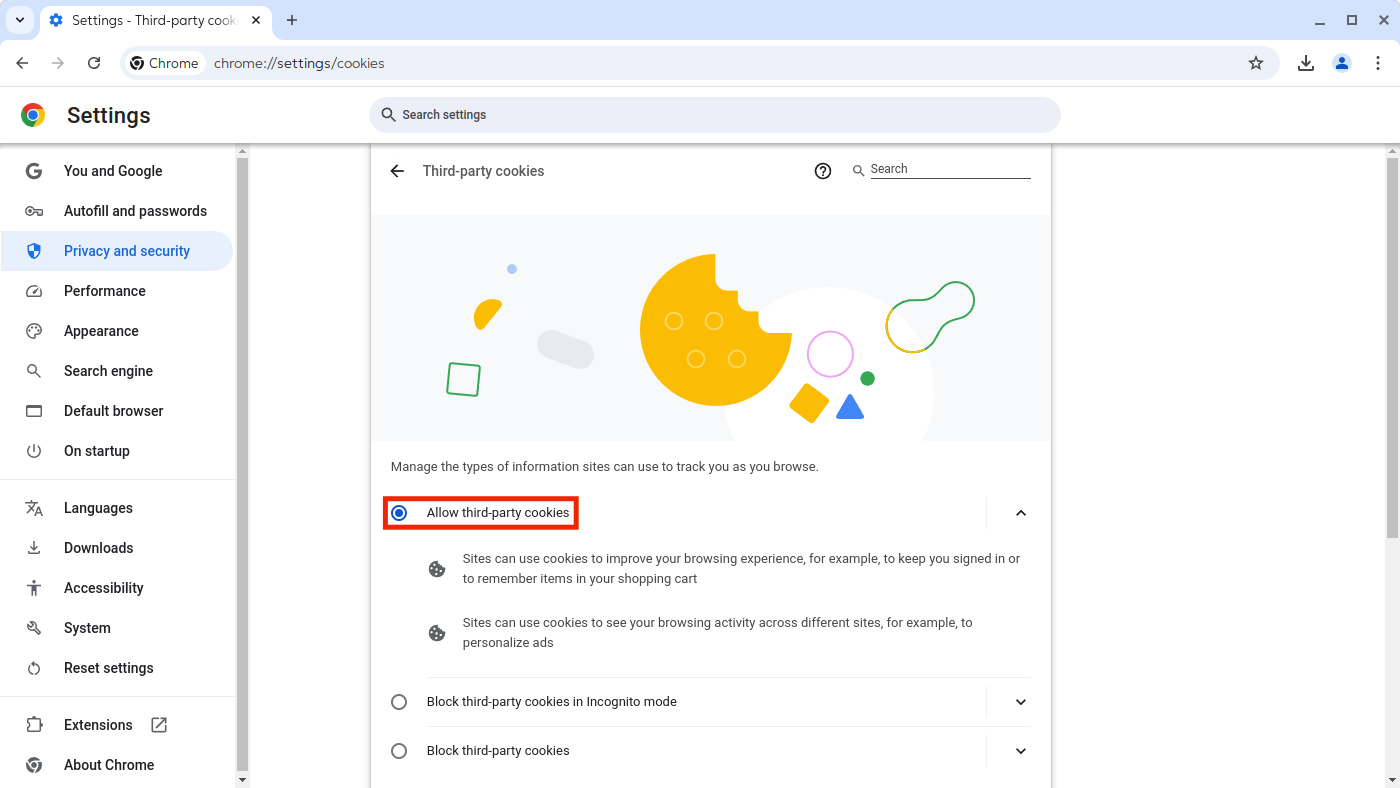
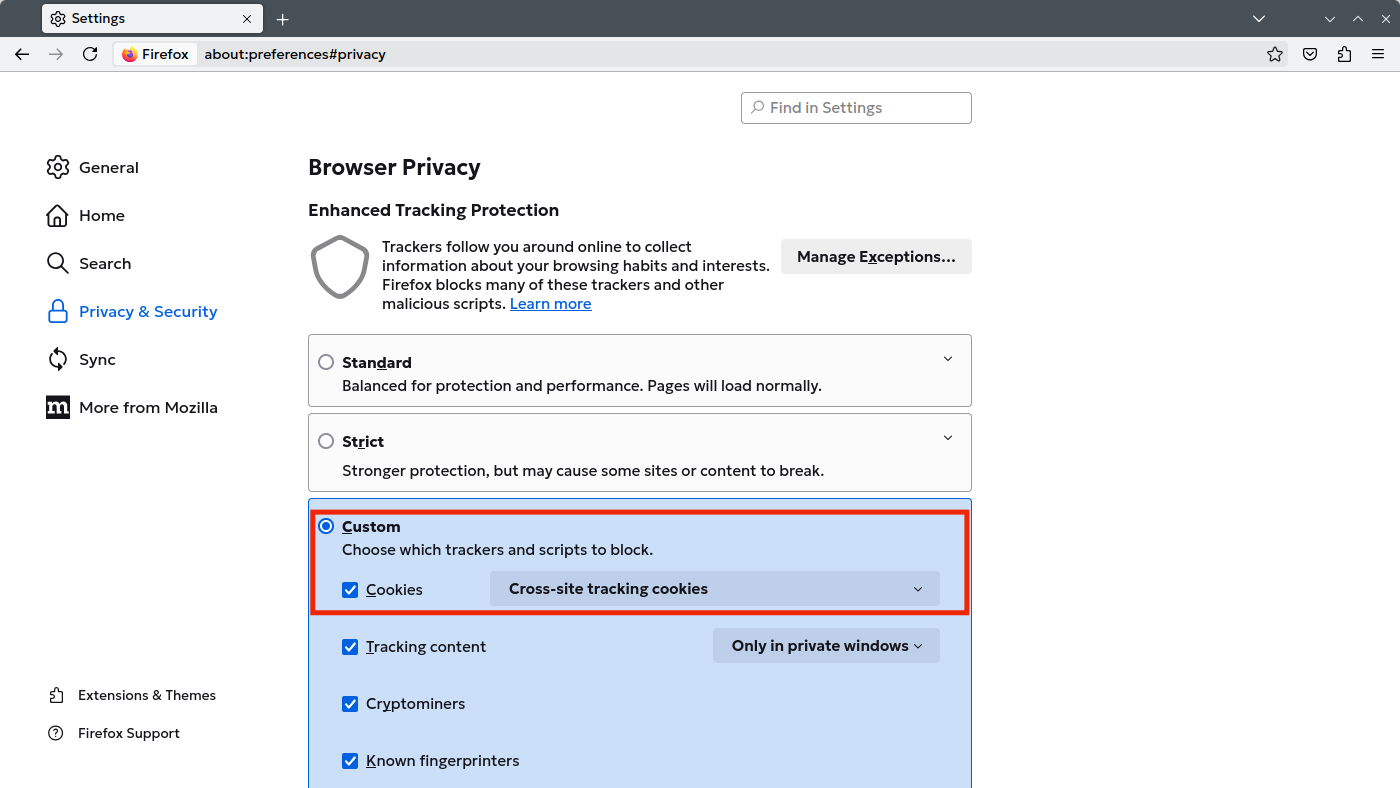
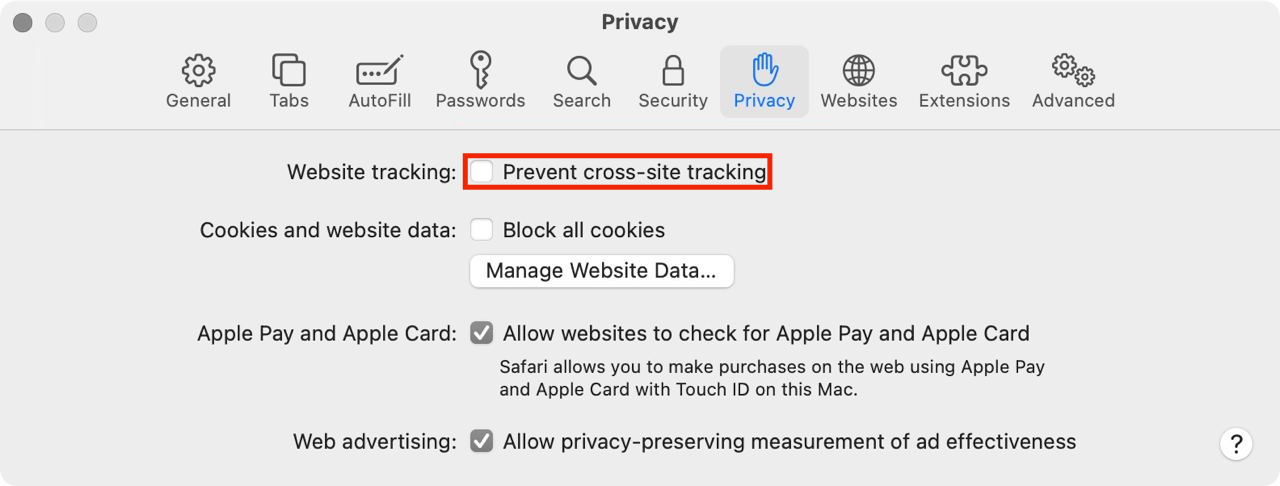
Test cases and Launches blocks display the Login button
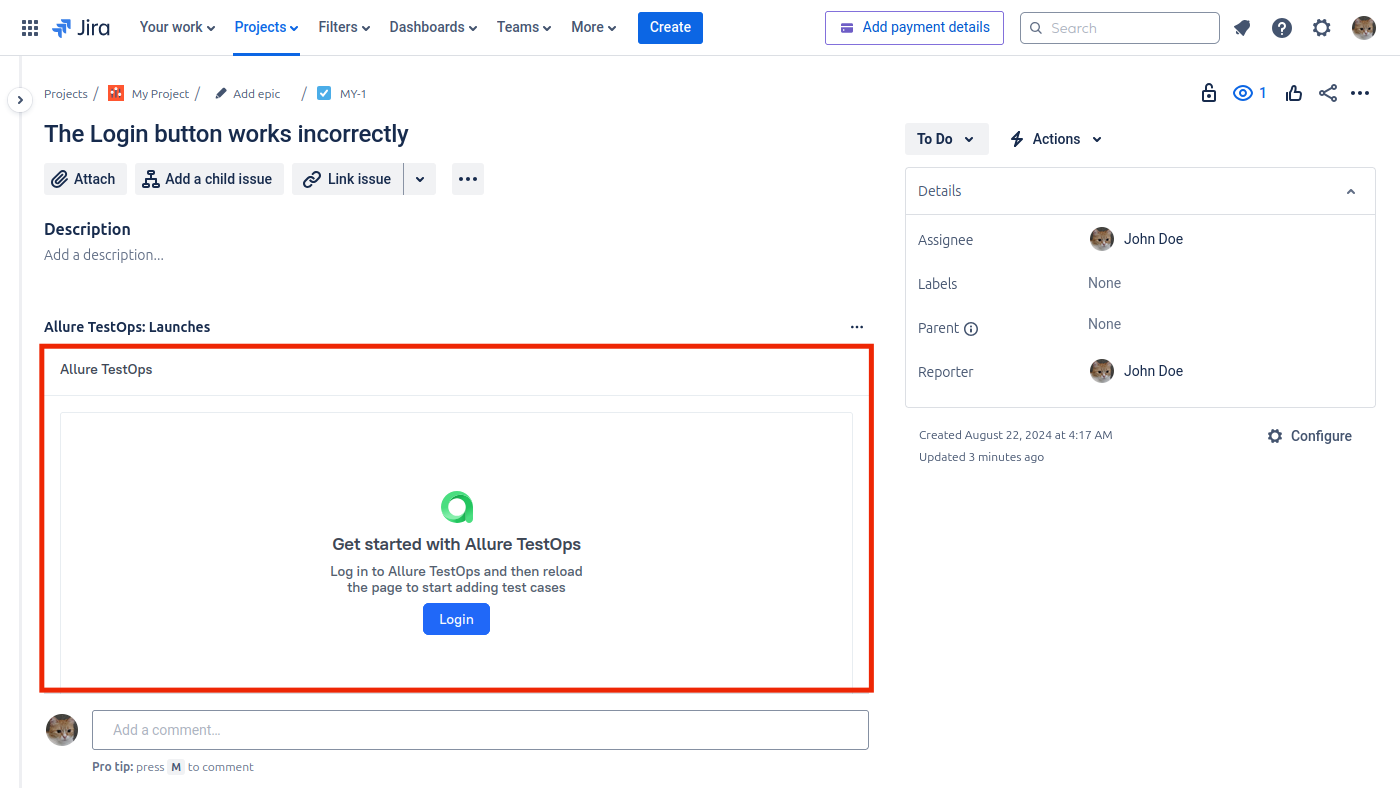
If you are signed in to Allure TestOps but you still see the Login button in Jira, this is most likely caused by the security settings in your web browser. Follow the browser-specific instructions below to make sure that the proper communication between Jira and the Allure TestOps is allowed.
Each user who encounters this error needs to do these steps.
Allure TestOps blocks display the message “Couldn't connect to Allure TestOps”
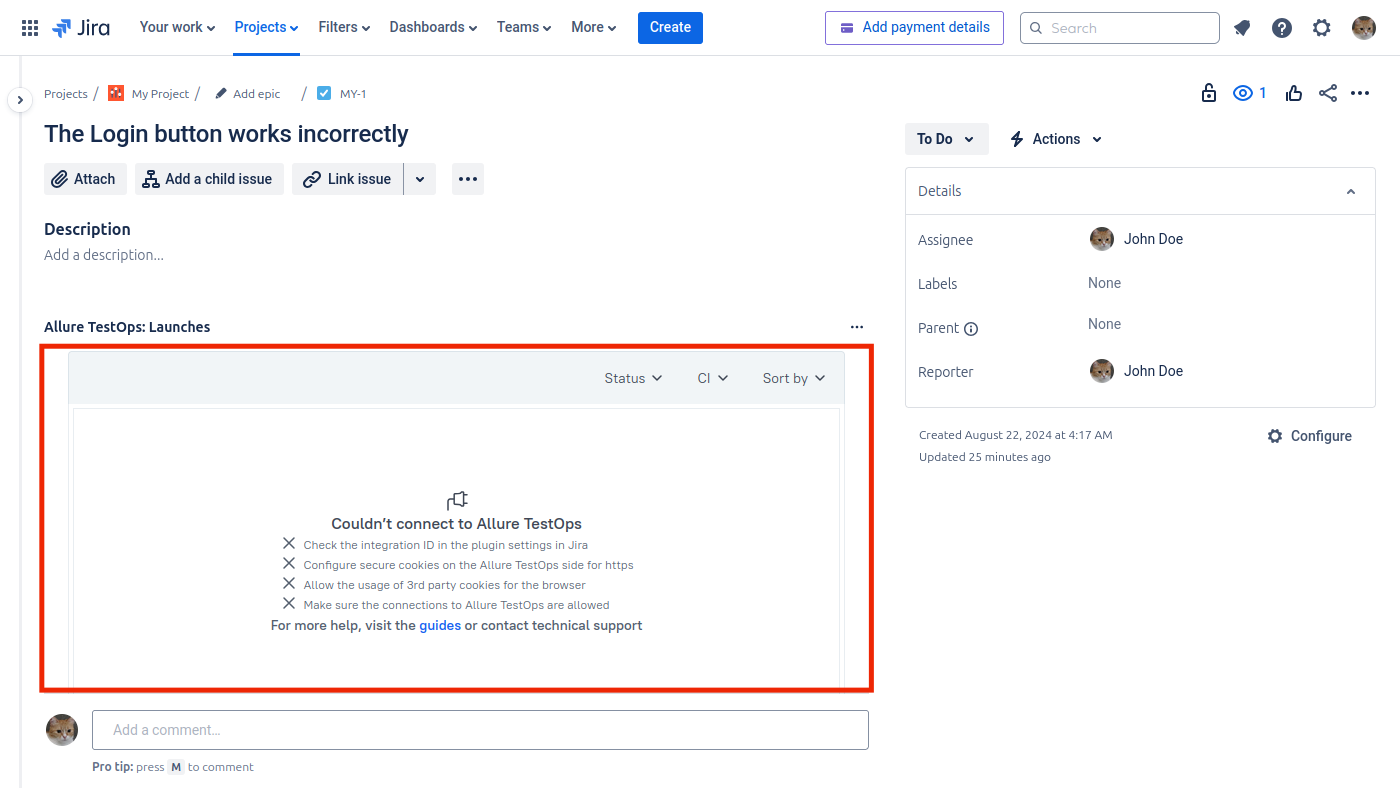
The message “Couldn't connect to Allure TestOps” means that an incorrect integration ID is specified in the plugin settings in Jira.
To fix the error:
- Find the relevant integration ID in Allure TestOps.
- Make sure that this ID is specified in the plugin settings.
Allure TestOps blocks display a connection failure icon or an error message
If the Allure TestOps blocks display a connection failure indicator (an icon or the text “502 Bad Gateway”) instead of data from Allure TestOps, go to your Allure TestOps instance and make sure that it is available.
If Allure TestOps opens but the problem remains, this means that the Jira Software Cloud policy does not allow the web page to communicate with the iFrame from your Allure TestOps domain. To solve this problem, you will need to contact Atlassian support. Before you do, we recommend you to identify the URL of the iframe section that isn’t displaying.
In Jira, open an issue page where the Allure TestOps content is expected to be displayed.
Open the developer tools in your browser:
Hover the area where the content from Allure TestOps is expected to be displayed. In the HTML source tree, find the
<iframe>element that corresponds to it.Copy the URL of the
srcattribute in the<iframe>element.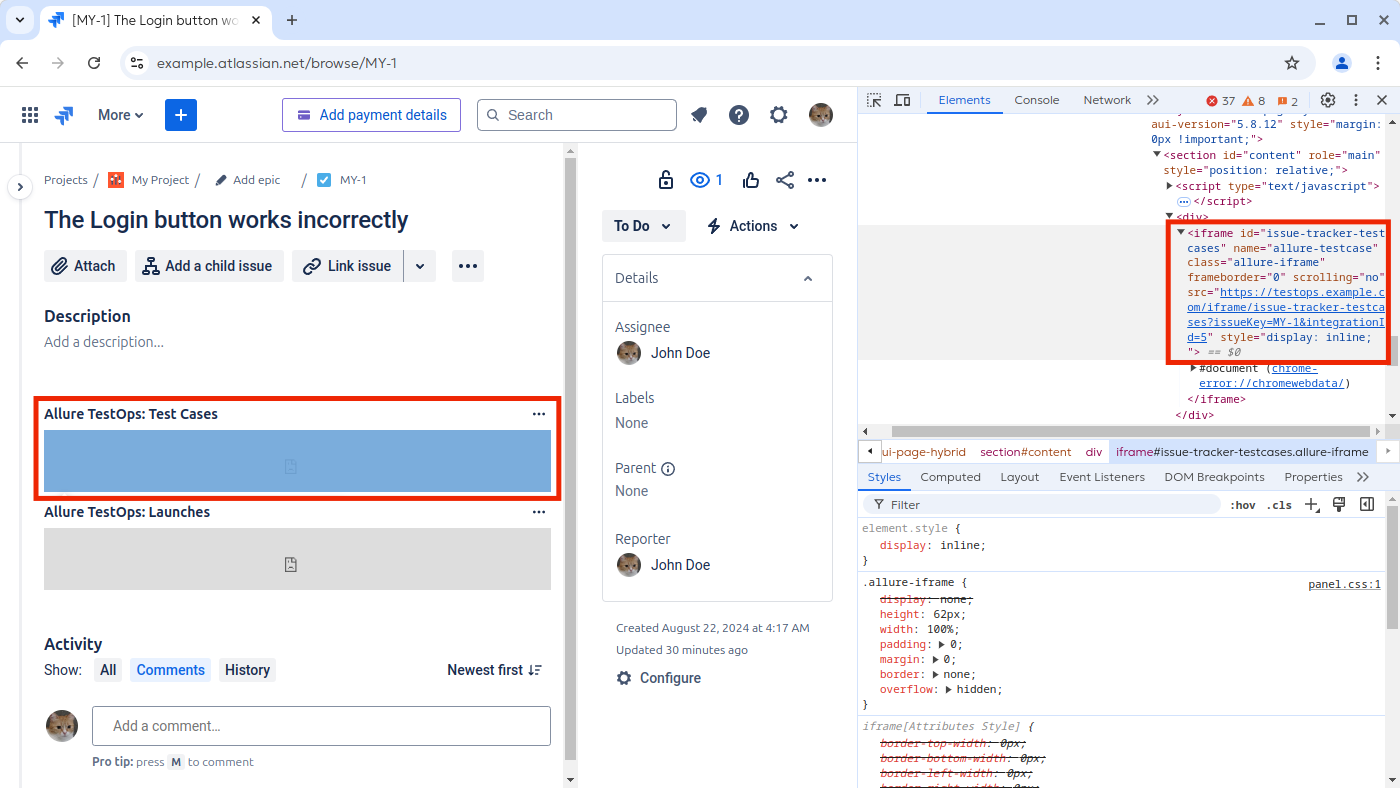
The web page may contain multiple
<iframe>elements, some of them within others. Make sure that the URL that you copied points to the Allure TestOps domain.Write to Atlassian support, providing them with the iFrame's URL and asking for the assistance or explanation why is it being blocked.
Deprecation of some JSC API endpoints in Aug / Sep 2025
Symptoms
The integration with Jira Software Cloud suddenly stops working somewhere in August / September 2025.
Cause
Products evolve, some of the evolution steps require getting rid of some old stuff and using something new. Atlassian is not an exclusion: please refer to this Atlassian change announcement. Long story short, some of the API endpoints on JSC side we used in the integration got deprecated and cannot be used anymore.
Solution
The only one way to get the integration working again is to upgrade your Allure TestOps instance to the most recent release of Allure TestOps that supports the new API endpoints added by Atlassian to JSC. The support of new API endpoints was added in Allure TestOps release 25.3.1.
