Integration with Jenkins
This page describes how to set up both Allure TestOps and Jenkins in a project that uses Jenkins to run tests.
Like all other CI integrations for Allure TestOps, this involves communication in two directions:
- The Jenkins build sends its status and test results to Allure TestOps.
- Allure TestOps uses Jenkins API to trigger new pipelines, optionally passing a test plan.
Once a pipeline run stops, the corresponding launch in Allure TestOps may be closed either manually or automatically, according to the Auto close policy.
To add Allure TestOps support in your Jenkins project:
- Install the plugin for Jenkins.
- Enable sending data from Jenkins.
- Enable triggering Jenkins builds.
- Parametrize jobs (if necessary).
1. Install the plugin for Jenkins
To install the Allure TestOps plugin, we recommend specifying its URL in the Jenkins settings. If your Jenkins instance does not have internet access, you can upload the HPI file with the plugin to Jenkins manually. The selected installation method does not affect the functionality of the plugin.
Specifying the URL
Select the latest version of the plugin from the allure-testops-jenkins page and copy the URL of the HPI file.
Please take into account, starting from the 15th Feb 2024 there are 2 versions of the plugin:
- version 4 for Jenkins 2.361.1 and later running on Java 17;
- version 3 for Jenkins earlier than 2.361.1 running on Java 11.
If you are using version 4, Java 17 must be installed on the Jenkins agent (runner). Otherwise, the plugin will not start and test result uploading will not work.
In Jenkins, go to Manage Jenkins → Manage Plugins → Advanced settings.
Under the Deploy Plugin section, paste the URL of the HPI file.
Click the Deploy button to confirm the installation of the plugin.
On the Download progress page, wait until each status is
Success.
File upload
Select the latest version of the plugin from the allure-testops-jenkins page and save the HPI file to a local directory on your device.
In Jenkins, go to Manage Jenkins → Manage Plugins → Advanced settings.
Under the Deploy Plugin section, click Browse and select the downloaded HPI file.
Click the Deploy button to confirm the installation of the plugin.
On the Download progress page, wait until each status is
Success.
2. Enable sending data from Jenkins
This section describes the second part of the two-way communication: sending job statuses and test results from Jenkins back to Allure TestOps. To configure this, any Allure TestOps user needs to generate an authentication token and add it to Jenkins, so that Jenkins can perform actions with that user's permissions.
The Jenkins job itself also needs to be modified so that it includes communicating with the instance. The plugin supports doing so for both freestyle projects and pipeline projects.
After configuring, run and check the job to make sure that everything works so far.
2.1. Create a token in Allure TestOps
In Allure TestOps, click your avatar and go to API Tokens.
Click + Token.
Enter a name for the token (e.g., "Token for Jenkins") and click Create.
Allure TestOps will generate the token and display it in a modal window.
Click the Copy icon to copy the token into clipboard. You will need this token in the next step.
2.2. Specify the instance and token in Jenkins
In Jenkins, go to Manage Jenkins → System.
Under the Allure section, click Add Allure Server → Allure Server.
Fill in the fields:
- ID — a name to help you recognize the Allure TestOps instance.
- Endpoint — the URL of the Allure TestOps instance.
Near the Credentials field, click Add → Jenkins.
In the dialog that appears, fill in the fields:
- Kind — “Secret text”.
- Secret — the API token that you got on step 2.1.
- ID — a name to help you recognize the credentials, e.g., “testops-credentials”.
Click Add to close the dialog.
In the Credentials drop-down list, select the ID of the stored credentials, e.g., “testops-credentials”.
If your Allure TestOps instance uses a self-signed SSL certificate, uncheck the Enable certificate validation checkbox. Otherwise, leave it checked.
Click Test connection. If the credentials are correct, a "Successfully authorized as ⟨USERNAME⟩" message will appear within a few seconds.
Click Advanced to configure additional parameters:
- Threads count — maximum number of threads for uploading files to the instance.
- Batch size — maximum number of files to upload to the instance at a time (by one thread).
- Results depth — number of subdirectory levels in the test results directory to scan and upload. “0” means no subdirectories will be uploaded.
- Process interval — minimum interval (in seconds) to wait between sending batches of files (by one thread).
- Indexing interval — interval (in seconds) to wait between scans of the test results directory.
- Delay interval — minimum interval (in seconds) to wait before uploading a newly created file (to avoid uploading half-written files).
- Delay before upload finish — interval (in seconds) to wait after the job is finished before assuming that no other files will appear in the directory. This is to avoid issues with some test runners that may spawn file writers in new processes.
Click Save at the bottom of the page.
2.3a. Modify a freestyle project
In Jenkins, a freestyle project is a build configuration for which you add and edit steps via the web interface. Once the Allure TestOps plugin is installed, you can use the same web interface to enable and configure automatic upload of test results to the Allure TestOps instance.
In Jenkins, select a job you want to enable upload for.
In the menu on the left, click Configure.
Under the Build Environment section, check the Allure: upload results checkbox.
Fill in the fields:
- Server — the name of the Allure TestOps instance that you specified on step 2.2.
- Project — the ID of the Allure TestOps project.
- Launch name — a template for naming test launches. You can use any Jenkins' environment variables (see the /env-vars.html page on your Jenkins instance for the full list).
- Launch tags — comma-separated list of tags that should be assigned to the test launch.
Click Add results → Results.
In the Results → Path field, specify the path to the test results directory, e.g., “build/allure-results”.
If you have multiple build steps generating test results into multiple directories, use the Add button to specify more paths.
Please note that the Jenkins plugin currently does not support wildcards and other patterns in the Path field.
Click Advanced to configure additional job parameters:
Silent mode — if checked, a connection failure when attempting to upload test results will not be treated as a job failure.
We recommend using this mode only if you have other means of viewing test results (e.g., if you also have the Allure Report plugin installed in Jenkins).
Index Existing Files — if checked, Allure TestOps will upload all files found in the target directory, even if they were not updated during this run.
Click Save.
2.3b. Modify a Jenkins Pipeline script
If you store the job in a Jenkins Pipeline script, the Allure TestOps plugin will add a withAllureUpload() block and a web interface for generating a snippet which uses it.
In Jenkins, select a job you want to enable upload for.
In the menu on the left, click Pipeline Syntax.
An interface for generating code snippets for Jenkins Pipeline will open.
In the Sample Step drop-down list, select “withAllureUpload: Allure: upload results”.
Fill in the fields:
- Server — the name of the Allure TestOps instance that you specified on step 2.2.
- Project — the ID of the Allure TestOps project.
- Launch name — a template for naming test launches. You can use any Jenkins' environment variables (see the /env-vars.html page on your Jenkins installation for the full list).
- Launch tags — comma-separated list of tags that should be assigned to the test launch.
Click Add results → Results.
In the Results → Path field, specify the path to the test results directory, e.g., “build/allure-results”.
If you have multiple build steps generating test results into multiple directories, use the Add button to specify more paths.
Please note that the Jenkins plugin currently does not support wildcards and other patterns in the Path field.
Click Advanced to configure additional job parameters:
Silent mode — if checked, a connection failure when attempting to upload test results will not be treated as a job failure.
We recommend using this mode only if you have other means of viewing test results (e.g., if you also have the Allure Report plugin installed in Jenkins).
Index Existing Files — if checked, Allure TestOps will upload all files found in the target directory, even if they were not updated during this run.
Click Generate Pipeline Script.
In the area below the button, the generated snippet will appear, for example:
withAllureUpload(name: '${JOB_NAME} - #${BUILD_NUMBER}', projectId: '1', results: [[path: 'build/allure-results']], serverId: 'Allure TestOps production', tags: '') {
    // some block
}
Copy the generated snippet into clipboard to use later.
Open the Groovy script that you use for the project. It may be:
- the script in the text box in Configure → Pipeline;
- the Jenkinsfile under the project's version control system (see the official documentation).
Find the command (or the set of commands) that runs the tests and wrap them into the
withAllureUpload()block from the generated snippet.If you use the Declarative Pipeline syntax, the
withAllureUpload()block must be placed inside astepsblock. For example:pipeline { agent any stages { stage('Build') { steps { git 'https://github.com/johndoe/testops-example.git' withAllureUpload(name: '${JOB_NAME} - #${BUILD_NUMBER}', projectId: '1', results: [[path: 'build/allure-results']], serverId: 'Allure TestOps production', tags: '') { sh './gradlew clean test' } } } } }If you use the Scripted Pipeline syntax, the
withAllureUpload()block must be placed inside astage()block. For example:node { stage('Build') { git 'https://github.com/johndoe/testops-example.git' withAllureUpload(name: '${JOB_NAME} - #${BUILD_NUMBER}', projectId: '1', results: [[path: 'build/allure-results']], serverId: 'Allure TestOps production', tags: '') { sh './gradlew clean test' } } }Save the script. In the case of a Jenkinsfile, make sure to commit the changes to the repository.
2.4. Run and check the job
In Jenkins, select the job for which you configured the Allure TestOps integration.
Click Build Now.
Wait until the build finishes.
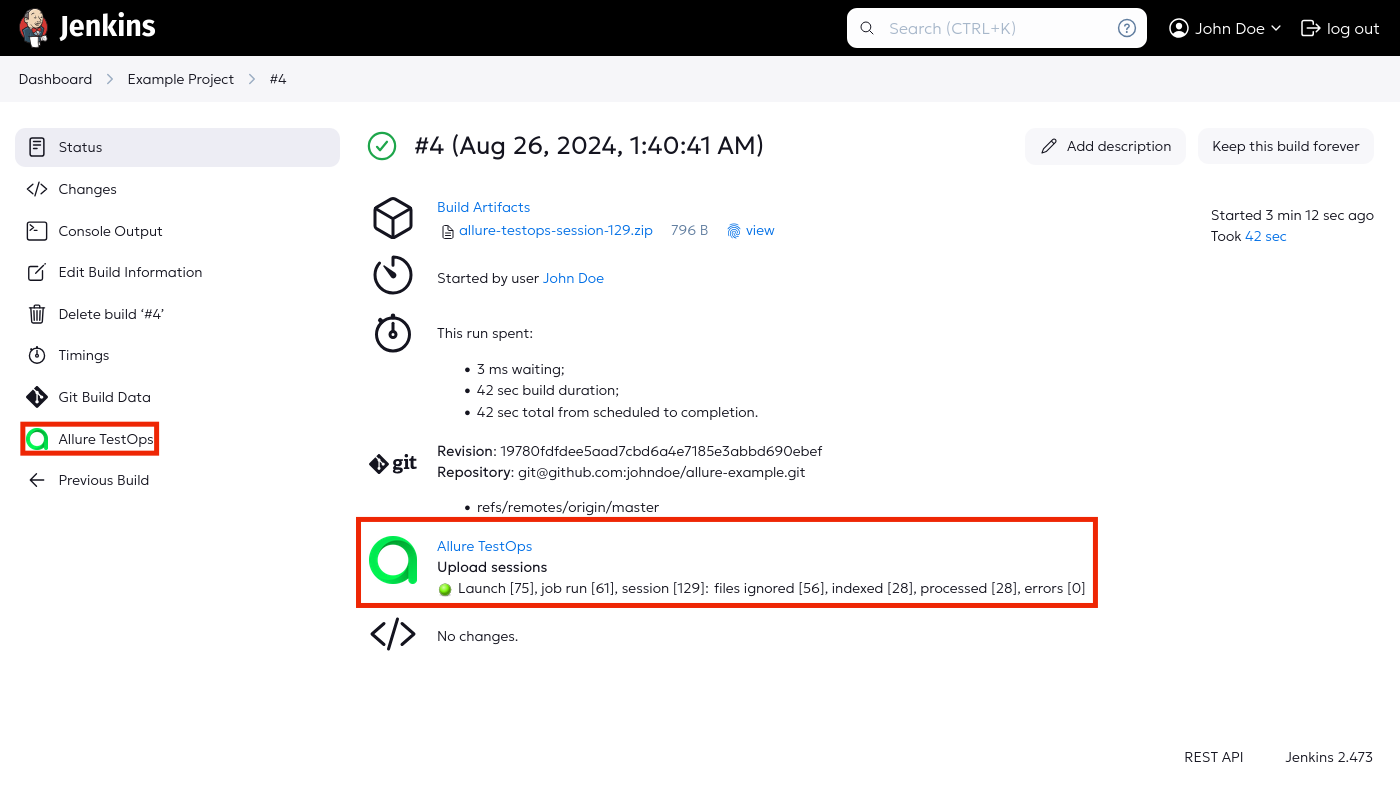
In the Build History, click the latest build.
Both in the menu and at the bottom of the page, there should be links to the test report at Allure TestOps. Make sure that it is present and works.
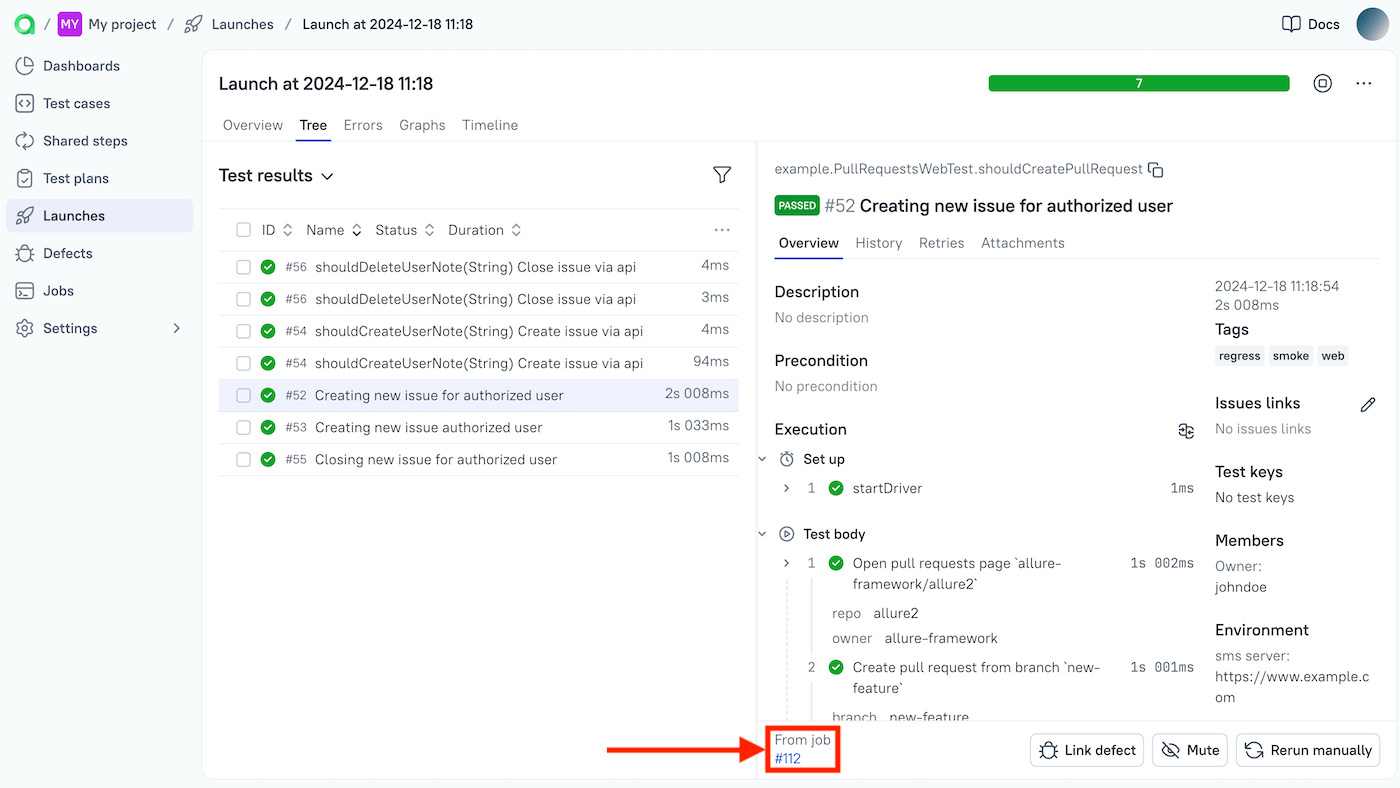
In the test report at Allure TestOps, open a single test's results.
At the bottom of the page, there should be a link back to Jenkins. Make sure that it is present and works.
3. Enable triggering Jenkins builds
Integration with the Jenkins instance needs to be configured on two levels.
First, the administrator needs to specify the URL of Jenkins instance.
Then, any project owner needs to create an authentication token in Jenkins, add it to Allure TestOps, and configure the job in Allure TestOps.
3.1. Specify Jenkins instance in Allure TestOps
Log into Allure TestOps using an administrator account.
Go to Administration → Integrations.
Click + Add integration in the upper-right corner of the page.
In the dialog that appears, select Jenkins.
Fill in the fields:
- Name — a name to help you recognize the Jenkins instance, e.g., “Jenkins production”.
- Endpoint — the URL of the Jenkins instance, e.g., “https://jenkins.example.com/”.
If your Jenkins instance uses a self-signed SSL certificate, check the Disable certificate validation checkbox.
Click Add integration.
3.2. Create a token in Jenkins
In Jenkins, click your username and go to Security.
Under the API Token section, click Add new Token.
Enter a name (e.g., “Token for Allure TestOps”), then click Generate.
In the dialog that appears, click the Copy icon to copy the token into clipboard.
You will need this token on the next step.
3.3. Add the token to an Allure TestOps project
In Allure TestOps, open your project.
Go to Settings → Integrations.
Under the Available integrations, find the Jenkins integration and click Add integration next to it.
In the dialog that appears, fill in the fields:
- Username — the Jenkins username (from the profile page in Jenkins).
- API token — the API token that you got on step 3.2.
Click Test connection. If the credentials are correct, a "Connection established" message will appear within a few seconds.
Click Add integration to save the settings.
3.4. Configure the job in Allure TestOps
In Allure TestOps, open your project.
Go to Jobs.
The page should contain a new job automatically added and configured during the launch on step 2.4.
Click
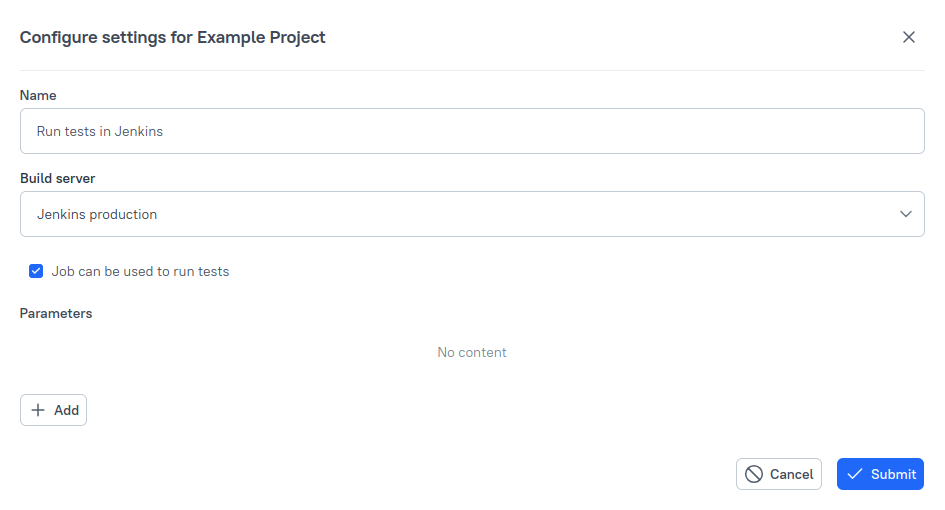
⋯next to the job, then select Configure.In the dialog that appears, fill in the fields:
- Name — a name to help you recognize the job.
- Build server — the name of the integration that you added on step 3.1.
- Job can be used to run tests — if checked, users will be able to trigger this job from Allure TestOps.
- Parameters — parameters that should be passed to Jenkins via environment variables, see Environment.
Click Submit.
4. Parametrize jobs
Jenkins supports parametrized builds. Allure TestOps integrates this feature with its own Environment concept, which lets you both set parameters for new jobs and see parameters set for jobs that were started outside Allure TestOps.
In Jenkins, the project owner needs to add variables and their default values.
In Allure TestOps, the administrator needs to declare the required display names for parameters globally. Then the project owner needs to configure the parameters mapping both in the project settings and in the job settings.
If your project's repository has multiple branches, make sure to create a Branch environment variable in Allure TestOps and pass it to your job. This special name will instruct Jenkins which of the branches it should use.
4.1. Set the default values in Jenkins
In Jenkins, select the job for which you configured the Allure TestOps integration.
In the menu on the left, click Configure.
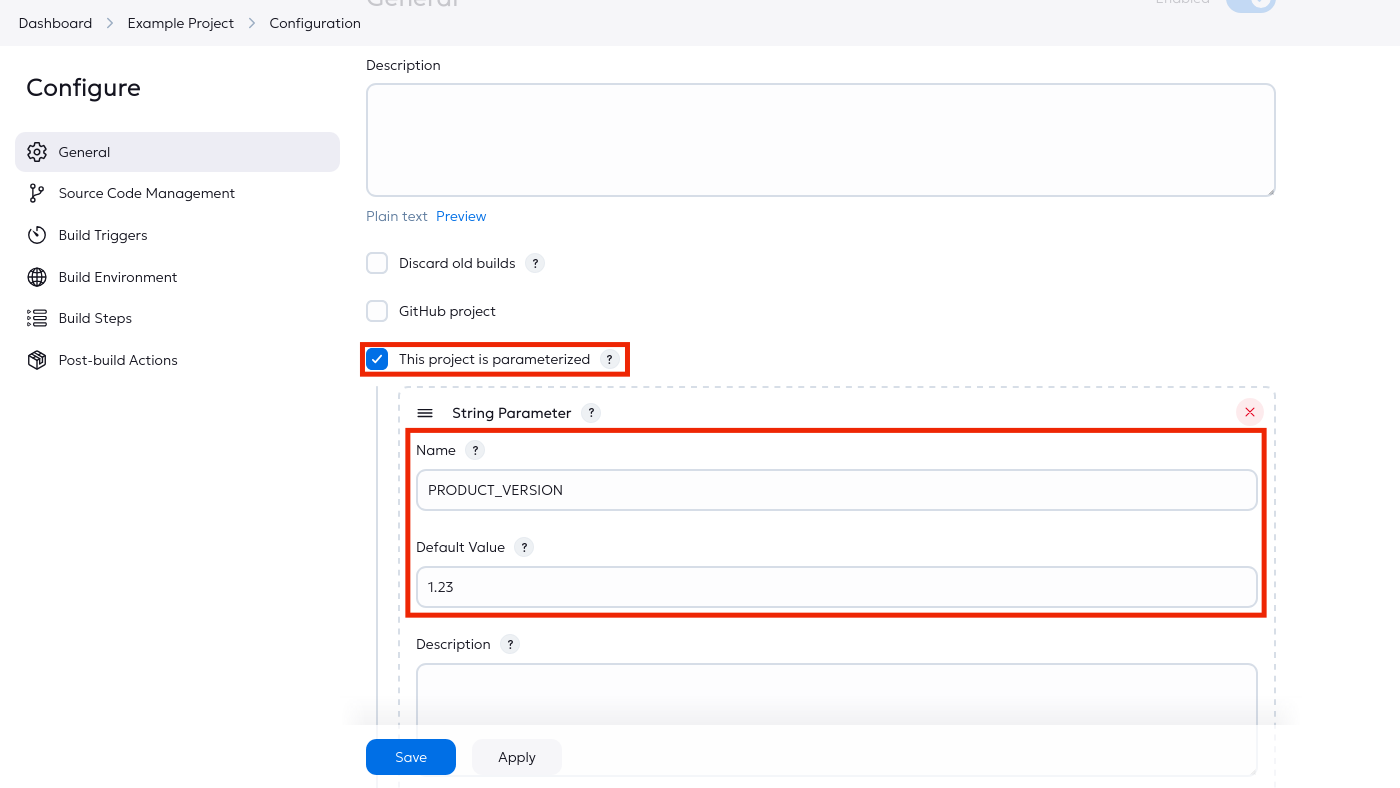
Under the General section, check the This project is parameterized checkbox.
For each parameter that you want to add, click Add Parameter → String Parameter and fill in the fields:
- Name — the name of the variable.
- Default Value — the default value that should be used unless overriden for a specific launch.
Click Save to save the new parameters.
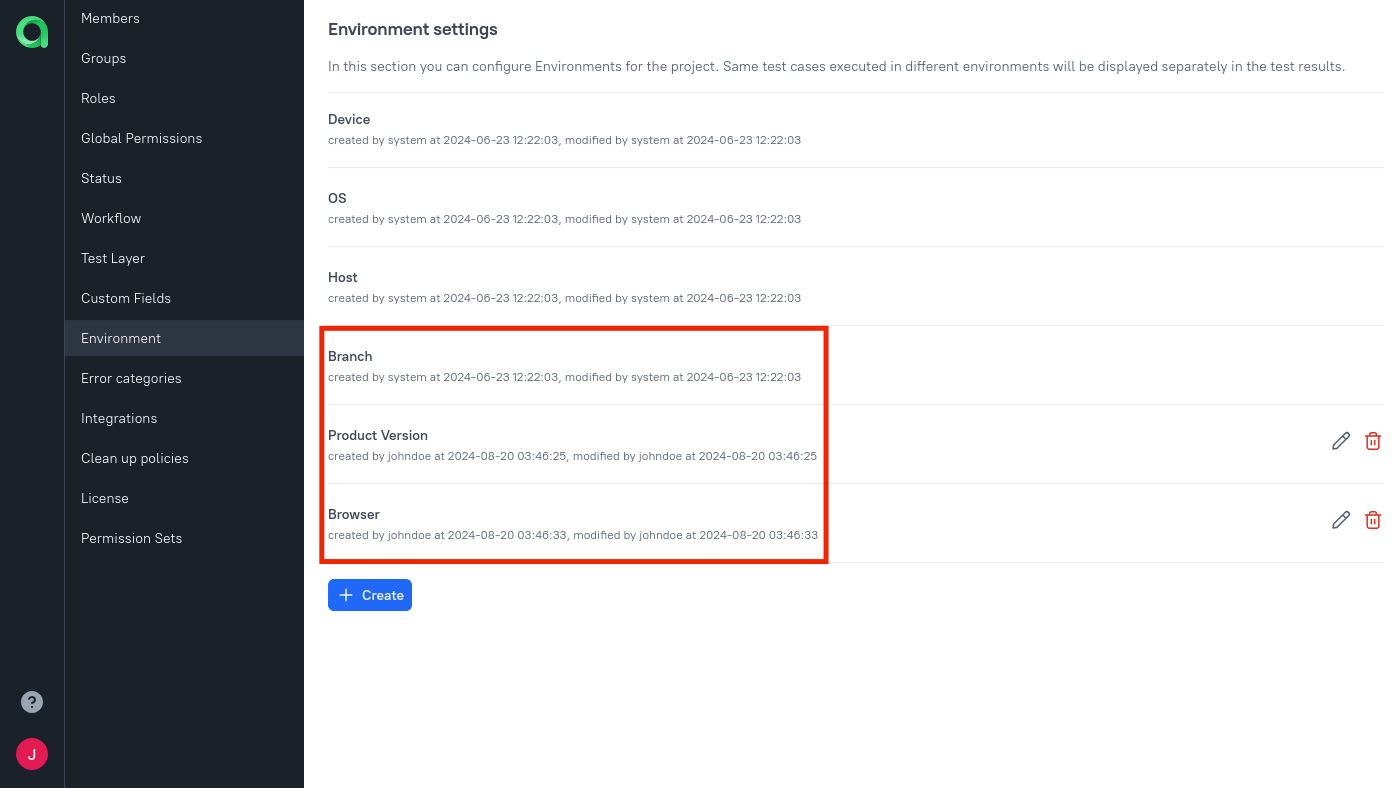
4.2. Add global parameter names in Allure TestOps
Log into Allure TestOps using an administrator account.
Go to Administration → Environment.
For each parameter name that you want to add, click + Create, enter the name of the new parameter and click Submit.
Note that this name can be a human-readable label and does not have to be equal to the name from step 4.1.
4.3. Map parameters to environment variables in Allure TestOps
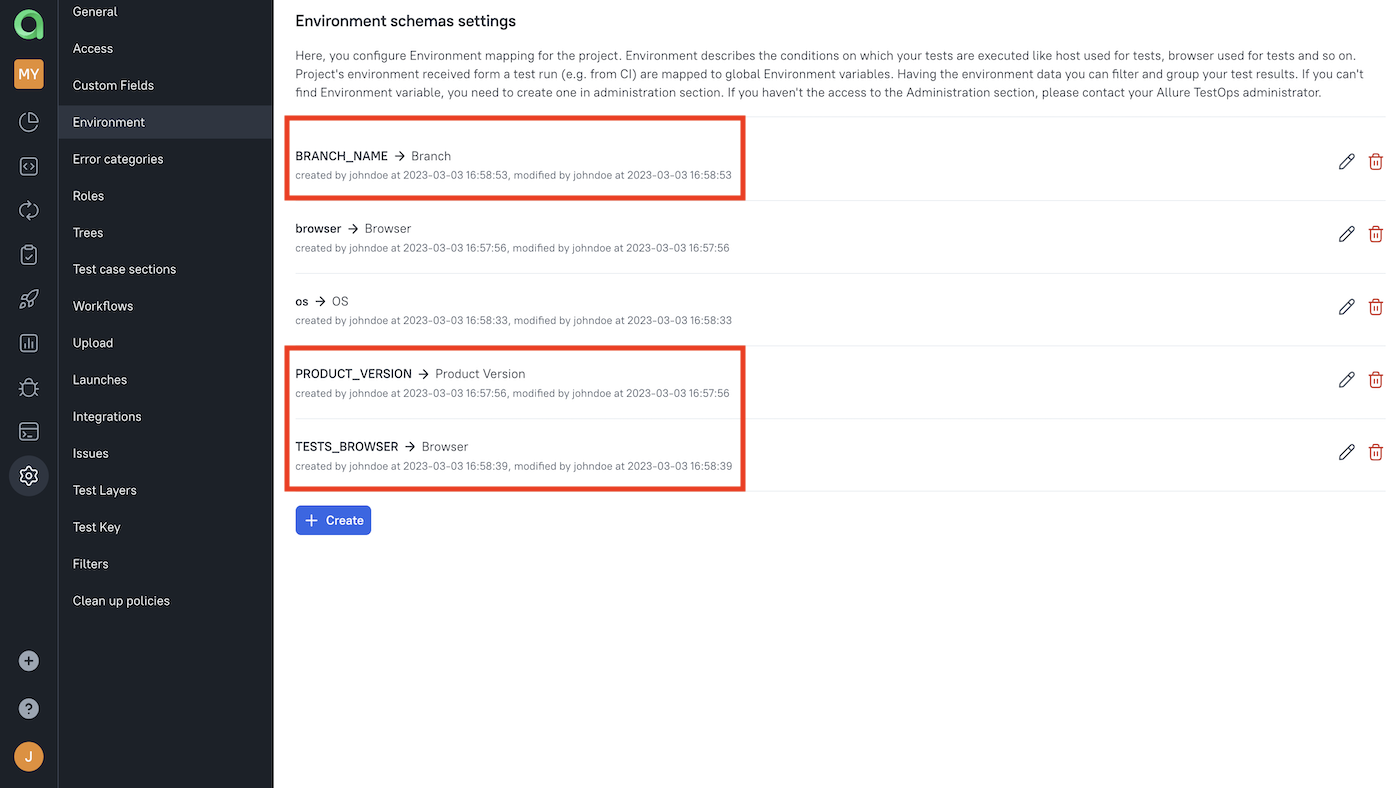
In Allure TestOps, open your project.
Go to Settings → Environment.
For each parameter name that you want to use:
- Click + Create if the parameter is not in the list. Otherwise, click the Edit icon next to its name.
- In the Mapping key field, specify the name of the environment variable name from step 4.1.
- In the Environment variable field, select the global parameter name from step 4.2.
- Click Submit.
4.4. Add the parameters into the Allure TestOps job
In Allure TestOps, open your project.
Go to Jobs.
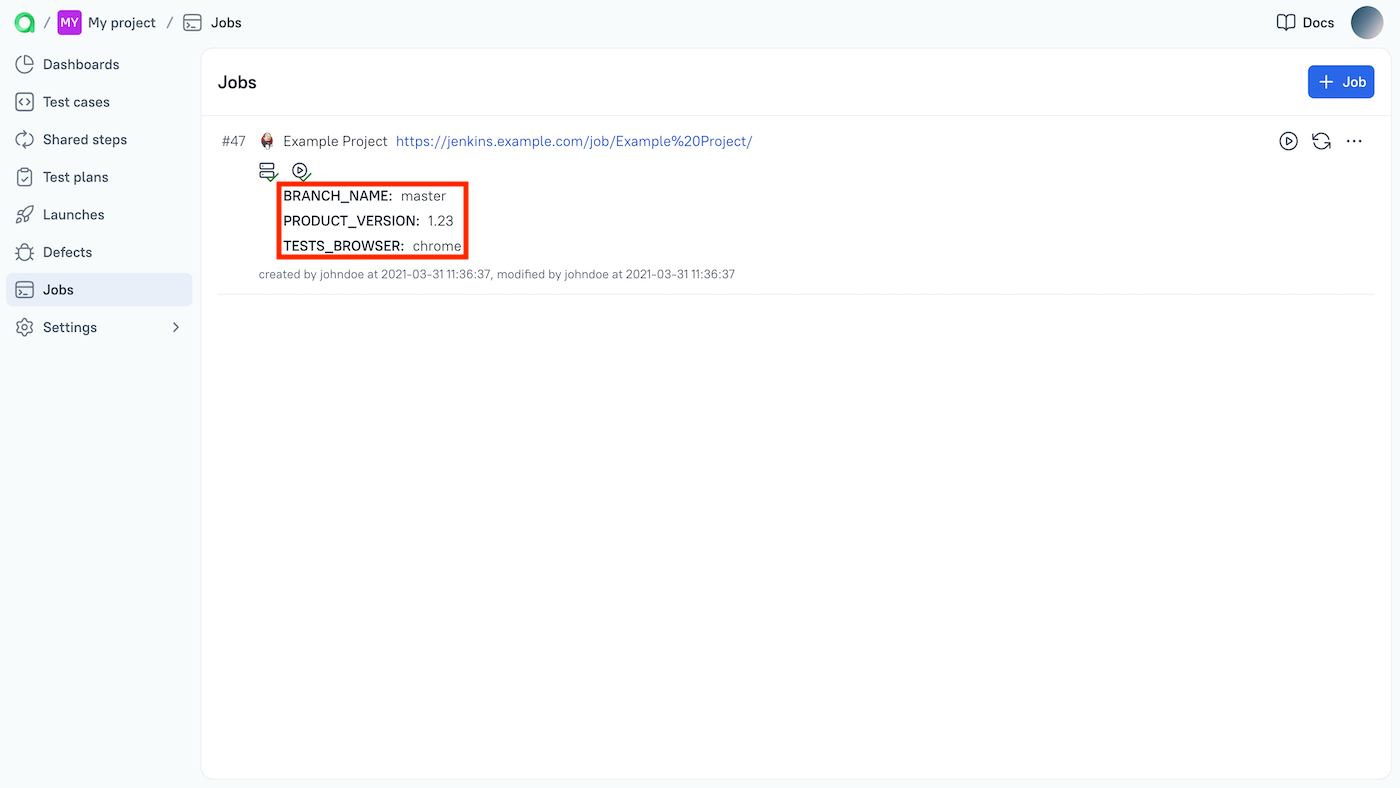
Find the job which you want to parametrize. Click the Refresh button next to it.
The parameter names and their default values should appear in the job description.
Click
⋯next to the job, then select Configure.The job settings dialog will appear, containing the Parameters section.
For each parameter that you want to use, select the corresponding environment variable from step 4.2.
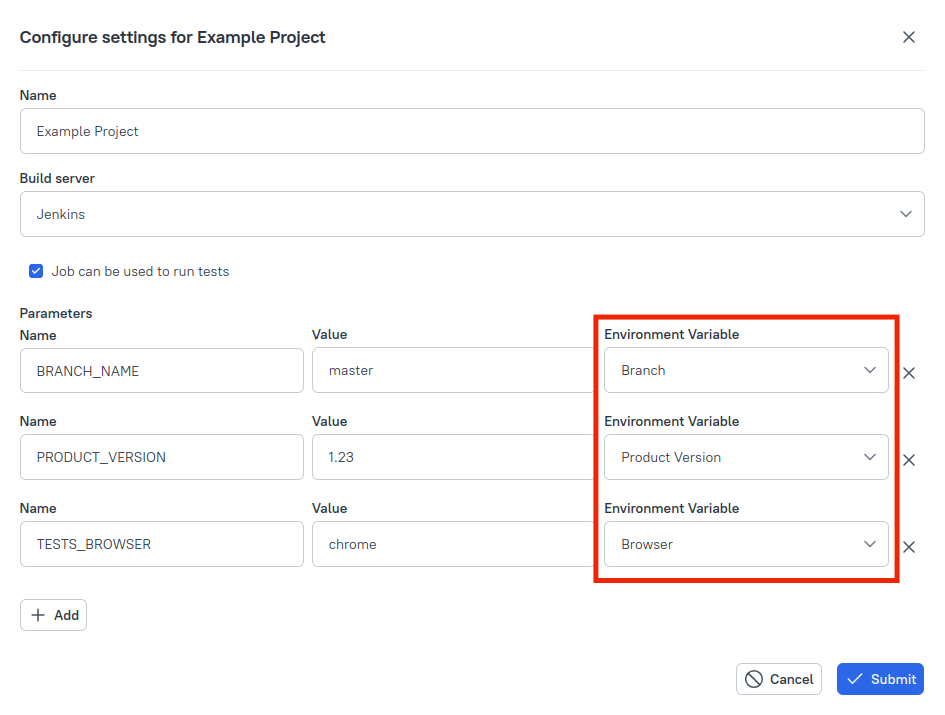
Click Submit.
Troubleshooting
Jenkins plugin cannot start uploading data ("Could not create session for closed launch" message in log)
In some cases you may encounter a situation where Jenkins plugin cannot upload data to Allure TestOps and writes a "Could not create session for closed launch" message into the log.
This is related to the fact that Jenkins pipelines do not have a unique identifier other than their name. Hence, if you delete a pipeline and create a new one with the same name, you would not be able to upload data to Allure TestOps because that name has already been used.
To fix this, rename the pipeline to a name you haven't used before.
Jenkins plugin cannot start uploading data (java.lang.UnsupportedClassVersionError)
Problem
Errors occurred that caused problems with uploading test results:
java.lang.UnsupportedClassVersionError: <...>/jenkins/callable/UploadResultsCallable has been compiled by a more recent version of
the Java Runtime (class file version 61.0), this version of the Java Runtime only recognizes class file versions up to 55.0
The errors are followed by:
Caused: hudson.remoting.ProxyException: <...>.jenkins.AllurePluginException: Could not stop uploader
Reason
It means you are using the Allure TestOps plugin incompatible with the current Jenkins version (Jenkins Java is newer than the version required to start the Allure TestOps plugin).
Solution
You need to upgrade the Allure TestOps plugin for Jenkins to the release compatible with Java 17.
Please also check your Jenkins version. Make sure to install the same Java version on Jenkins agents as on the Jenkins host. For Jenkins versions above 2.361.1, Java 17 is required. If the host and agent versions differ, the plugin code will not be able to run on the agent, making agent usage impossible.