Integration with GitLab
This page describes how to configure Allure TestOps integration with GitLab in a project that uses GitLab to run tests.
Like all other CI integrations for Allure TestOps, this involves communication in two directions:
- A job in a GitLab pipeline uses allurectl to send its status and test results to Allure TestOps.
- Allure TestOps uses GitLab API to trigger new pipelines, optionally passing a test plan.
Once a pipeline run stops, the corresponding launch in Allure TestOps may be closed either manually or automatically, according to the auto-close policy settings.
To add Allure TestOps support in your GitLab project:
- Enable sending data from GitLab.
- Enable triggering GitLab pipelines.
- Parametrize jobs (if necessary).
1. Enable sending data from GitLab
For GitLab to send pipeline statuses and test results to Allure TestOps, you need to generate an authentication token in Allure TestOps, add the token to GitLab, and modify the pipeline itself.
Then, run and check the pipeline to make sure that everything works so far.
1.1. Create a token in Allure TestOps
In Allure TestOps, click your avatar and go to API Tokens.
Click + Token.
Enter a name for the token (e.g., "Token for GitLab") and click Create.
Allure TestOps will generate the token and display it in a modal window.
Click the Copy icon to copy the token into clipboard. You will need this token in the next step.
1.2. Specify the token in GitLab
In GitLab, open the project and go to Settings → CI/CD.
Under the Variables section, click Add variable.
In the dialog that appears, fill in the fields:
- Type — Variable;
- Visibility — Masked;
- Key — “ALLURE_TOKEN”;
- Value — the API token that you got on step 1.1.
Click Add variable to save the settings.
1.3. Modify the pipeline
To make changes to the pipeline, edit the .gitlab-ci.yml in your GitLab repository. You can do it either in a local directory or in the GitLab's web-based text editor (CI/CD → Editor in the old navigation, Build → Pipeline editor in the new navigation).
For each job that runs tests, do the following:
Add a
before_scriptcommand that downloads the allurectl tool and makes it executable.In the example below, we use curl for downloading the file. If curl is not included in the Docker image that you use for the job, use wget or a similar tool.
Alternatively, you can build and use your own Docker image with allurectl included in it.
Add or extend the job's
variablesblock. It must include the following variables:ALLURE_ENDPOINT— the URL of the Allure TestOps instance.ALLURE_PROJECT_ID— the ID of the Allure TestOps project.ALLURE_RESULTS— the path to the test results directory, e.g., “build/allure-results”. If there are multiple test result directories in your project, you can separate them with commas or use a wildcard pattern, e.g., “modules/*/build/allure-results”.
Wrap the command that runs the tests into the
./allurectl watchcommand.
Example
Assume we have a Java project with a .gitlab-ci.yml file like this:
test:
  stage: test
  image: gradle
  script:
    - gradle clean test
With Allure TestOps integration, the file will look something like this:
test:
  stage: test
  image: gradle
  variables:
    ALLURE_ENDPOINT: https://testops.example.com
    ALLURE_PROJECT_ID: 1
    ALLURE_RESULTS: build/allure-results
  before_script:
    - curl -fsSL https://github.com/allure-framework/allurectl/releases/latest/download/allurectl_linux_amd64 -o allurectl
    - chmod +x allurectl
  script:
    - ./allurectl watch -- gradle clean test
1.4. Run and check the pipeline
In GitLab, open the project and go to the pipeline run triggered by the latest commit.
If the pipeline run is not yet finished, wait until it finishes.
In the pipeline run details, click the job that runs tests.
Close to the end of its log, there should be a link to the test report at Allure TestOps. Make sure that it is present and works.
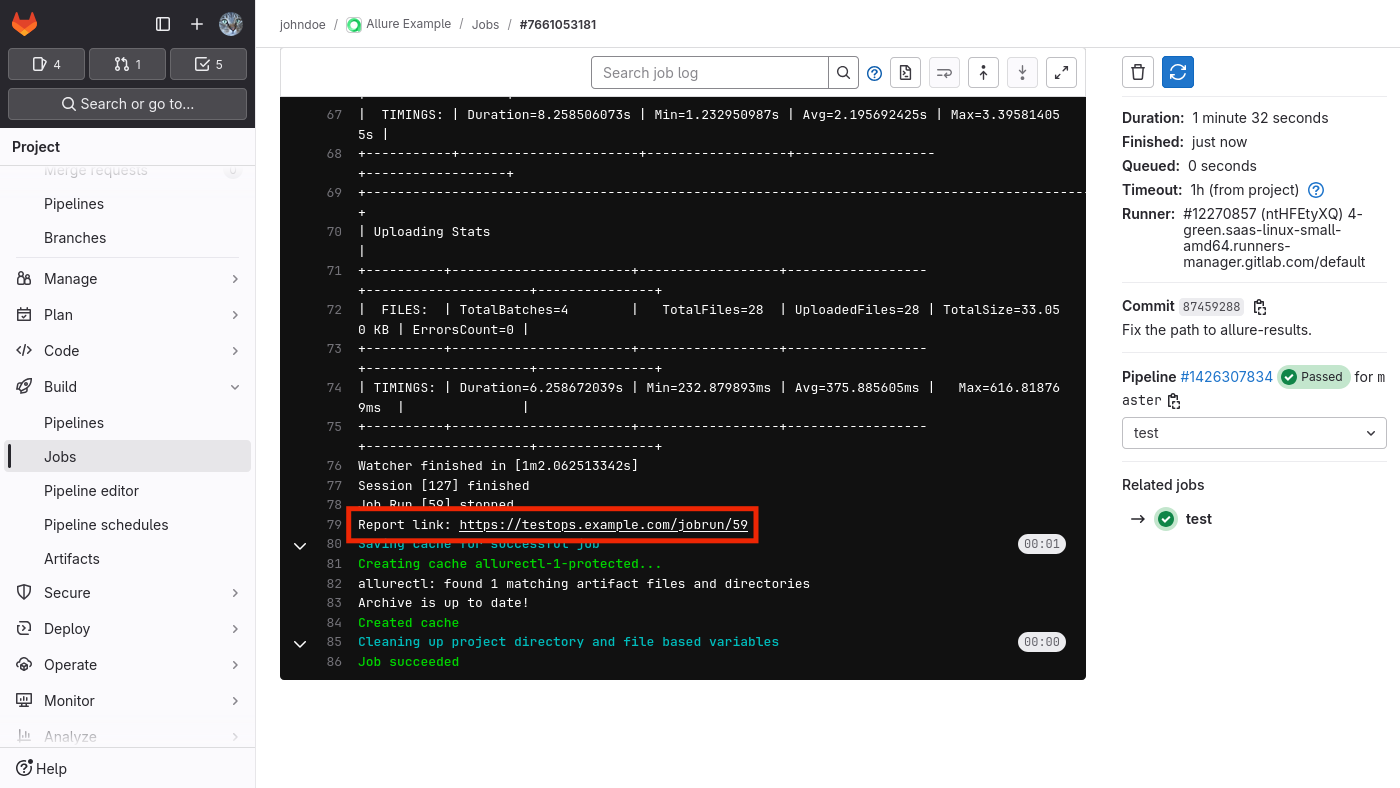
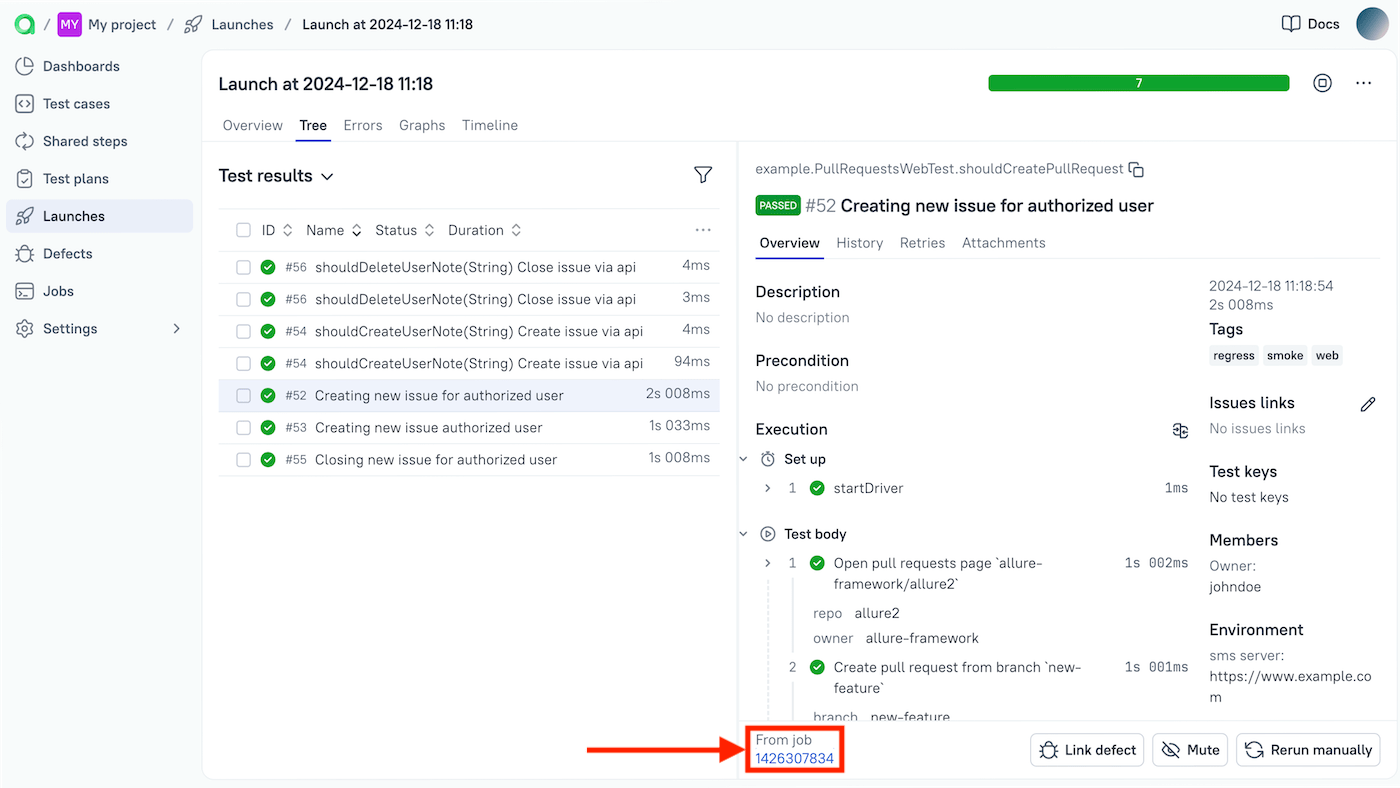
In the Allure TestOps launch, open a single test result.
At the bottom of the page, there should be a link back to the GitLab pipeline. Make sure that it is present and works.
2. Enable triggering GitLab pipelines
On the Allure TestOps side, the integration with GitLab needs to be configured on two levels.
First, the administrator enables integration with a GitLab instance by providing the instance URL.
Then the project owner needs to add the enabled integration to their project: create an authentication token in GitLab, add it to Allure TestOps, and configure the job in Allure TestOps.
2.1. Enable integration with a GitLab instance in Allure TestOps
Log into Allure TestOps using an administrator account.
Go to Administration → Integrations.
Click + Add integration in the top right corner of the page.
In the dialog that appears, select GitLab.
Fill in the fields:
- Name — a name to help you recognize the GitLab instance, e.g., “GitLab production”.
- Endpoint — the URL of the GitLab instance, e.g., “https://gitlab.example.com/”.
If your GitLab instance uses a self-signed SSL certificate, check the Disable certificate validation checkbox.
Click Add integration.
2.2. Create a token in GitLab
In GitLab, click your avatar and go to Preferences.
In the menu on the left, click Access Tokens.
If the token creation form has not appeared, click Add new token above the tokens list.
Fill in the fields:
- Token name — a name to help you recognize the token, e.g., “Token for Allure TestOps”.
- Expiration date — any date within a year from the current date. After this date, the integration will stop working, and you will need to create a new token to continue using the integration.
- Select scopes — “api” and “read_api”.
Click Create personal access token.
The page will reload, and the Your new personal access token field will appear on the top. Click the Copy icon next to it.
You will need this token on the next step.
The same way, you can use a project access token, but please note that this token allows access to only one project.
2.3. Add the token to an Allure TestOps project
In Allure TestOps, open your project.
Go to Settings → Integrations.
Under the Available integrations, find the GitLab integration and click Add integration next to it.
In the dialog that appears, specify the Token that you got on step 2.2.
Click Test connection. If the token is correct, a "Connection established" message will appear within a few seconds.
Click Add integration to save the settings.
2.4. Configure the job in Allure TestOps
In Allure TestOps, open your project.
Go to Jobs.
The page should contain a new job automatically added and configured during the launch on step 1.4.
Click
⋯next to the job name, then select Configure.In the dialog that appears, edit the fields:
- Name — a name to help you recognize the job.
- Build server — the name of the integration that you added on step 2.1.
- Job can be used to run tests — if checked, users will be able to trigger this job from Allure TestOps.
- Parameters — parameters that should be passed to GitLab via environment variables, see Environment.
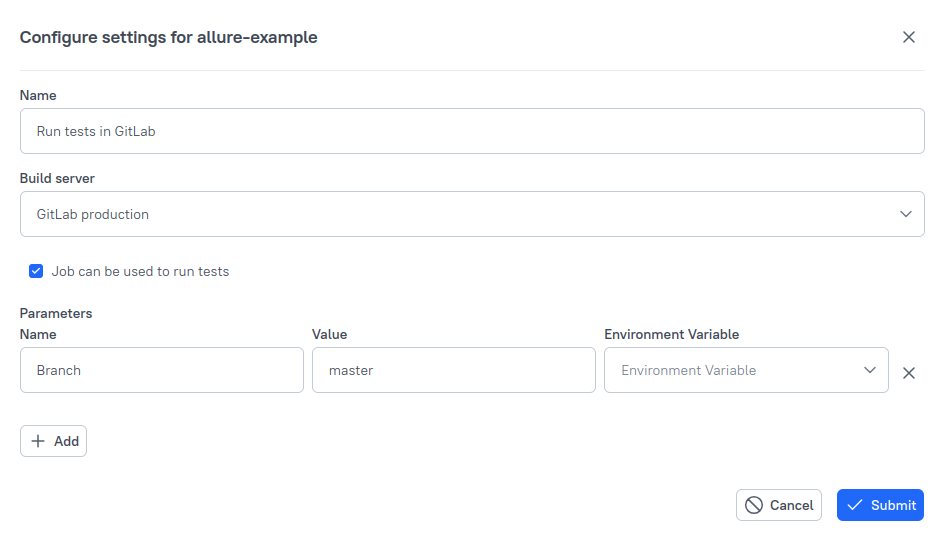
Click Submit.
3. Parametrize jobs
GitLab uses environment variables for passing parameters to pipelines. Allure TestOps integrates this feature with its own Environment concept, which lets you both set parameters for new jobs and see parameters set for jobs that were started outside Allure TestOps.
In GitLab, the project owner needs to add variables and their default values.
In Allure TestOps, the administrator needs to declare the required display names for parameters globally, then the project owner needs to configure the parameters mapping both in the project settings and in the job settings.
If your project's repository has multiple branches, make sure to create a Branch environment variable in Allure TestOps and pass it to your job. This special name will instruct GitLab which of the branches it should use.
3.1. Set the default values in GitLab
To make changes to the pipeline, edit the .gitlab-ci.yml in your GitLab repository. You can do it either in a local directory or in the GitLab's web-based text editor (CI/CD → Editor in the old navigation, Build → Pipeline editor in the new navigation).
Add variables and their default values into the pipeline's or the job's variables block. For example:
test:
  stage: test
  image: gradle
  variables:
    ALLURE_ENDPOINT: https://testops.example.com
    ALLURE_PROJECT_ID: 1
    ALLURE_RESULTS: build/allure-results
    PRODUCT_VERSION: '1.23'
    TESTS_BROWSER: chrome
  before_script:
    - curl -fsSL https://github.com/allure-framework/allurectl/releases/latest/download/allurectl_linux_amd64 -o allurectl
    - chmod +x allurectl
  script:
    - ./allurectl watch -- gradle clean test
3.2. Add global parameter names in Allure TestOps
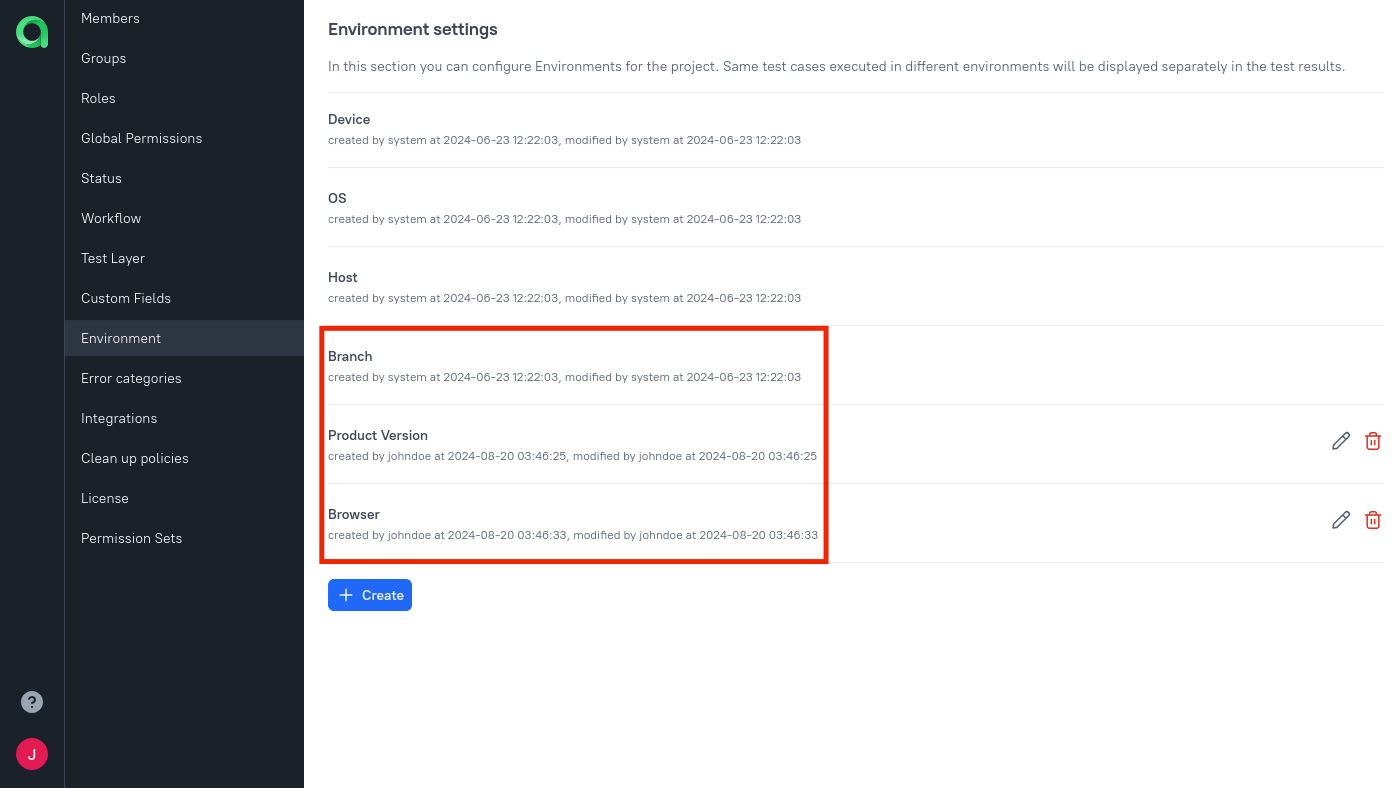
Log into Allure TestOps using an administrator account.
Go to Administration → Environment.
For each parameter name that you want to add, click + Create, enter the name of the new parameter and click Submit.
Note that this name can be a human-readable label and does not have to be equal to the name from step 3.1.
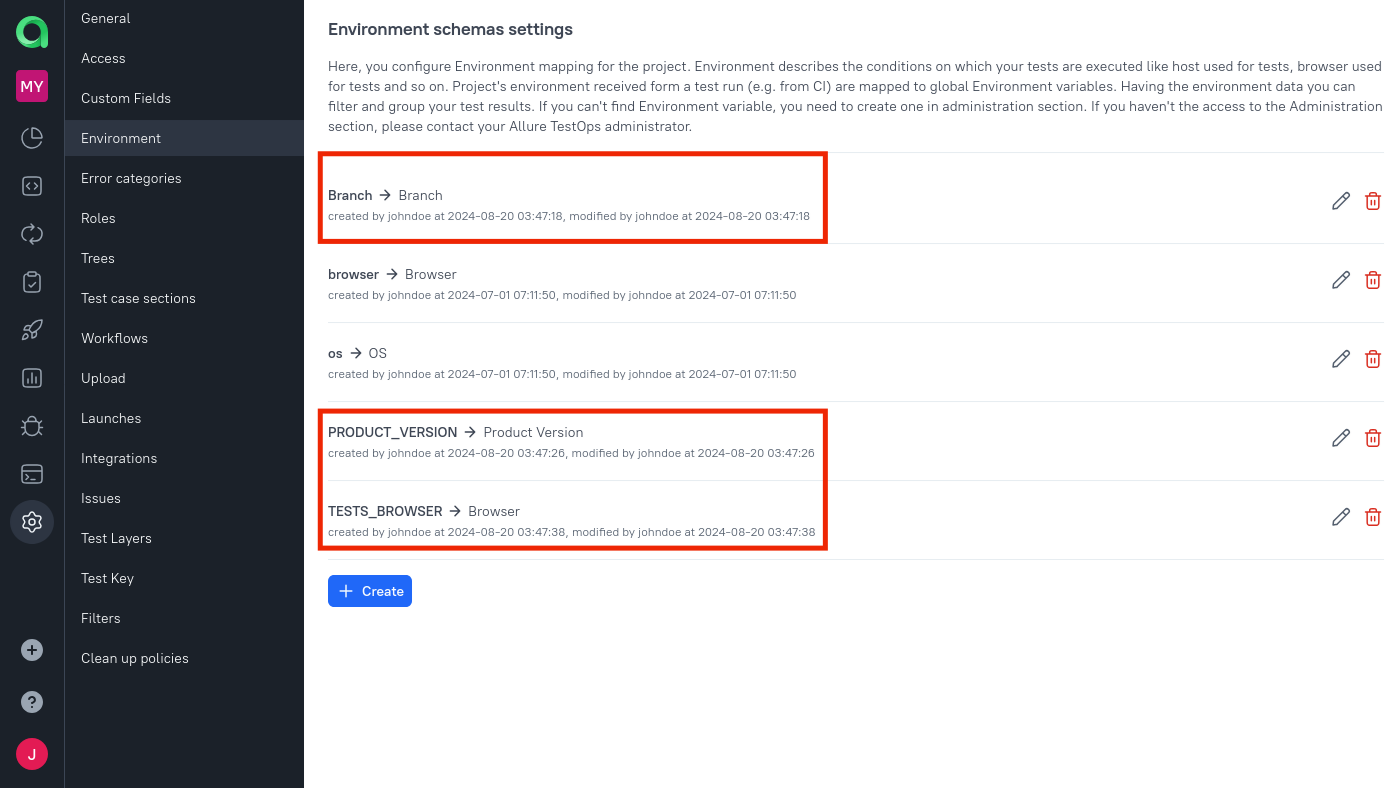
3.3. Map parameters to environment variables in Allure TestOps
In Allure TestOps, open your project.
Go to Settings → Environment.
For each parameter name that you want to use:
Click + Create if the parameter is not in the list. Otherwise, click the Edit icon next to its name.
In the Mapping key field, specify the name of the environment variable name from step 3.1.
In the Environment variable field, select the global parameter name from step 3.2.
Click Submit.
3.4. Add the parameters into the Allure TestOps job
In Allure TestOps, open your project.
Go to Jobs.
Find the job which you want to parametrize. Click
⋯next to the job name, then select Configure.The job settings dialog will appear, containing the Parameters section.
For each parameter that you want to use, click Add and fill in the fields:
- Name — the name of the environment variable name from step 3.1.
- Value — the default value, same as the value from step 3.1.
- Environment Variable — the global parameter name from step 3.2.
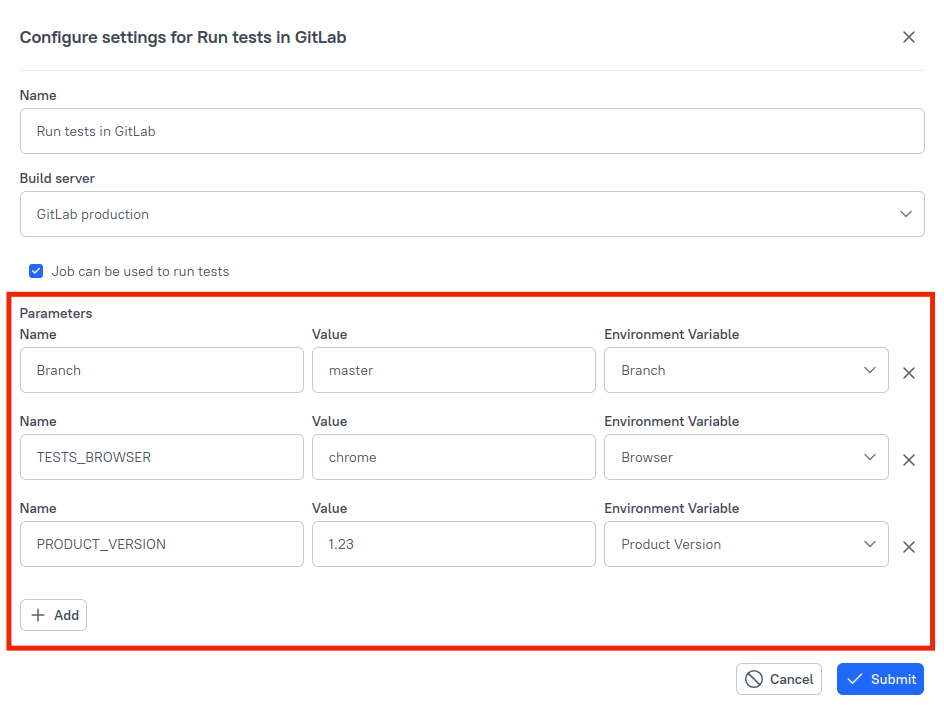
Click Submit.