Allure TestOps plugin for Jetbrains' IDEs
Plugin capabilities
Allure TestOps for Jetbrains' IDEs allows you doing the following:
- Upload the test results of a local test run to Allure TestOps instance.
- use case: local test run for newly automated tests
- use case: the automation of a manual test which exists in Allure TestOps
- Creation of a new automated test case in Allure TestOps from IDE.
- use case: Creation of a brand new test case, AllureID will be assigned to the method created in the code
- Bulk operation for AllureID assignment
- use case: to prevent creation of new test cases and abandoning the old ones when code changes you need to assign Allure ID to a test case in your code.
- Import of all the meta-data of a manual test case for its automation in IDE.
- use case: you'll save a lot of time on the meta-data creation in your code if you import test case data from Allure TestOps to IDE.
- Generation of Allure Report based on the test results
- Opening generated Allure Report
- Serving (temporary report is created) Allure Report based on the test results
JetBrains' IDEs
The table below shows the supported programming languages and test frameworks with the references to the JetBrains IDE name.
| Programming language | Test framework | IDE |
|---|---|---|
| Java | JUnit4 | IntelliJ IDEA |
| Java | JUnit5 | IntelliJ IDEA |
| Java | TestNG | IntelliJ IDEA |
| Kotlin | JUnit4 | IntelliJ IDEA |
| Kotlin | JUnit5 | IntelliJ IDEA |
| Kotlin | TestNG | IntelliJ IDEA |
| Java | Cucumber | IntelliJ IDEA |
| Groovy | Spock | IntelliJ IDEA |
| Python | pytest | PyCharm |
| Python | Robot Framework | PyCharm |
| PHP | Codeception | PHP Storm |
| JavaScript | WIP | JetBrains IDE family |
Installation (JetBrains IDEs)
Go to plugins section of your IDE settings.
- go File > Settings > Plugins
In search field start typing Allure TestOps Support
Then in the results field find the plugin and hit
Install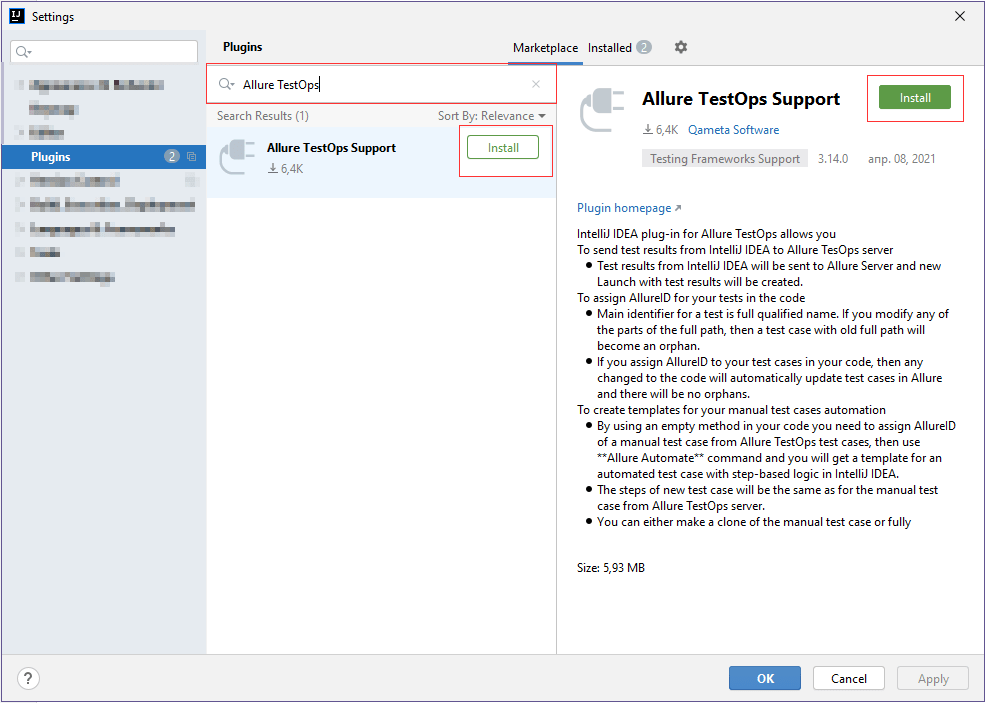
Restart IDE.
Next step is to authorize the plugin to perform the operations on Allure TestOps side.
To authorize the plugin in Allure TestOps you need to generate personal access token in your user menu on Allure TestOps side.
Early access
Qameta Software also publishes features previews for the Allure TestOps plugin for JetBrains's IDEs in the Early Access Program (EAP) channel.
Although, the plugins in EAP channel could have more features, than the same plugin in the main release channel, it also can have brand new errors absent in the main release channel.
To register the bugs related to EAP channel releases, please use the same help desk.
Adding the EAP channel to your IDE
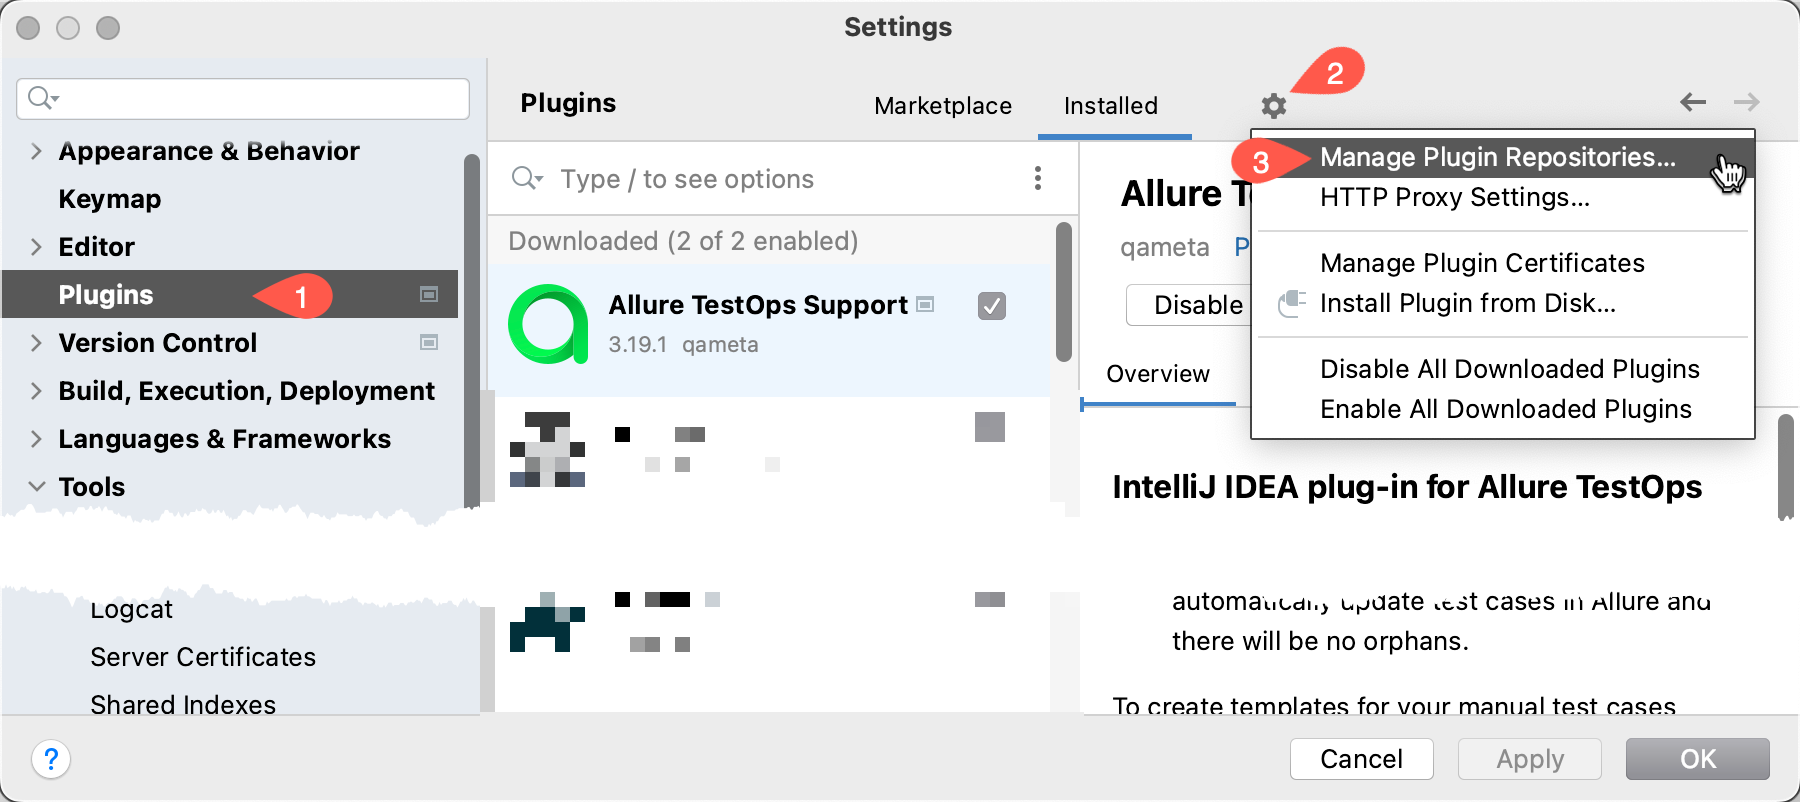
Open the IDE settings
Go to plugins.
Click the gear icon. It resides in the same line as Installed / Marketplace plugins lists.
Click Manage Plugin Repositories... menu item.
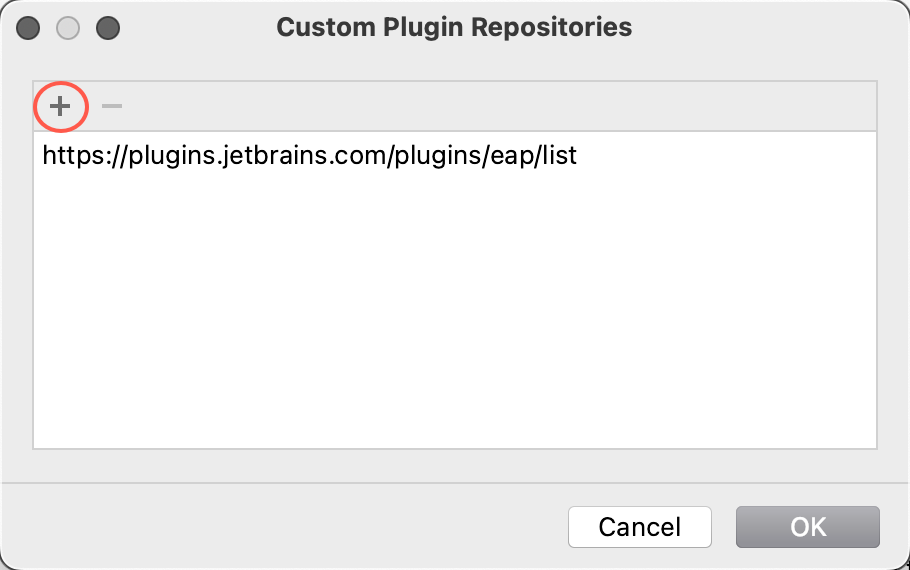
Add EAP repository
- click +
- add line
https://plugins.jetbrains.com/plugins/eap/list - click Ok
If there is any early access version of the plugin available, IDE will suggest upgrading to it.

Cancelling EAP builds upgrades
- Open the IDE settings
- Go to plugins.
- Click the gear icon. It resides in the same line as Installed / Marketplace plugins lists.
- Click Manage Plugin Repositories... menu item.
- Remove EAP channel from the settings.
- Uninstall Allure TestOps plugin.
- Install Allure TestOps from the stable releases channel (the default one).
Plugin connection settings
For the plugin releases 3.18+
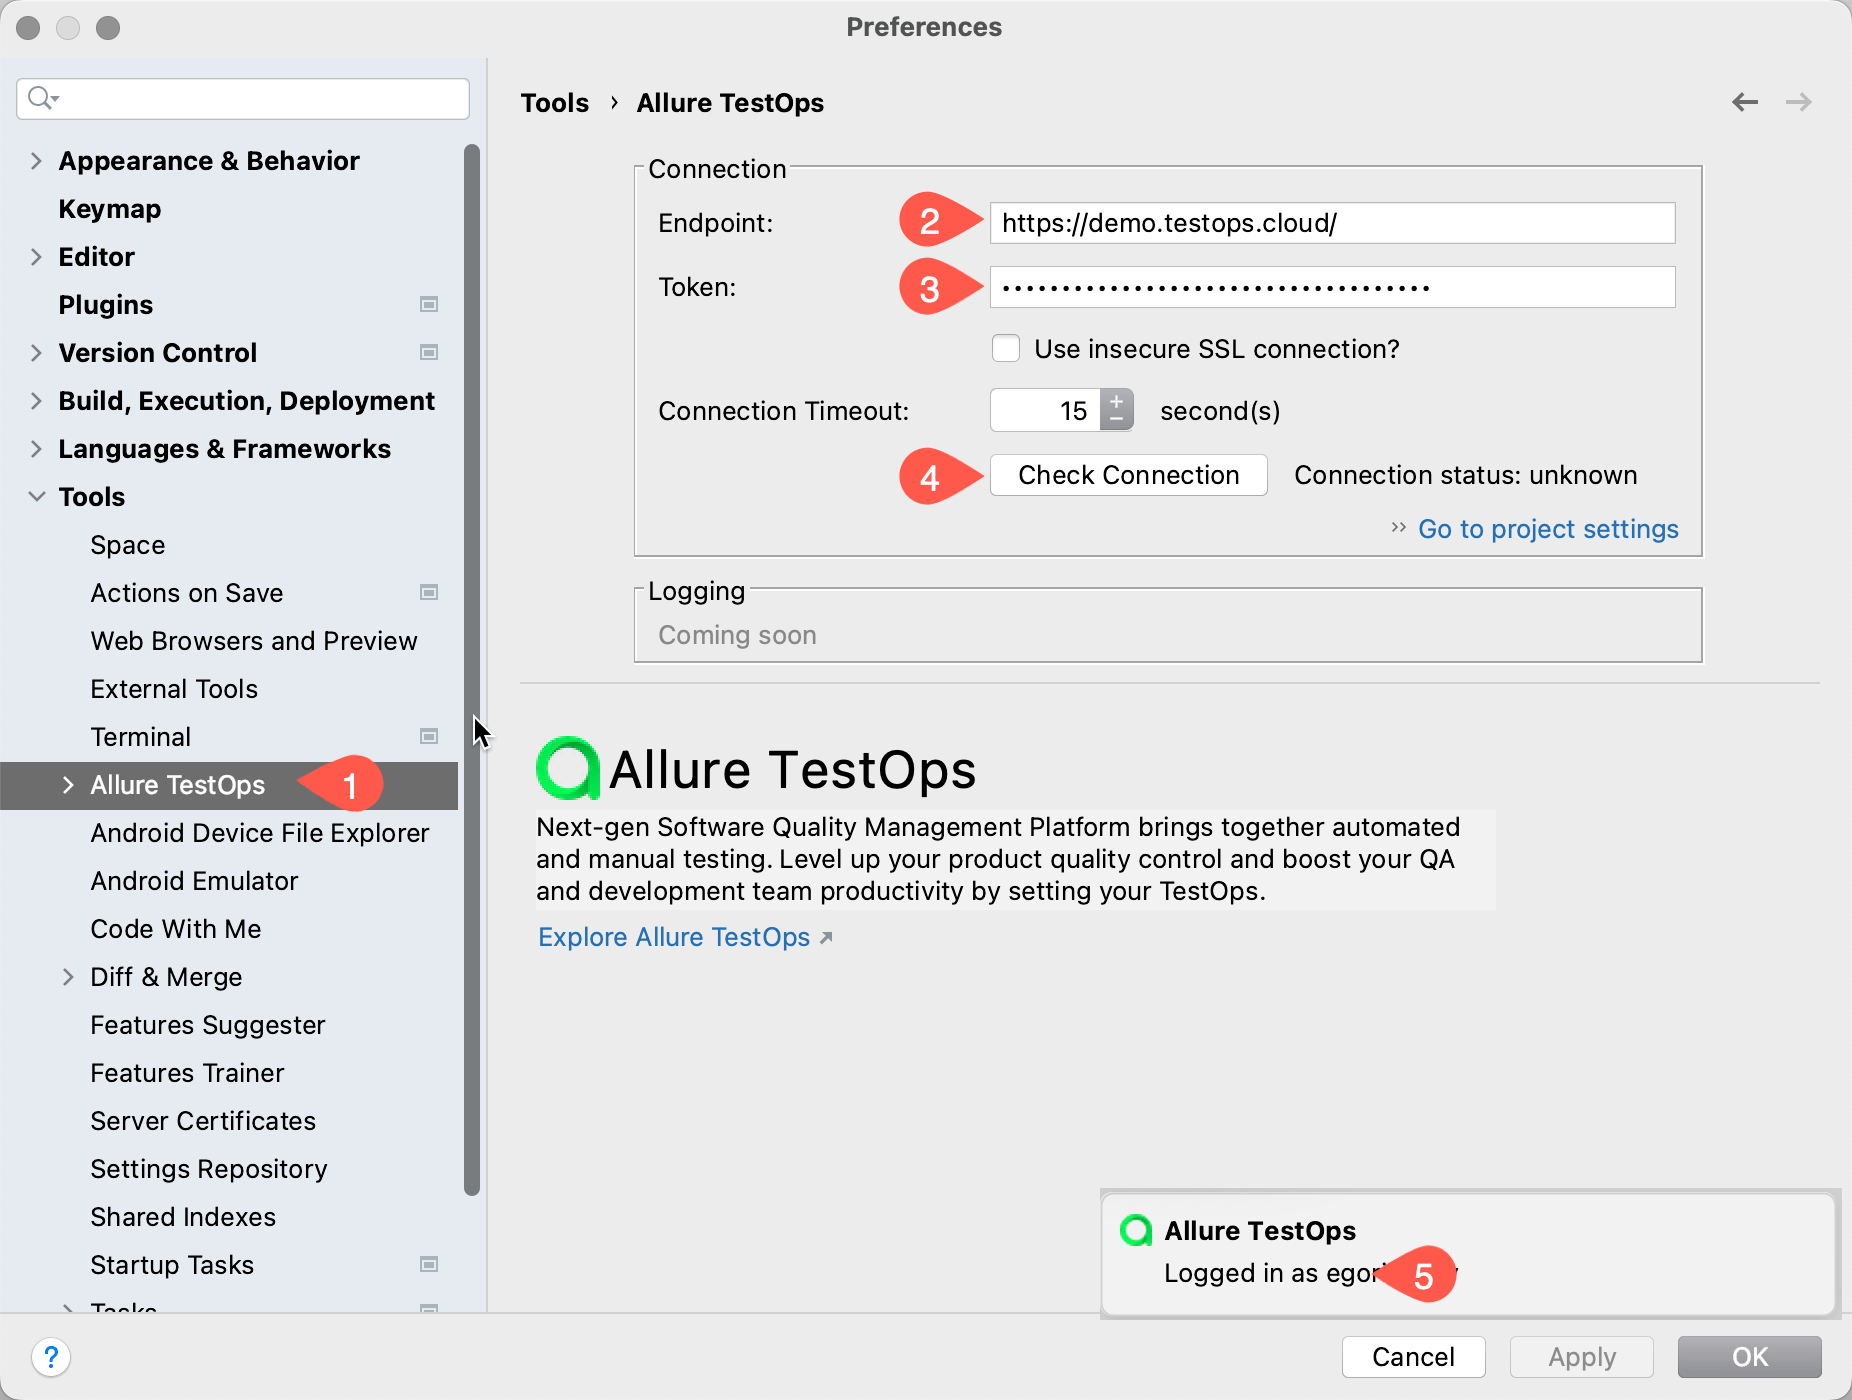
Plugin's settings reside in the Tools section of JetBrains' IDEs.
Proceed to Preferences > Tools > Allure TestOps
Configuring the plugin
Preconditions
- Generate personal access token
- To work with Allure TestOps projects using the IDE plugin for IDE, you need to have at least ROLE_USER authority and at least
project:writepermission.
Plugin configuration
- Open plugin settings.
- Enter the URL of your Allure TestOps instance.
- Provide the personal access token.
- Click Check connection
- If all the data above (items 2 and 3) are correct, system will provide your username as it registered in Allure TestOps.
Project settings
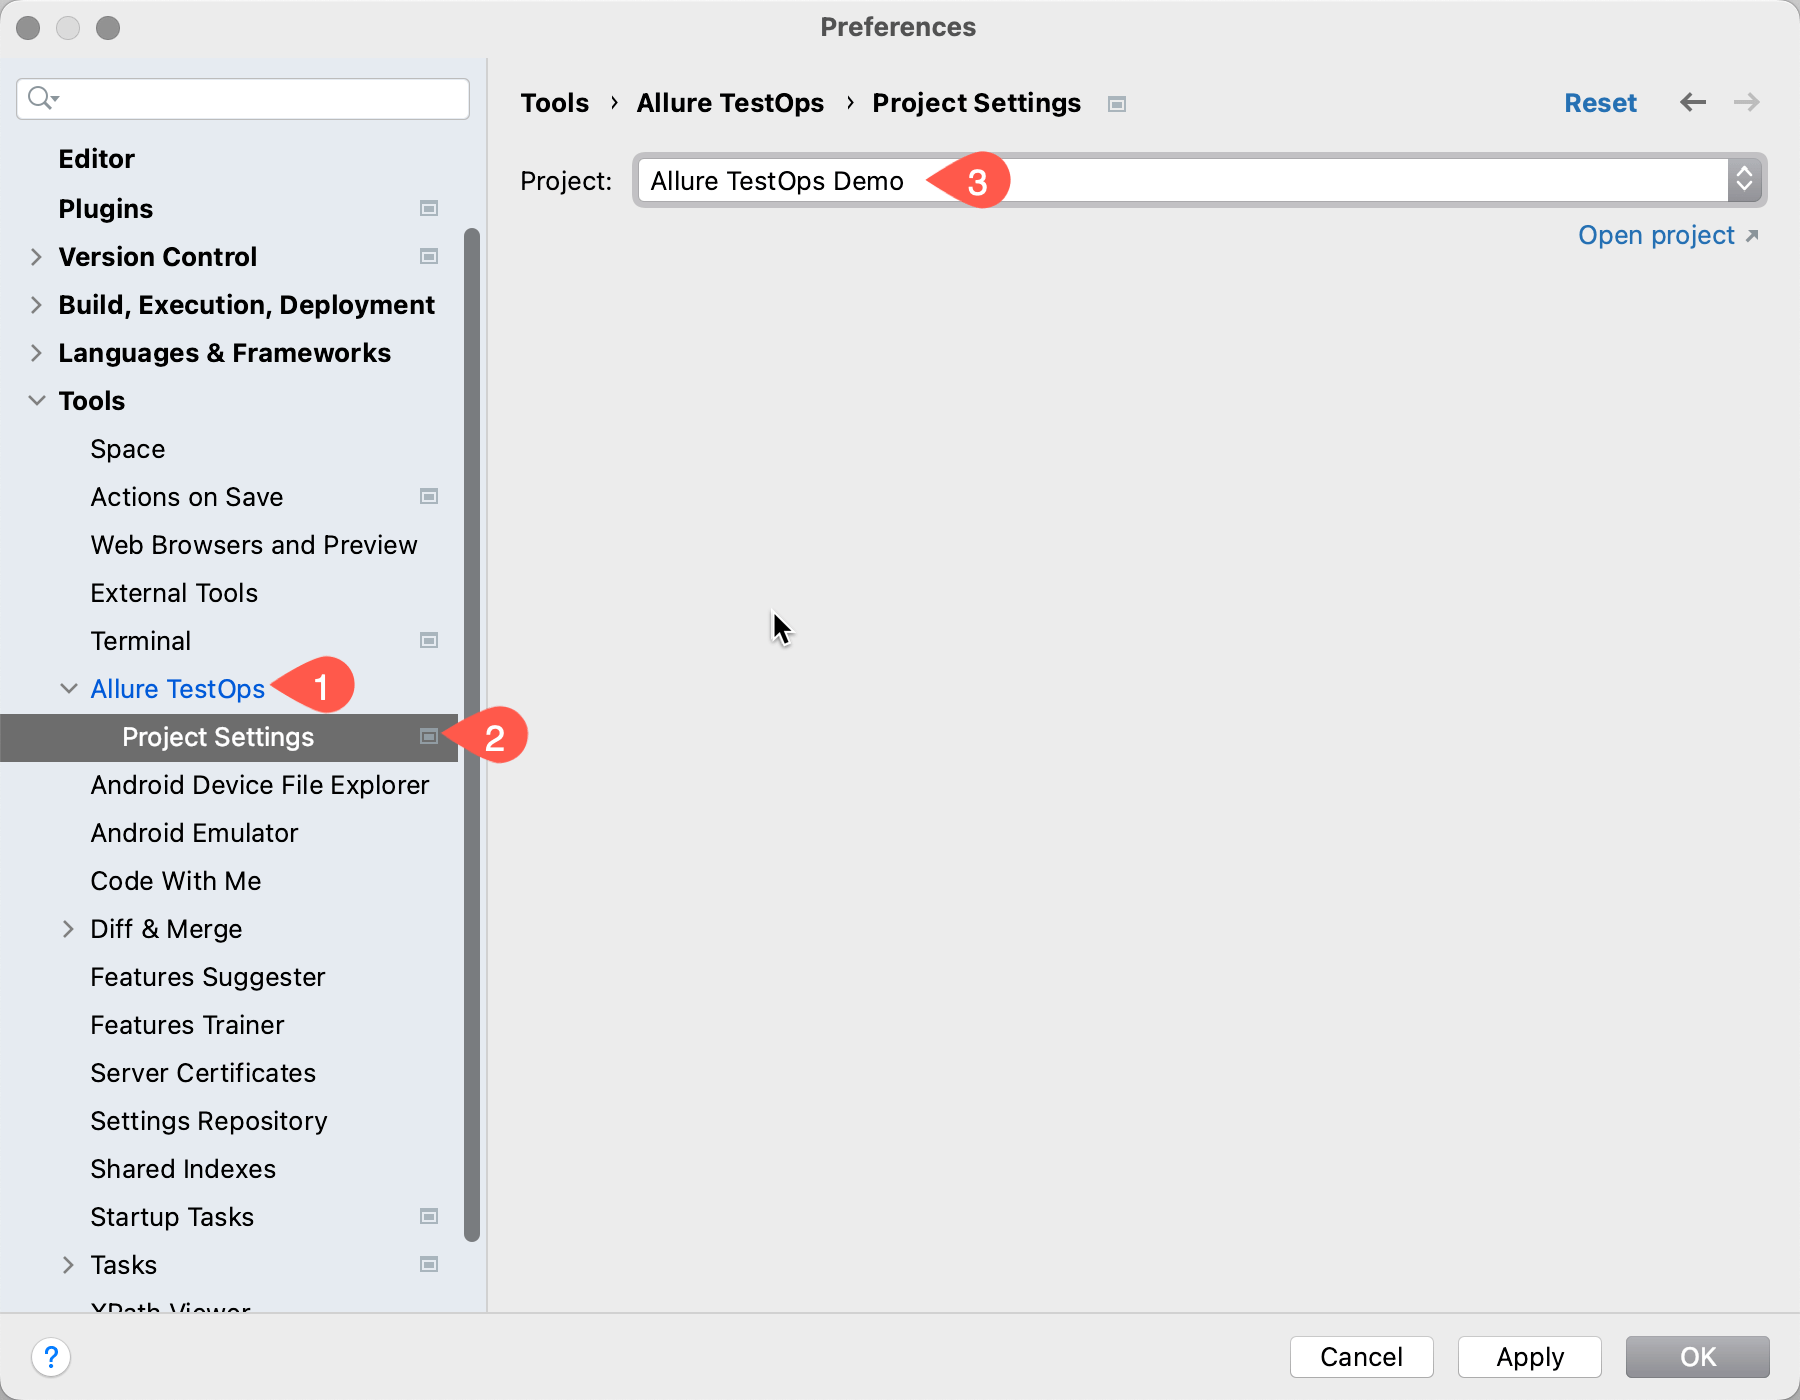
Plugin allows you to select the default Allure TestOps project for the current IDE's project, i.e. all the operations will be for a certain project in ATO Allure TestOps, and you won't need to select the project each time you need to upload the results.
Proceed to IDE > Preferences > Tools > Allure TestOps > Project settings and select the project you want to be used by default by the plugin.
Upload test results to Allure TestOps from IntelliJ IDEA
Why
Use case for the test results upload is pretty simple: surely, you want to see how your freshly baked automated tests look like in the Allure TestOps launches. So, you'll be able to check. Plugin will create a new launch and upload your test results to this new launch on Allure TestOps side.
How
- Run tests on your development environment, i.e. on your local machine.
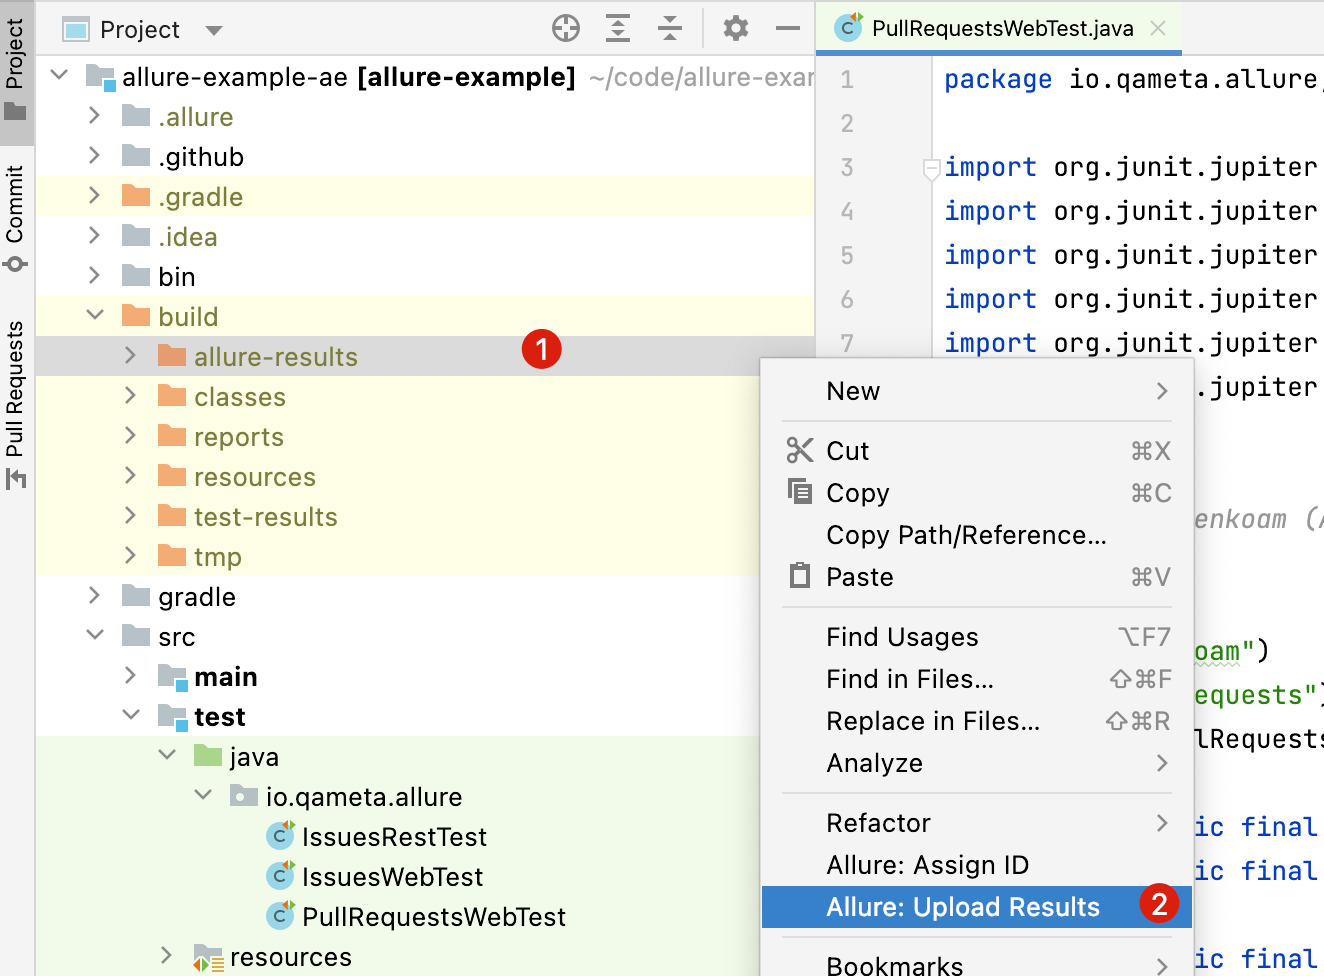
- Select folder with allure results in the project tree and then right click the folder.
- In the context menu select Allure: Upload results
- Update the name for a new launch plugin is going to create (if needed)

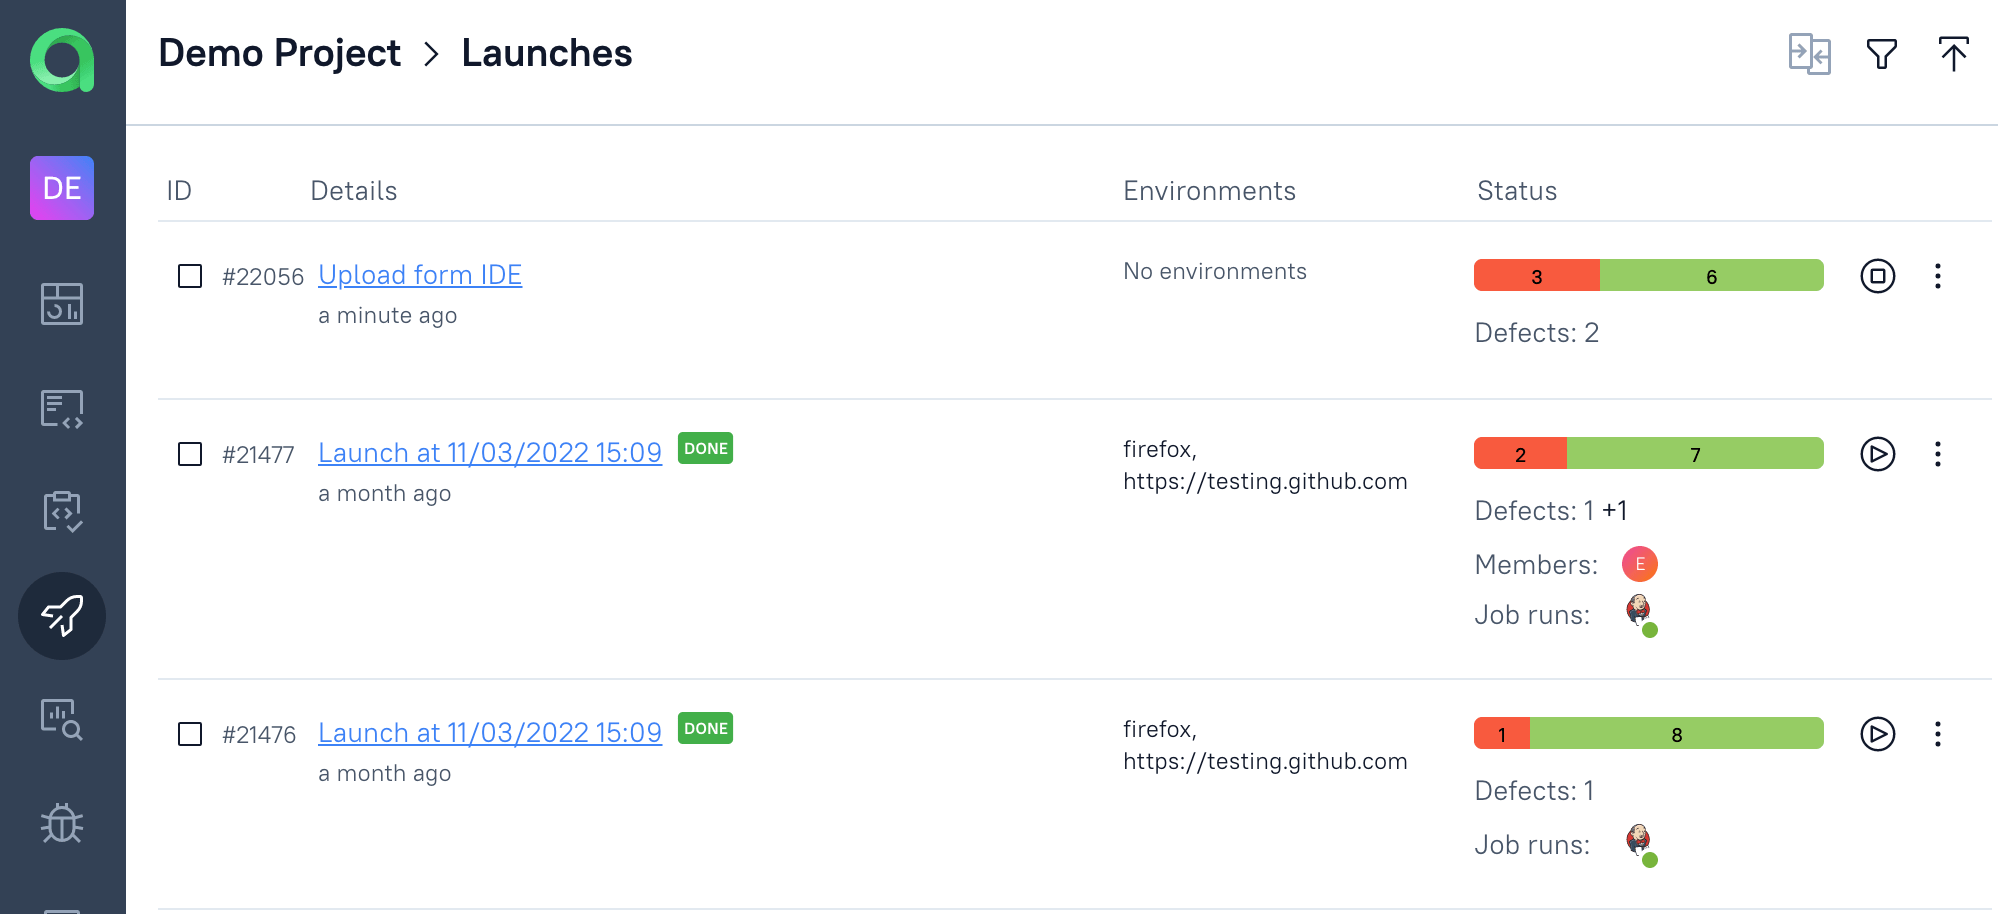
- The results will be available in the Allure TestOps in section Launches.
Link tests in IDE to Tests cases in Allure TestOps via AllureID
What
Allure TestOps uses certain rules to link your automated test to Allure TestOps test case.
Linking rules depend on a test framework, but generally it works similar to the next example:
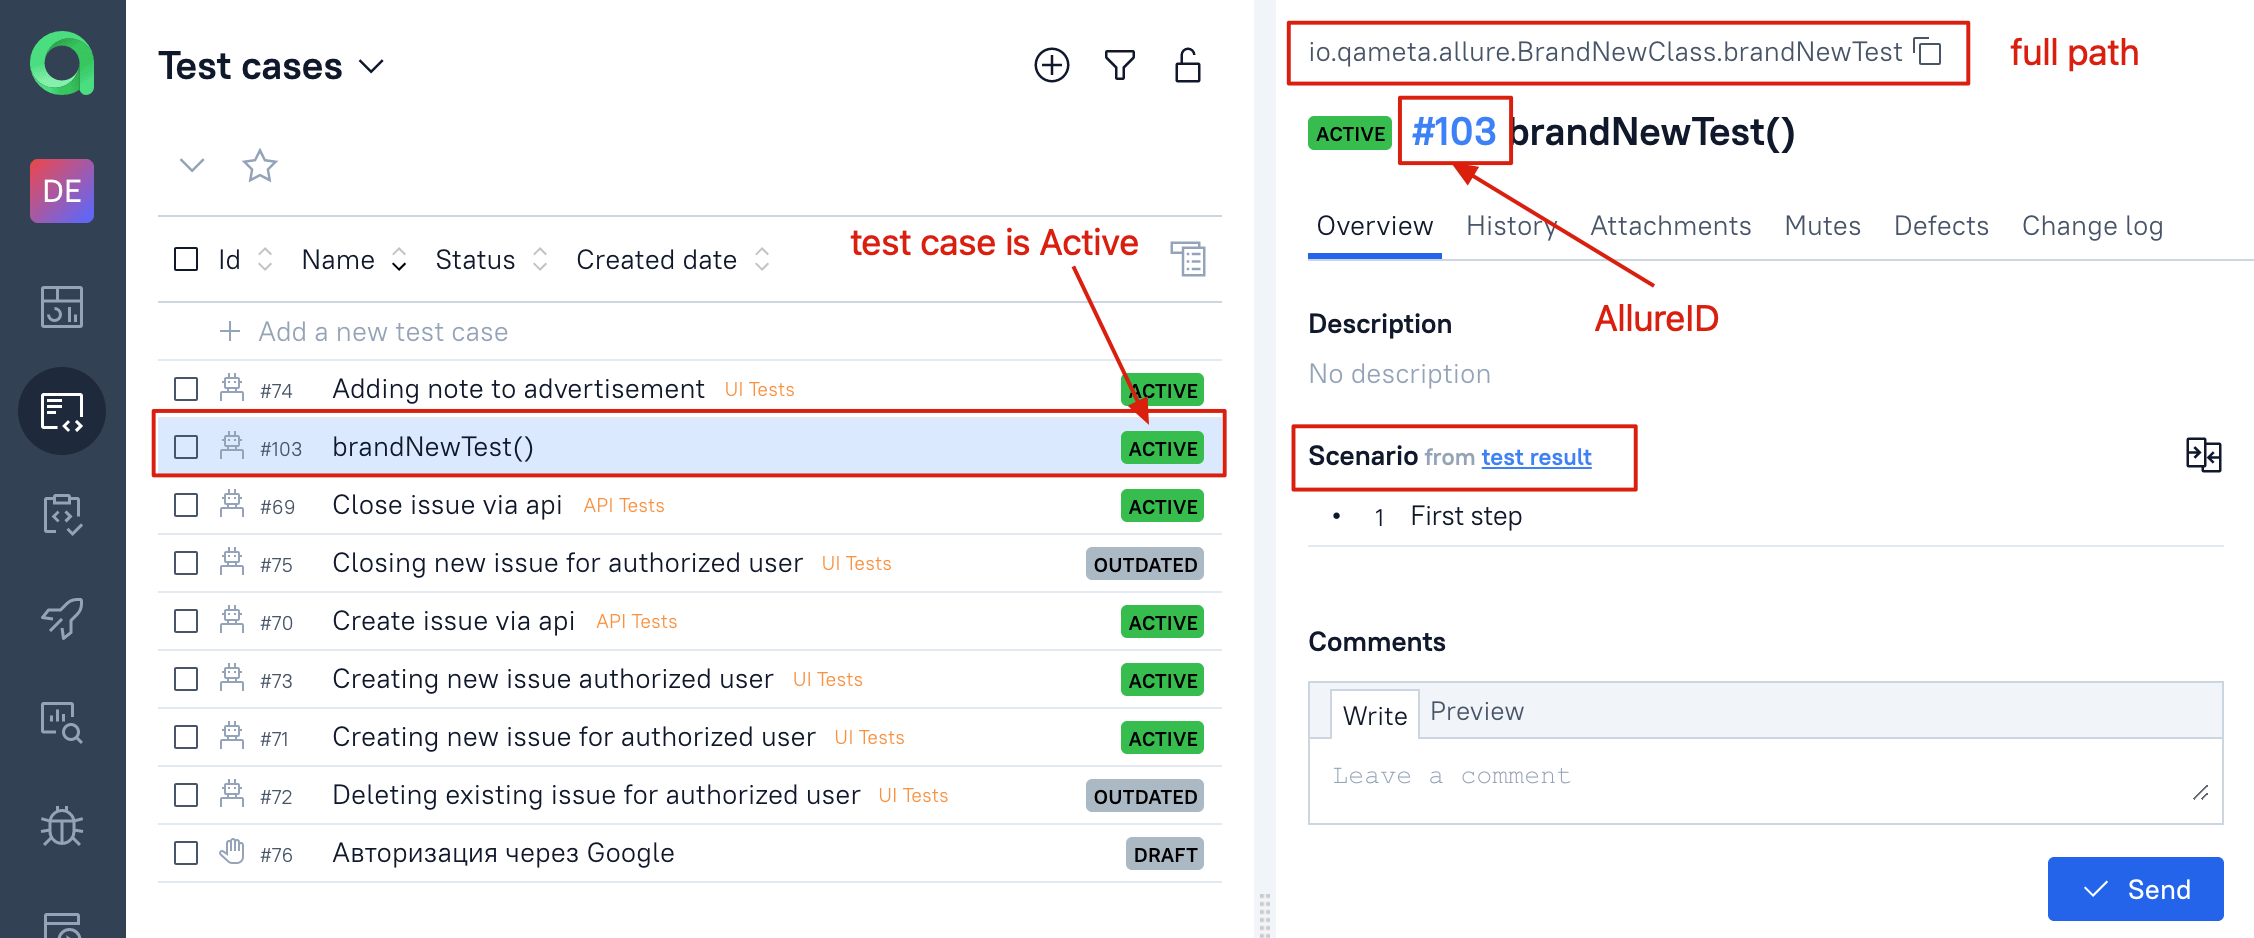
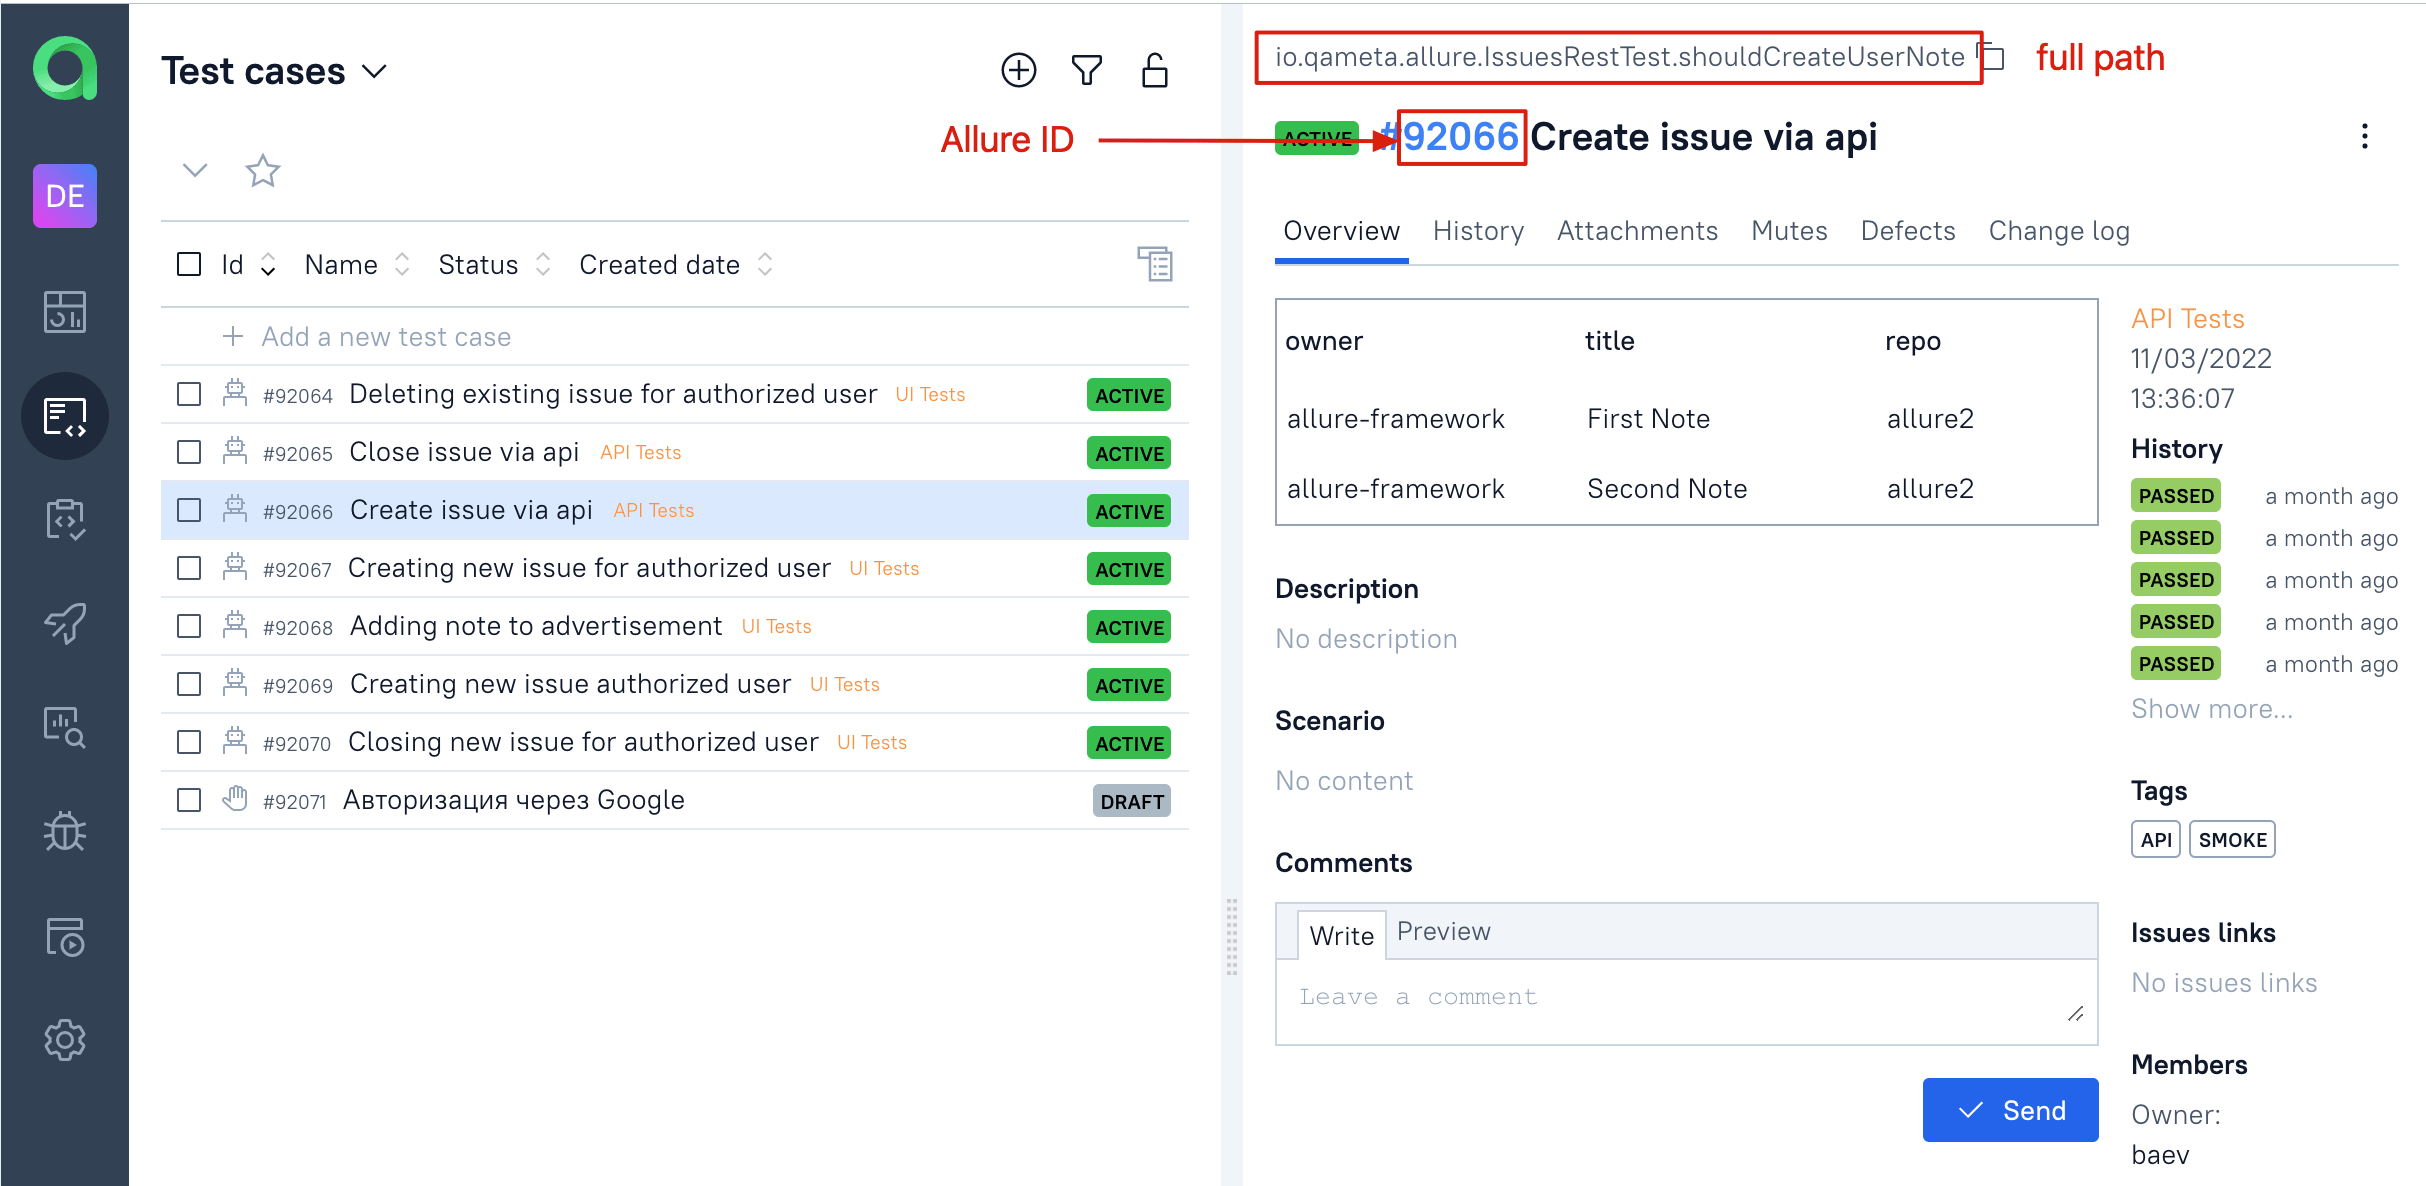
AllureID will be linked to the full path of your test method like <package>.<class name>.<method name>.
Allure TestOps also uses the parameters of a test to link a test case to certain AllureID, i.e. test <package>.<class name>.<method name> without parameters and with one parameter aren't the same, these will be two different test cases with different AllureIDs.
Why
Simply, AllureID is the ID of a test case in the database of Allure TestOps. AllureID is a unique number, meanwhile the full path and parameters of a test could change over time due to refactoring of your code for example.
If you modify any part of this mapping, Allure TestOps will consider such test as a new test case and will create one for you with new AllureID. So, you will have to test cases – one with old path (set of parameters) and the new one with new path and set of parameters.
This will lead to the following:
- old test case will stop receiving updates from your code and will become abandoned one, statistics will be frozen on the latest result referring to the old test case
- new test case will receive updates and statistics will start with the first test result.
- Ultimately, your statistics and analytics will become irrelevant for these two test cases.
How
To avoid abandoning test cases, you must mark your test with AllureID annotation.
If the tests were never reported to Allure TestOps, you need to upload your test results first time your tests into Allure TestOps as described:
- right click the allure results' folder
- select Allure: Upload results
- select the project to upload to
- name the launch

Close the Launch to process the results, new test cases will be created
- test cases are created and updated in Allure TestOps only when a launch is closed.
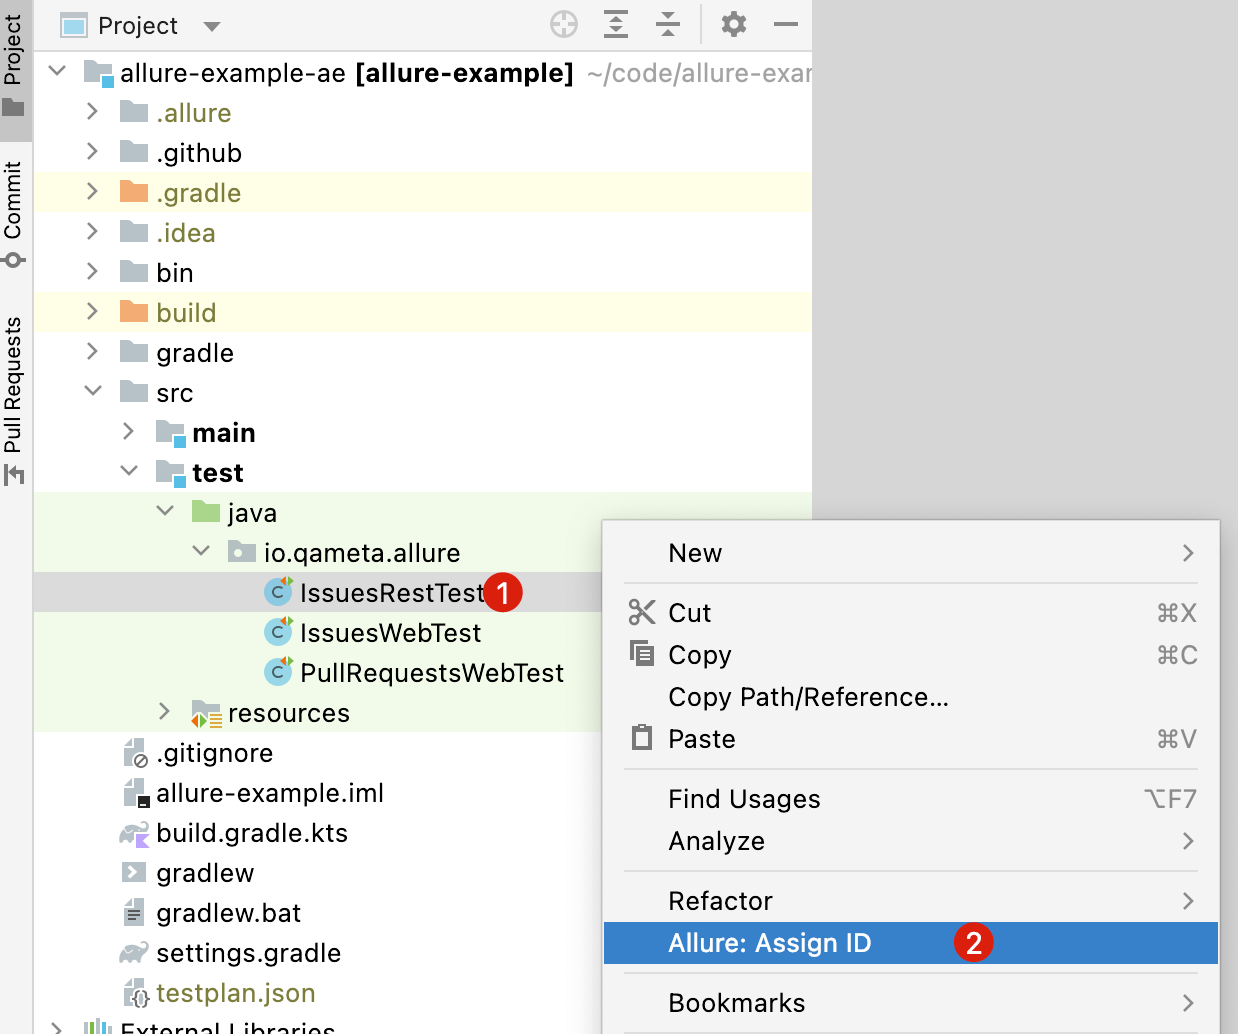
Right click a package or a class to be processed and select Allure: Assign ID
In the modal window select the project in Allure TestOps to which you've sent the test results
Tests will be annotated with @AllureId.
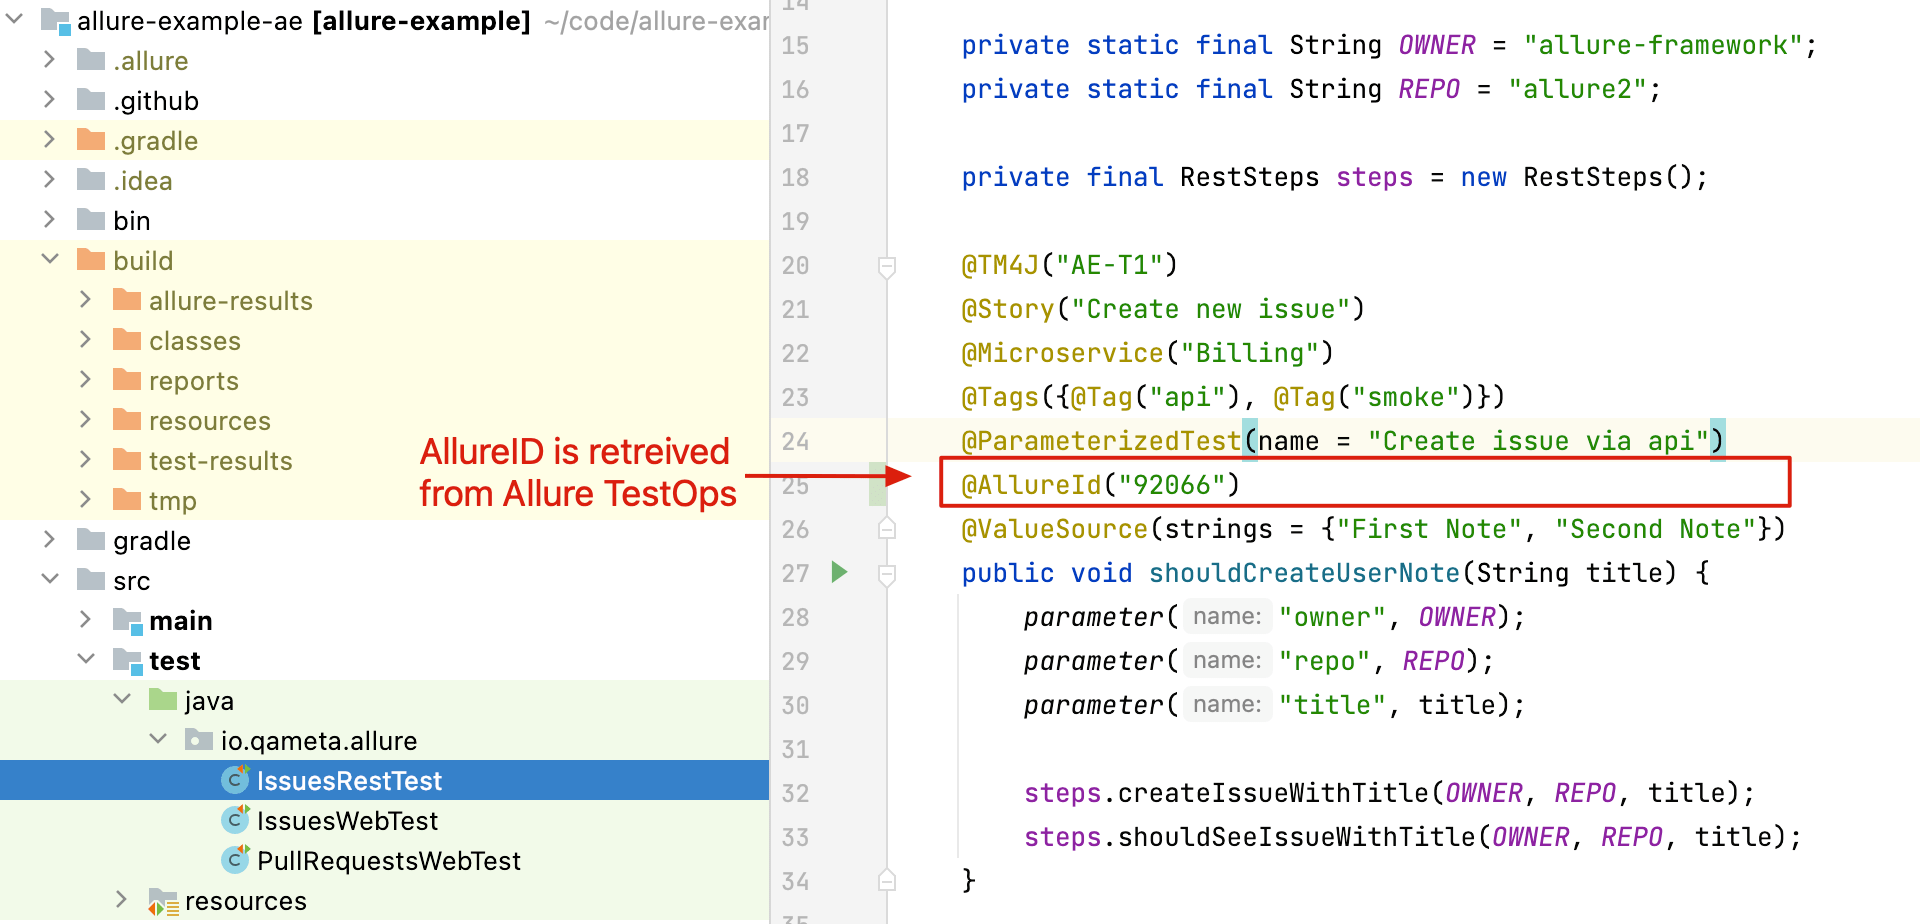
Now, if you modify either package name or the class name or the test name it will be correctly mapped to Allure TestOps test case.
Manual test cases automation
What
Following workflow allows you easy-peasy automation of a manual test case you have in Allure TestOps.
How
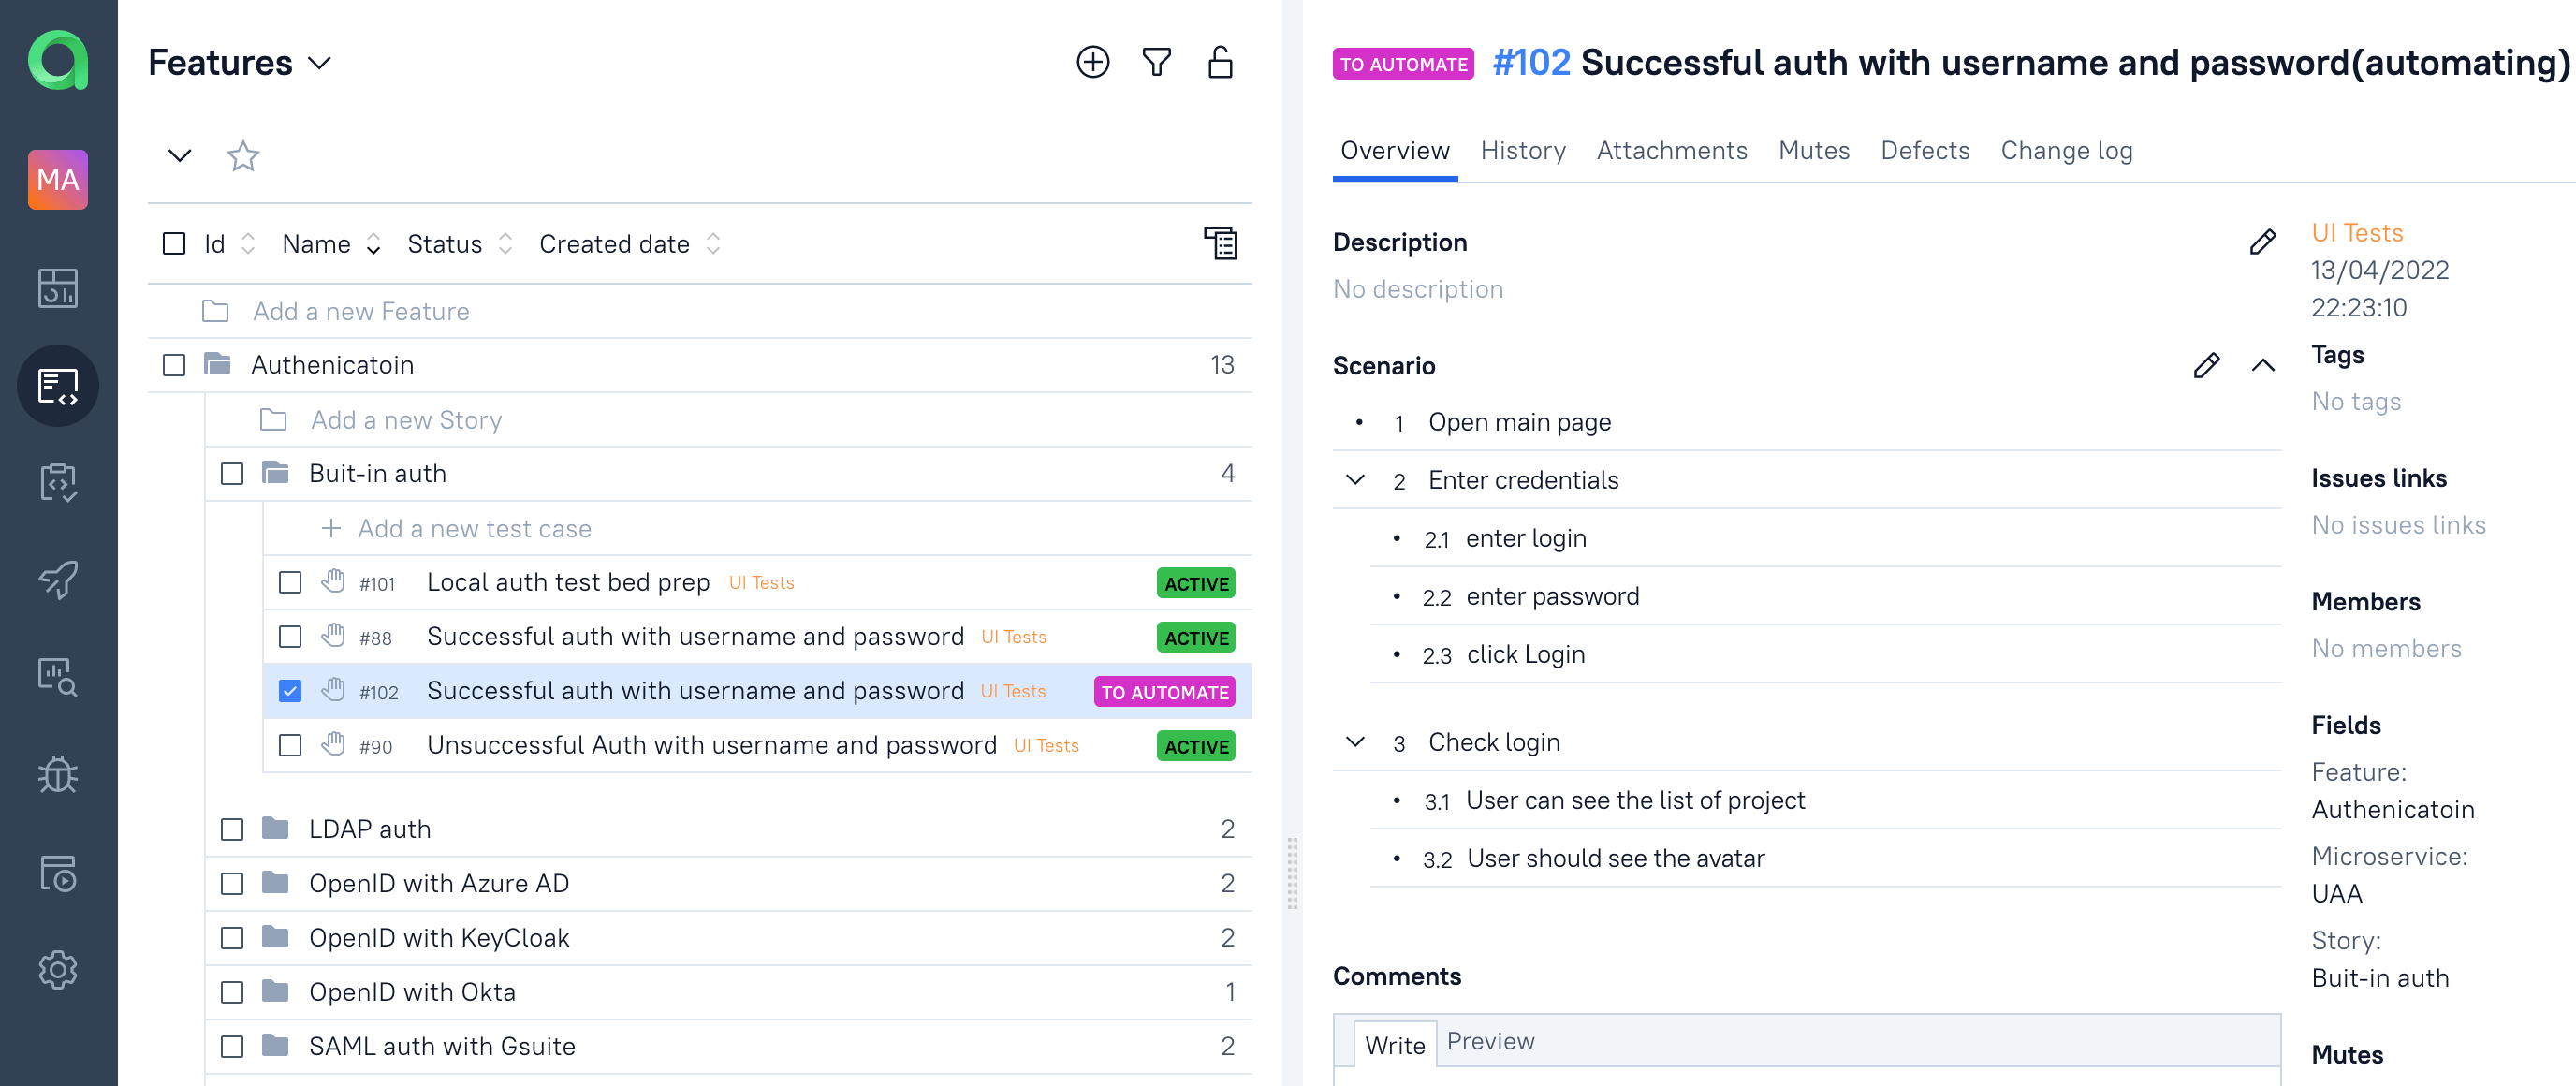
Say, in a project you have a manual test case you want to automate.
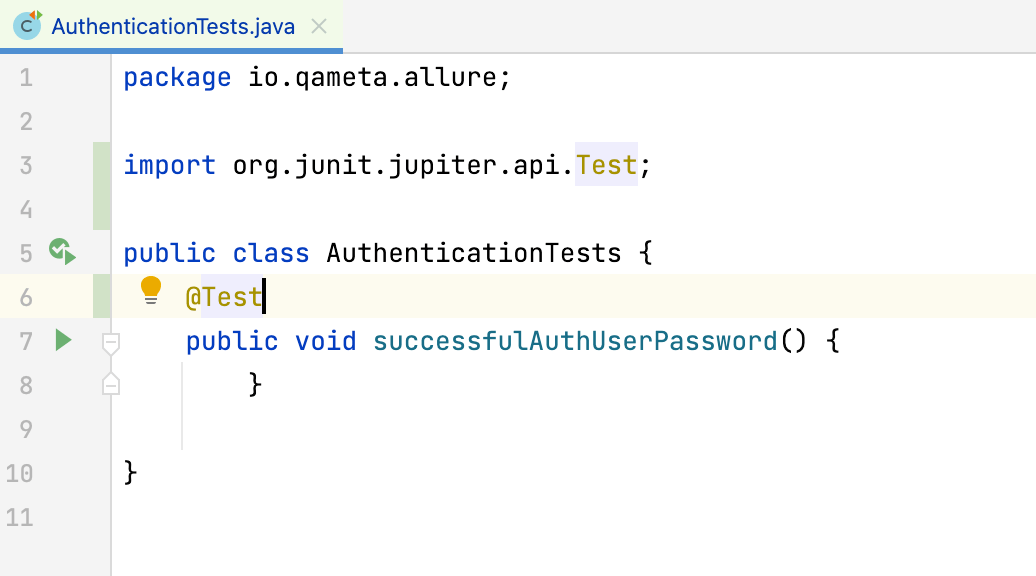
In IDE create new class or use an existing one and add a new method (test) marked with @Test annotation
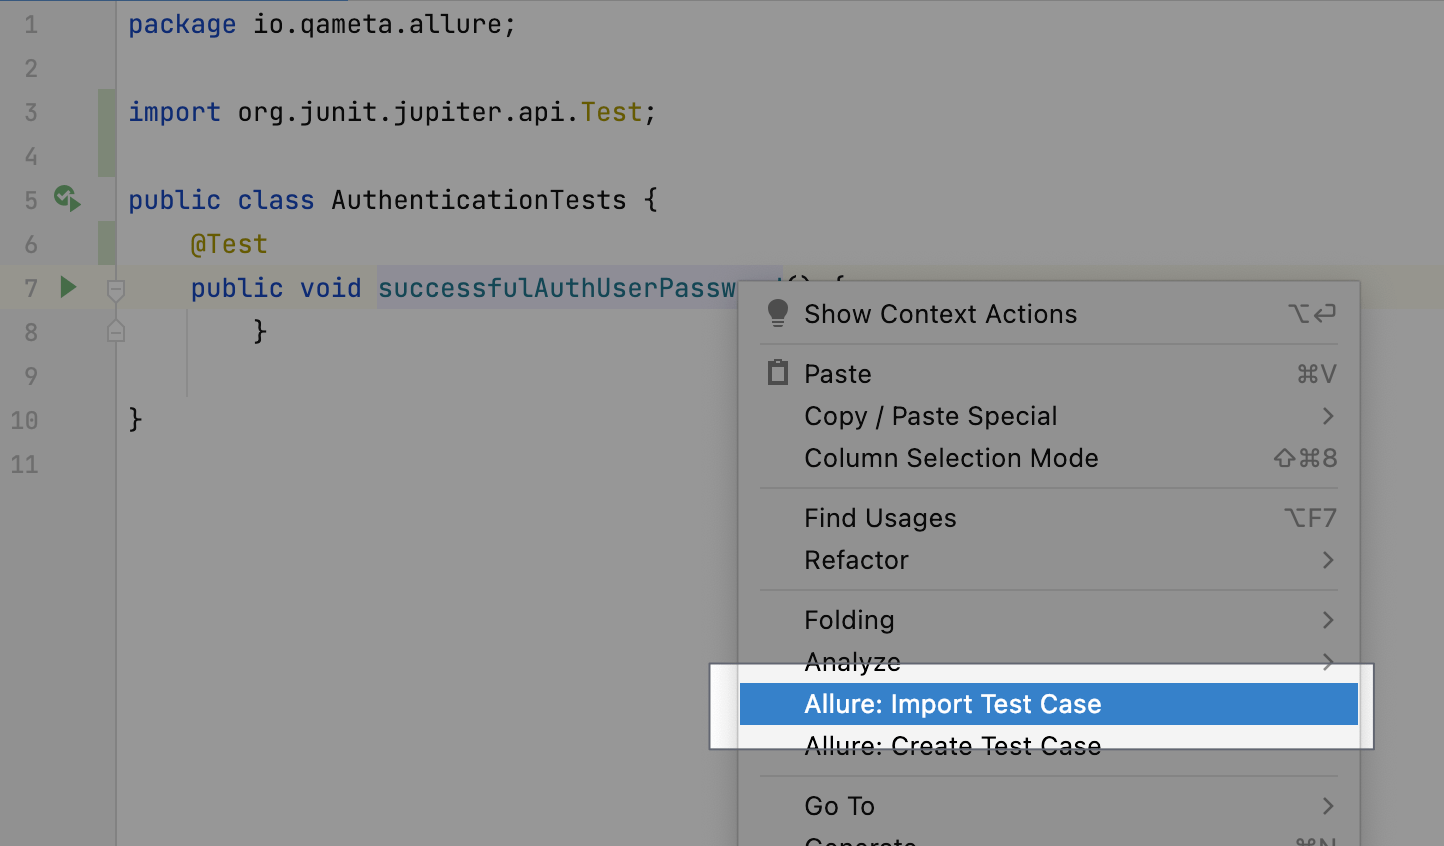
Right click the method and select Allure: Import test case
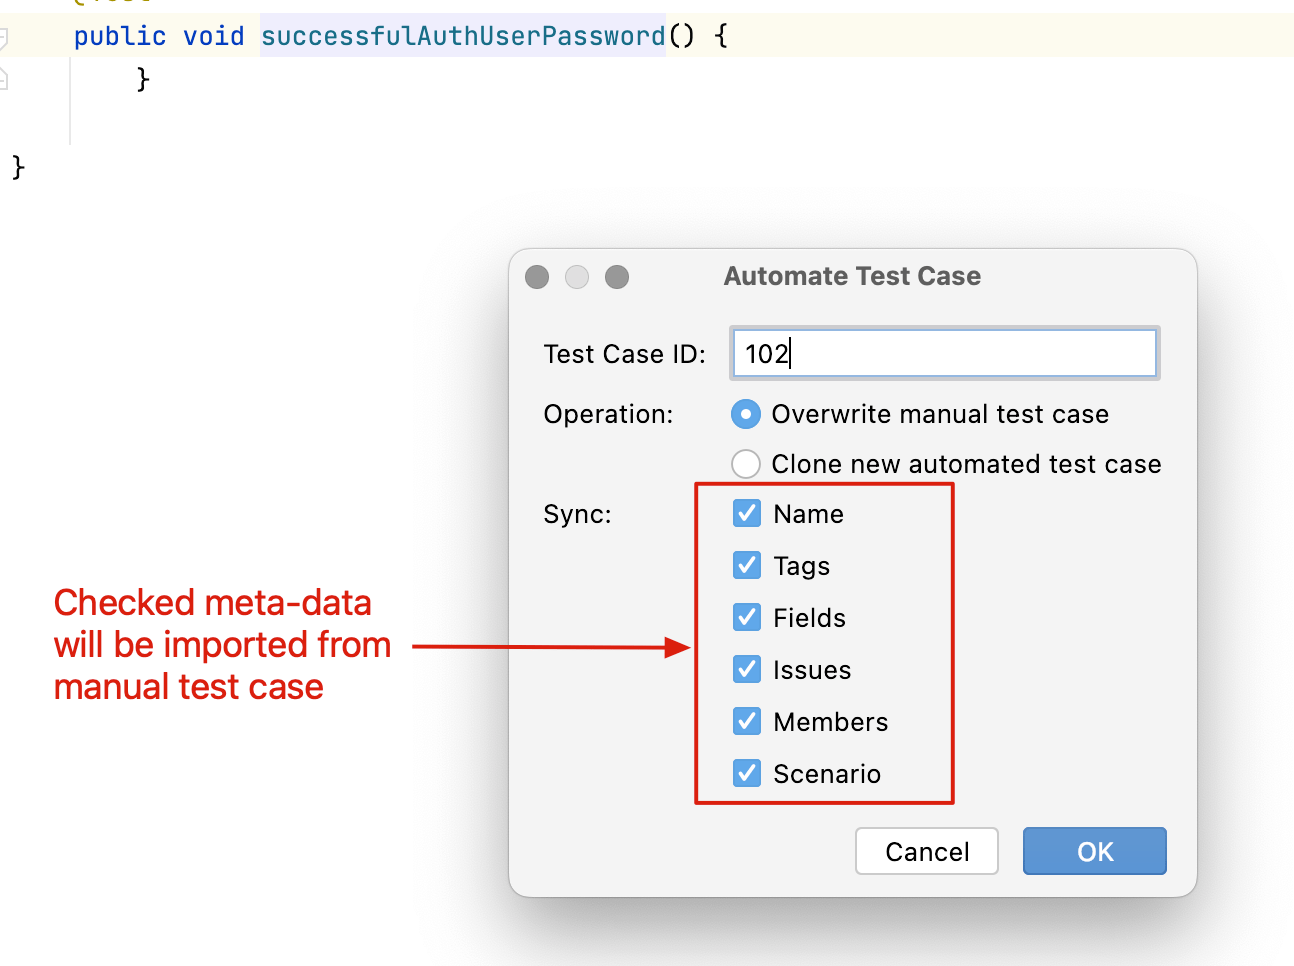
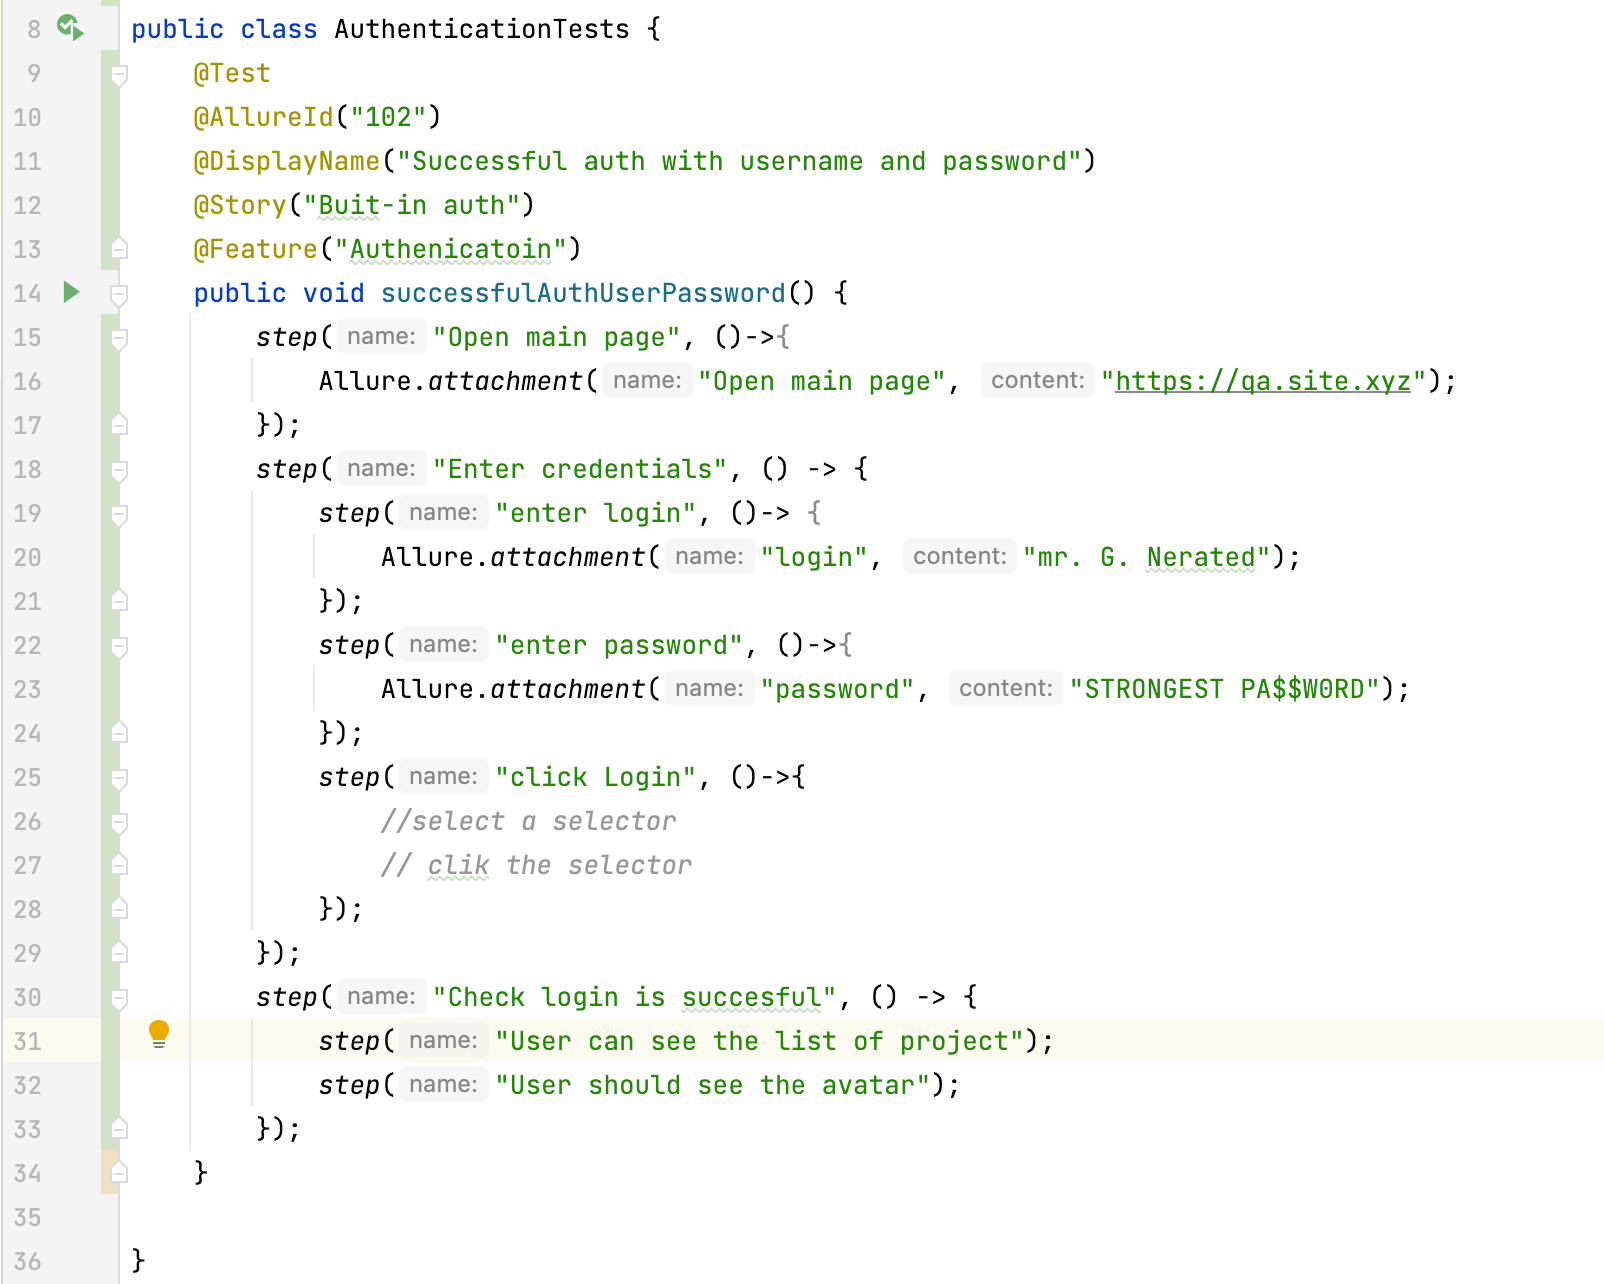
In the modal dialogue provide Allure ID from Allure TestOps to Test Case ID field and select the items to import from Allure TestOps manual test case.
Your test in IntelliJ IDEA will be updated with the information you selected and will have
@AllureIdassigned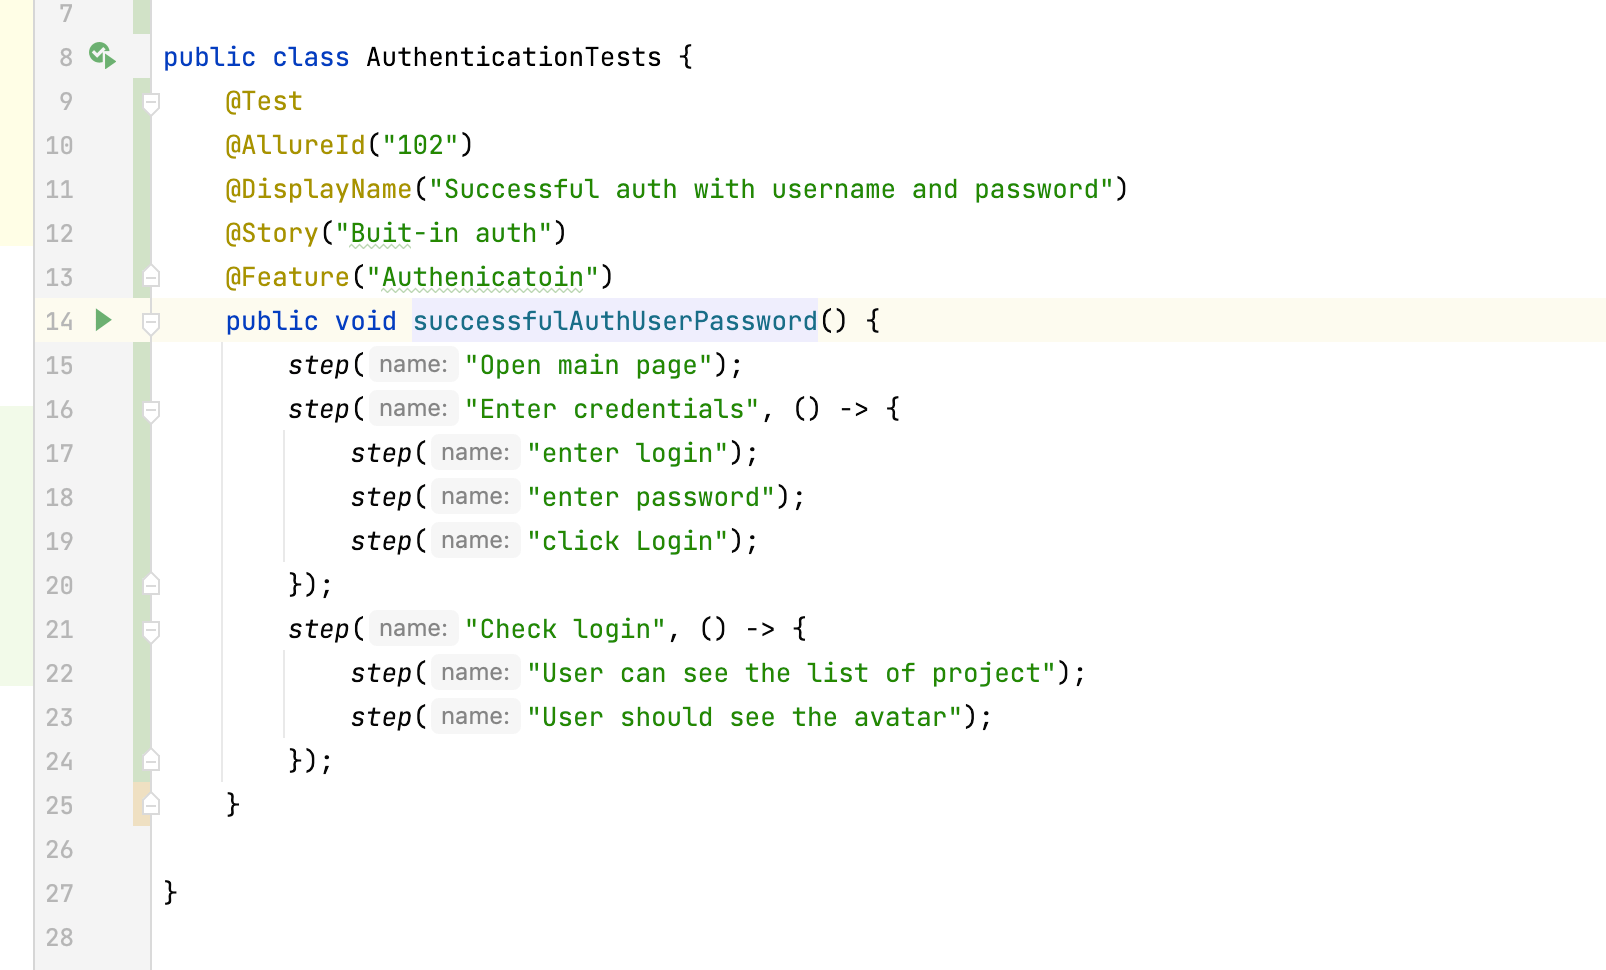
Update the scenario of your test
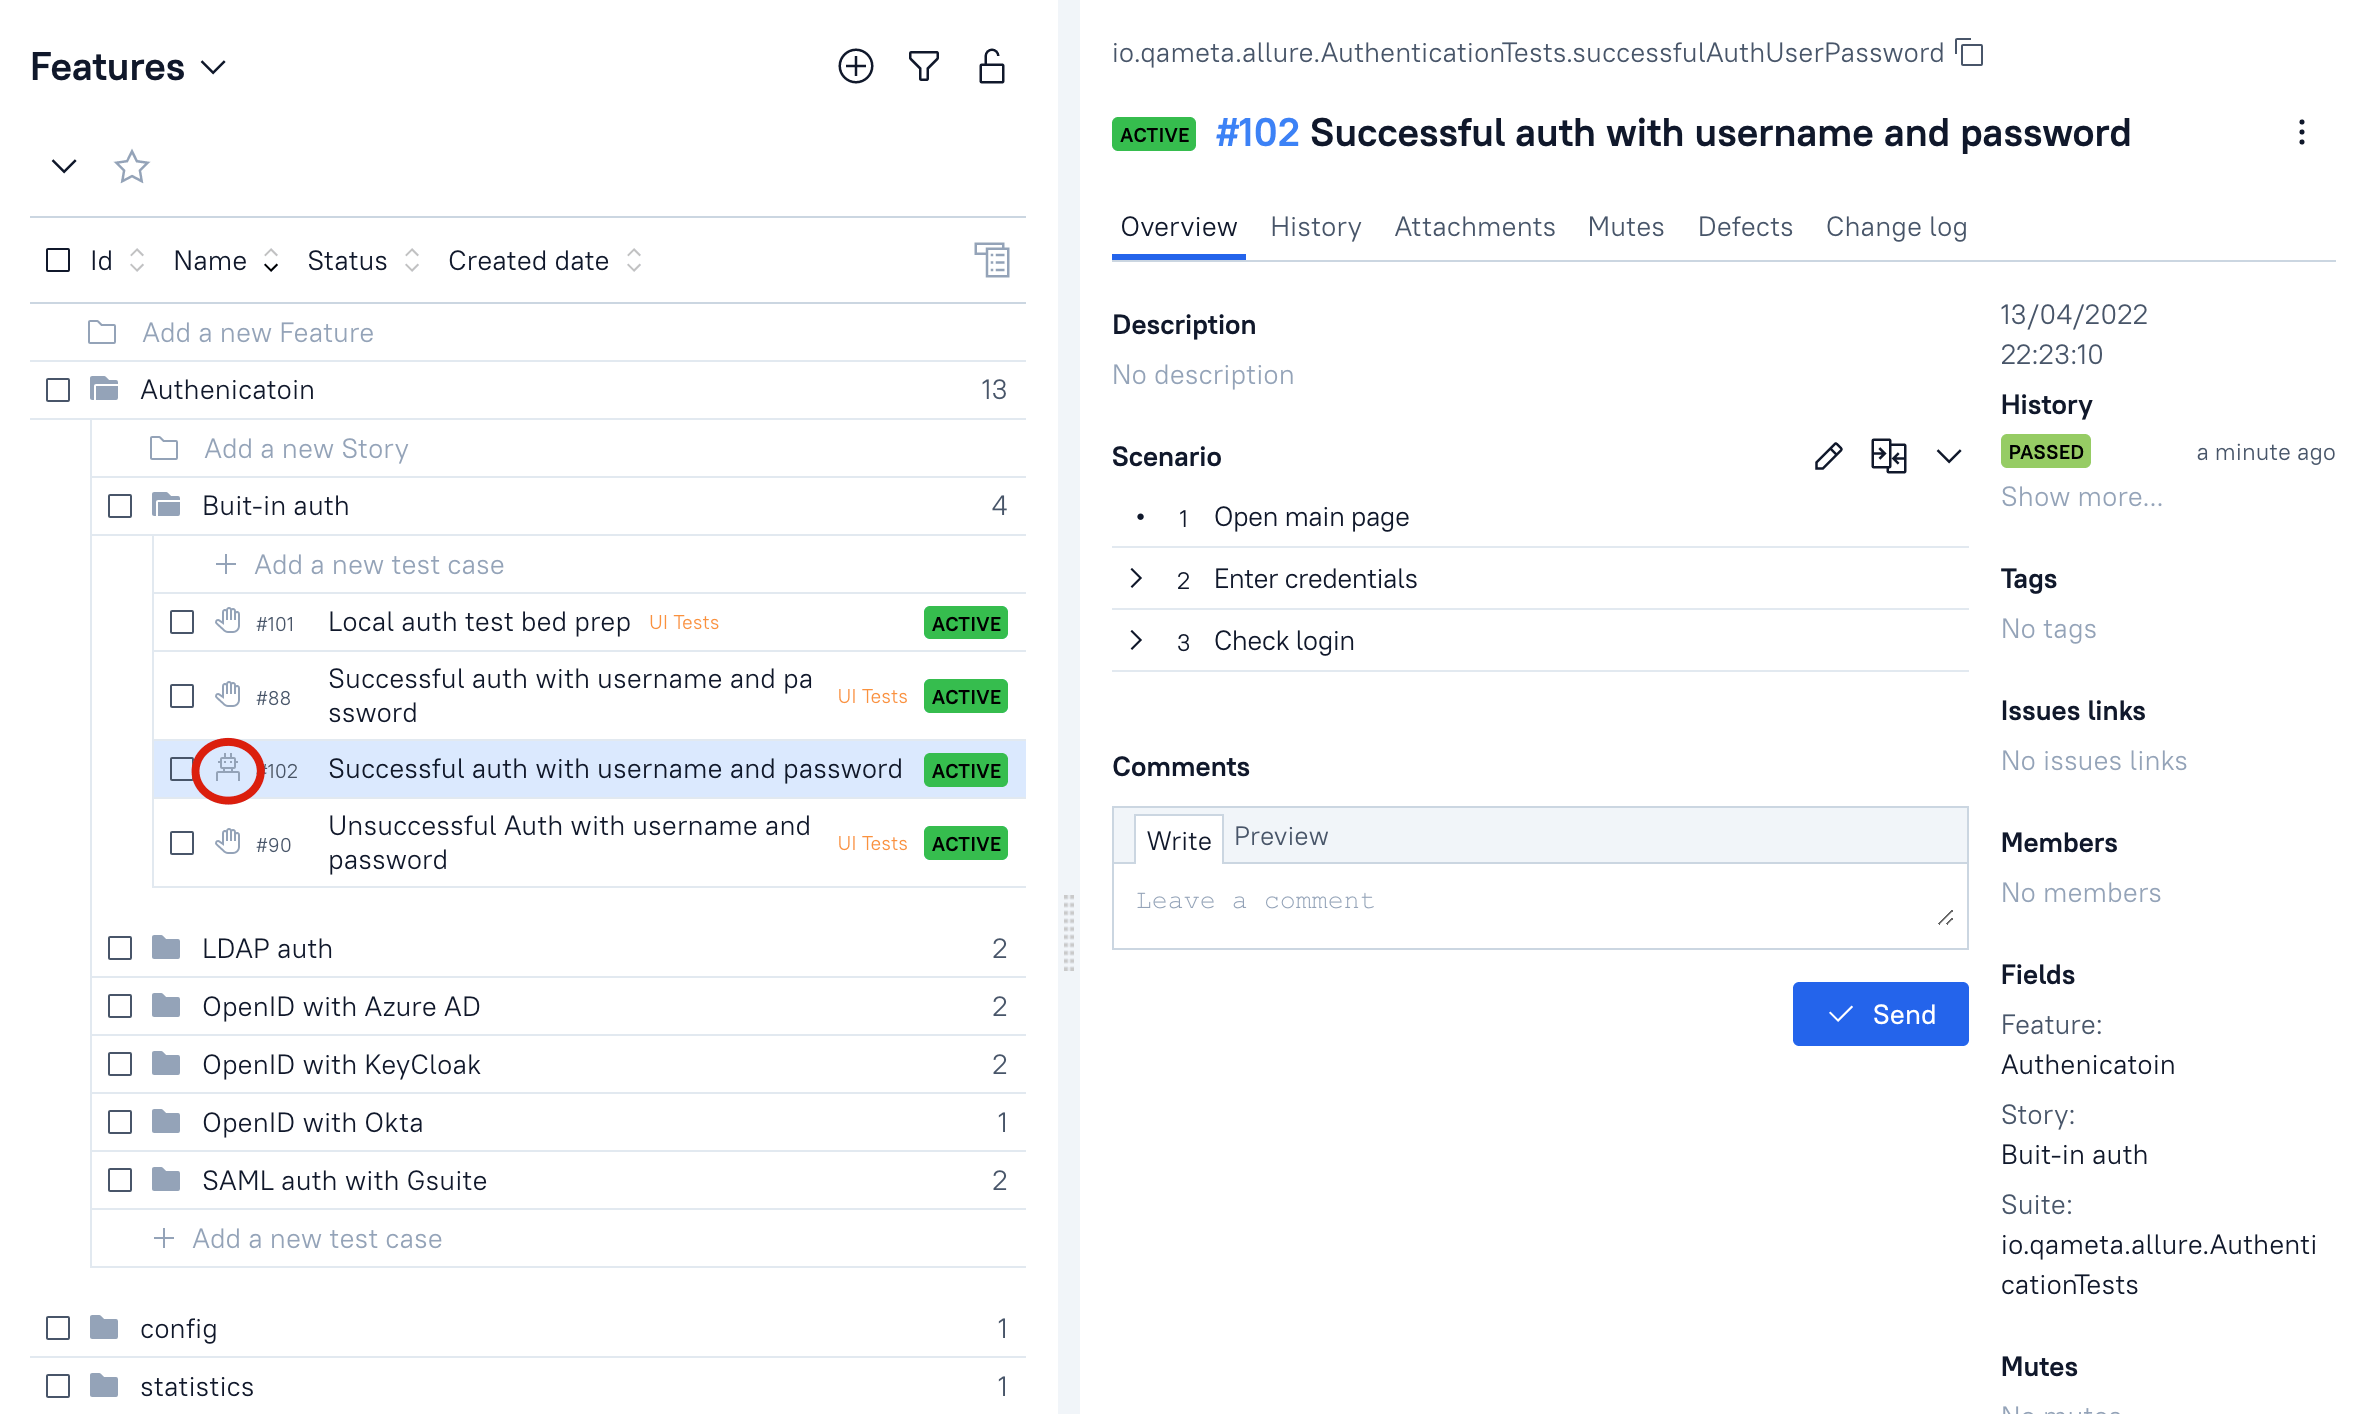
Execute your updated test and upload the results
Close the Launch on Allure TestOps side to process the results
You Allure TestOps manual test case will become an automated one
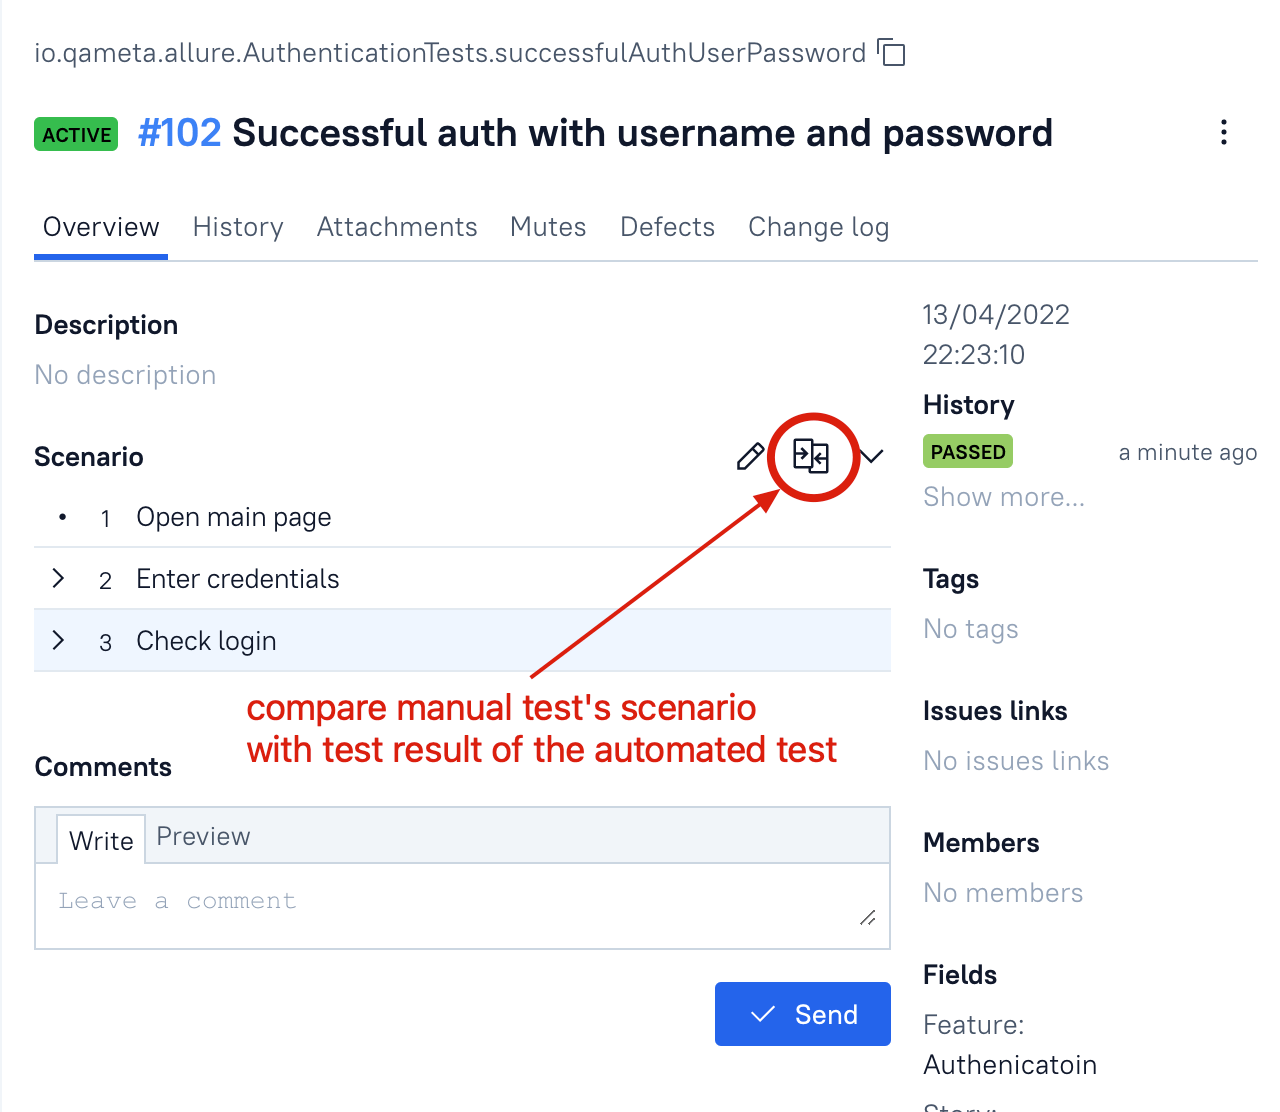
Now, to complete the automation process you need to compare manual and automated scenarios by clicking compare button near Scenario item
If you're satisfied with the results, remove the manual scenario, and the scenario from test results will be used

Now, your test case's scenario is being taken from the latest test result
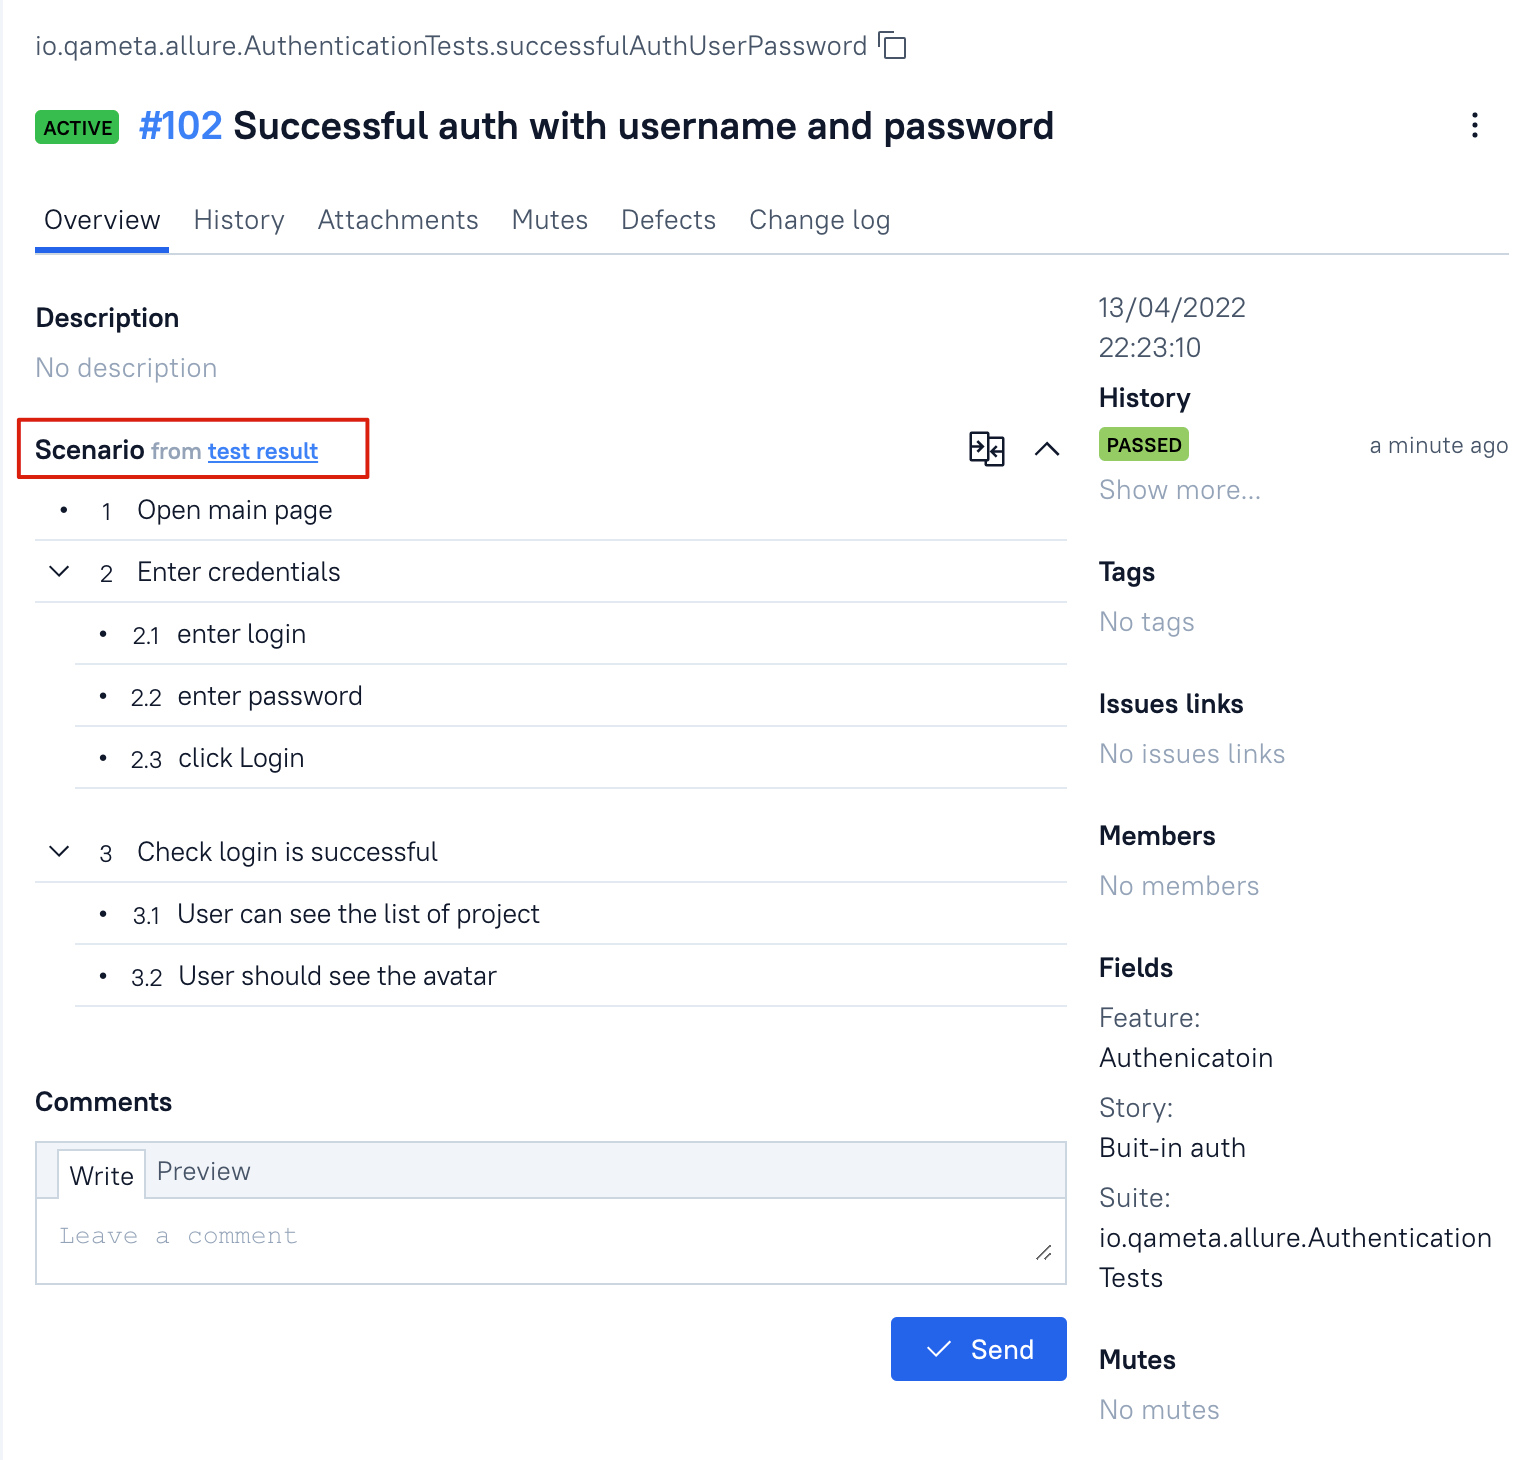
Now, your test is fully automated
Creation of automated tests form IDE and and reservation of Allure ID
Why
If you are developing an automated test from scratch, you don't need importing the data from a manual test case, so you can create an empty automated test case from IDE and assign Allure ID to it form the very beginning, so all the changes in names and parameters will be reflected in the same Test case on Allure TestOps side.
What
Workflow is the following:
- You create a test method in your IDE
- You request the Allure ID for your test
- Allure TestOps reserves the AllureID for your test and makes link between AllureID and full path of your test (
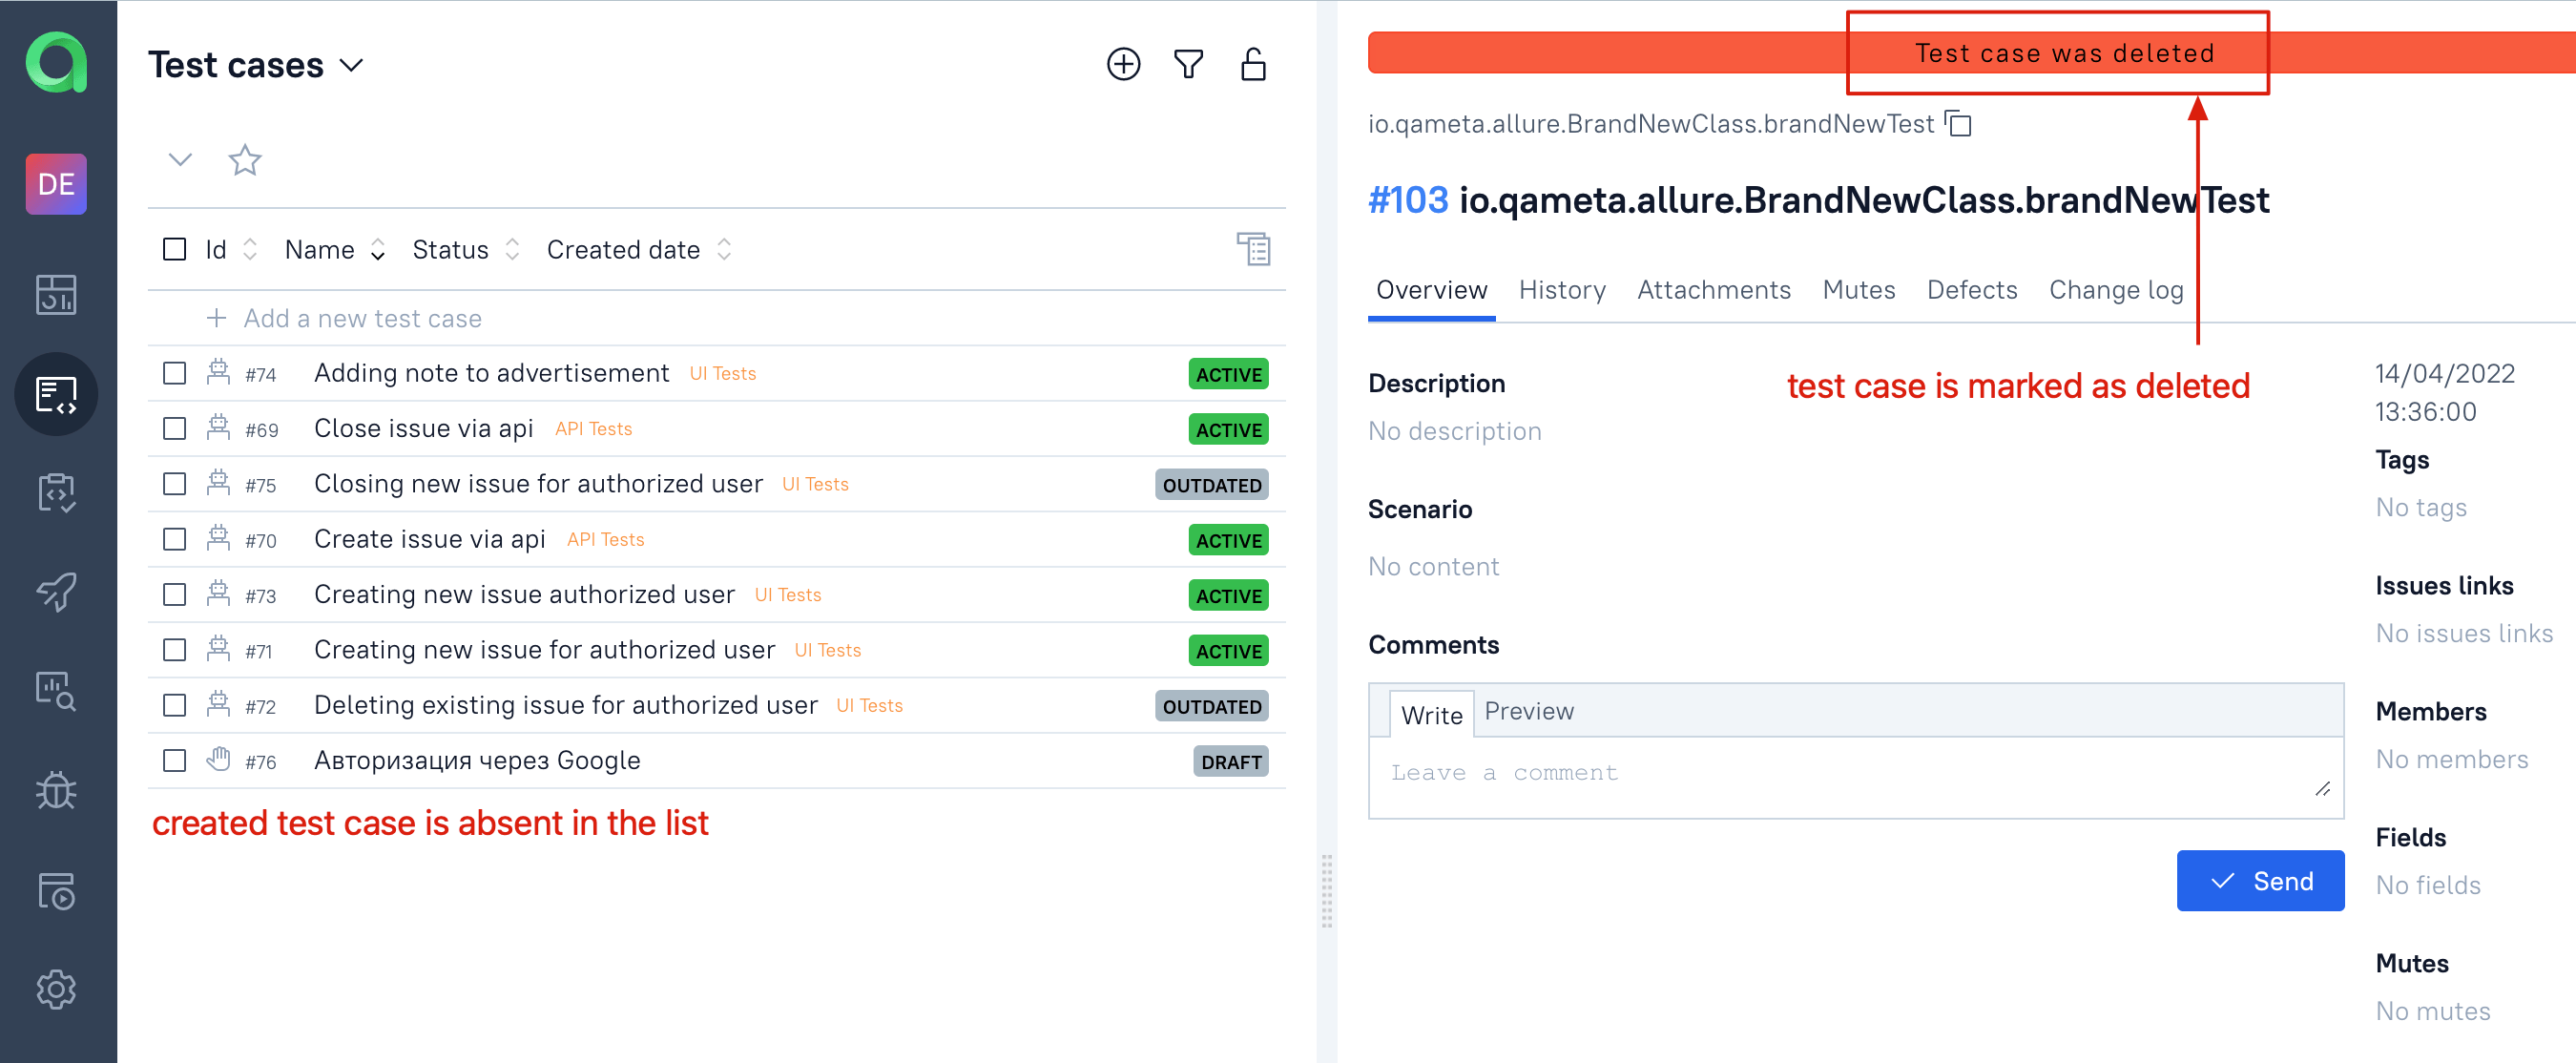
<packageName>.<ClassName>.<methodName>). - The test case in Allure TestOps is marked as deleted until you sent test results to Allure TestOps.
How
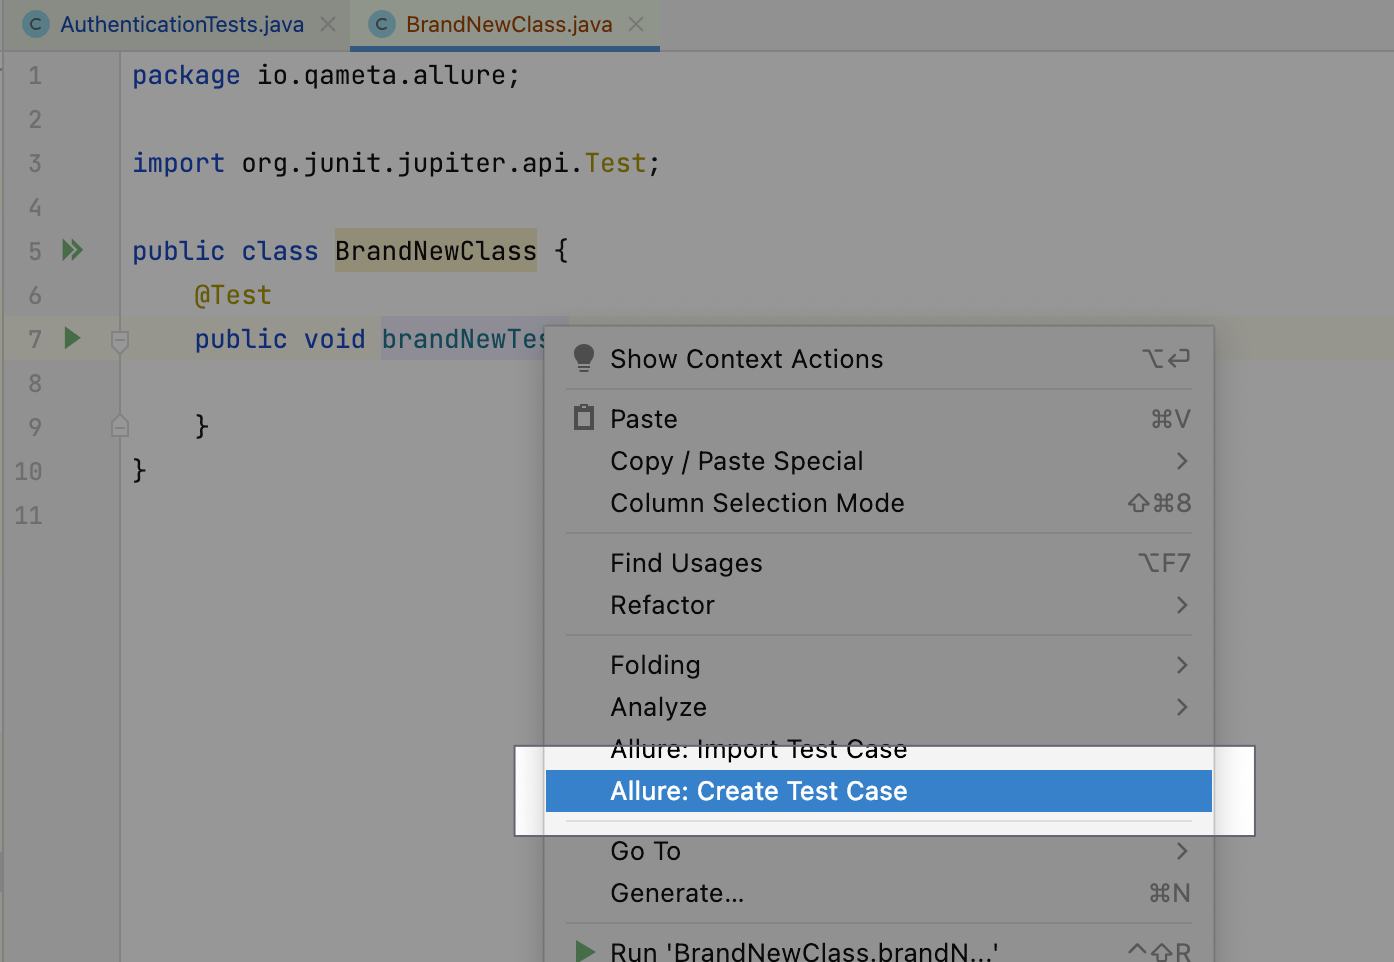
Create a new test method and right-click it. Select Allure: Create Test Case
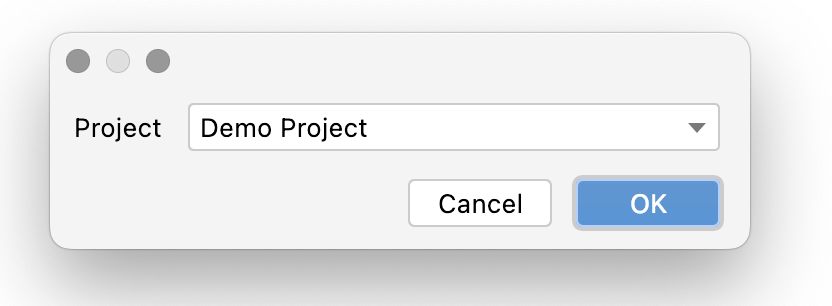
Select project name where you want your TC to be created in.
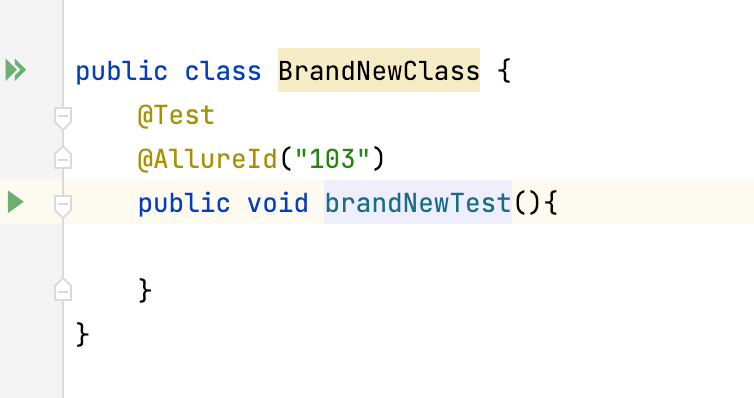
Allure TestOps plugin will create a test case in deleted state and will provide AllureID to your code.
Now, you can open test case in Allure TestOps interface by clicking on the context menu item Allure: Open Test Case
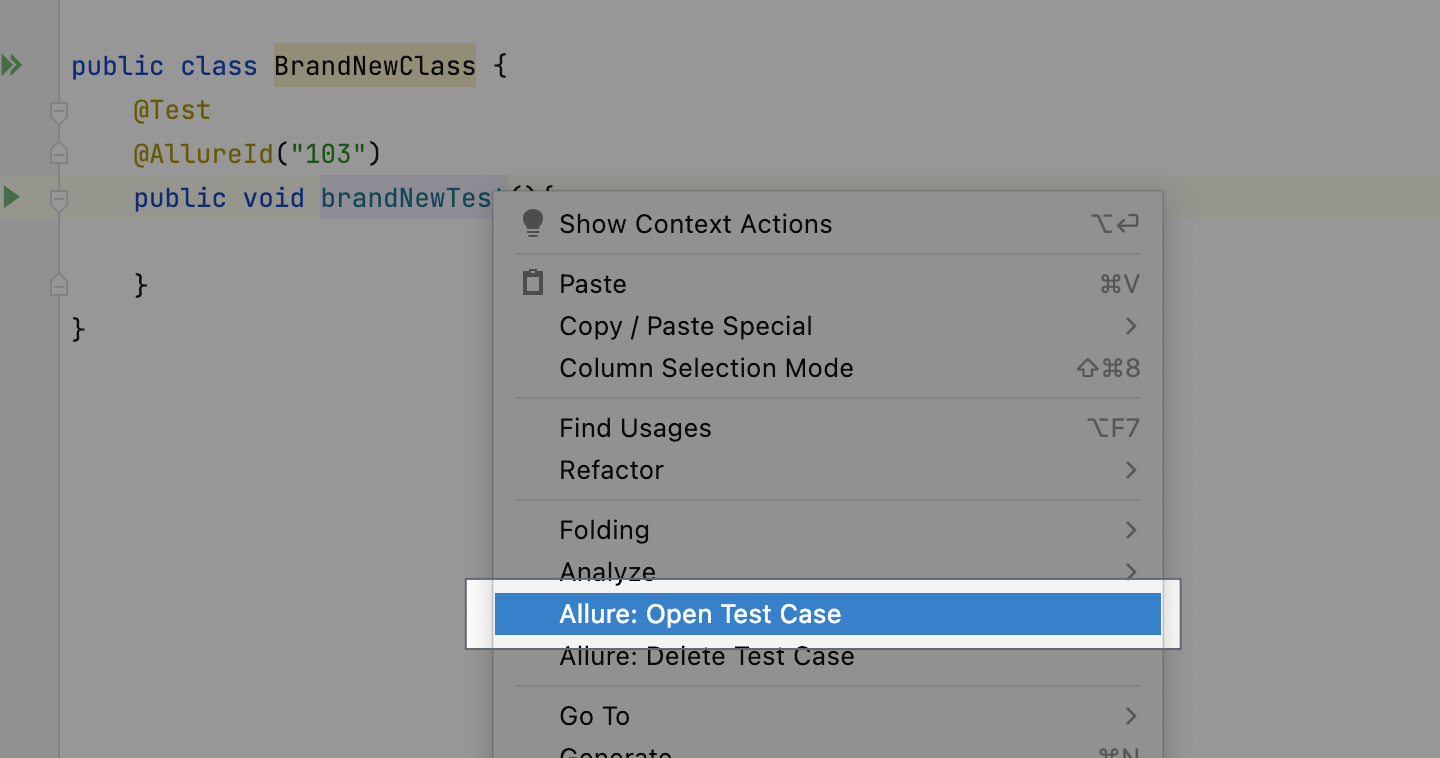
Created test case is added in deleted state as the creation only does the reservation of AllureID.
Run your test to create test results and upload the test results the test results to Allure TestOps. Remember you need to close the created launch for magic to happen. Click the close button.

As soon as test results arrived and launch was closed, your test case will appear in the list with the other test cases and Deleted state will be removed.
