Allure TestOps quick start for automation QA
Assumptions
We assume that your aim here is to understand the basic processes, all the advanced stuff like integrations and advanced settings are described in dedicated sections of this site.
The plan
Generally, work with automated tests in Allure TestOps goes as follows:
- Create a project.
- Add team members.
- Work with automated tests
- Import test results
- Analysis of the test results
- Generation of test cases
- Run/rerun tests from Allure TestOps
Creating projects
In Allure TestOps everything goes in a project. No project basically means no work can be done.
In main Allure TestOps UI click Create new project button in upper right corner.
- Name your project.
- Add abbreviation
- Add a description.
- Decide whether it should be public or not (see Project visibility below for clarifications).
- Hit Submit to start working on your new project.

Project visibility
Projects are private by default if not explicitly specified as Public.
Public projects are visible and accessible by every person that has an account in Allure TestOps.
Private projects are not visible for registered users that aren't added to these as project team members.
Abbreviation
Abbreviation is a 2 chars project's short identifier, it'll be either filled by you or by Allure TestOps automatically.
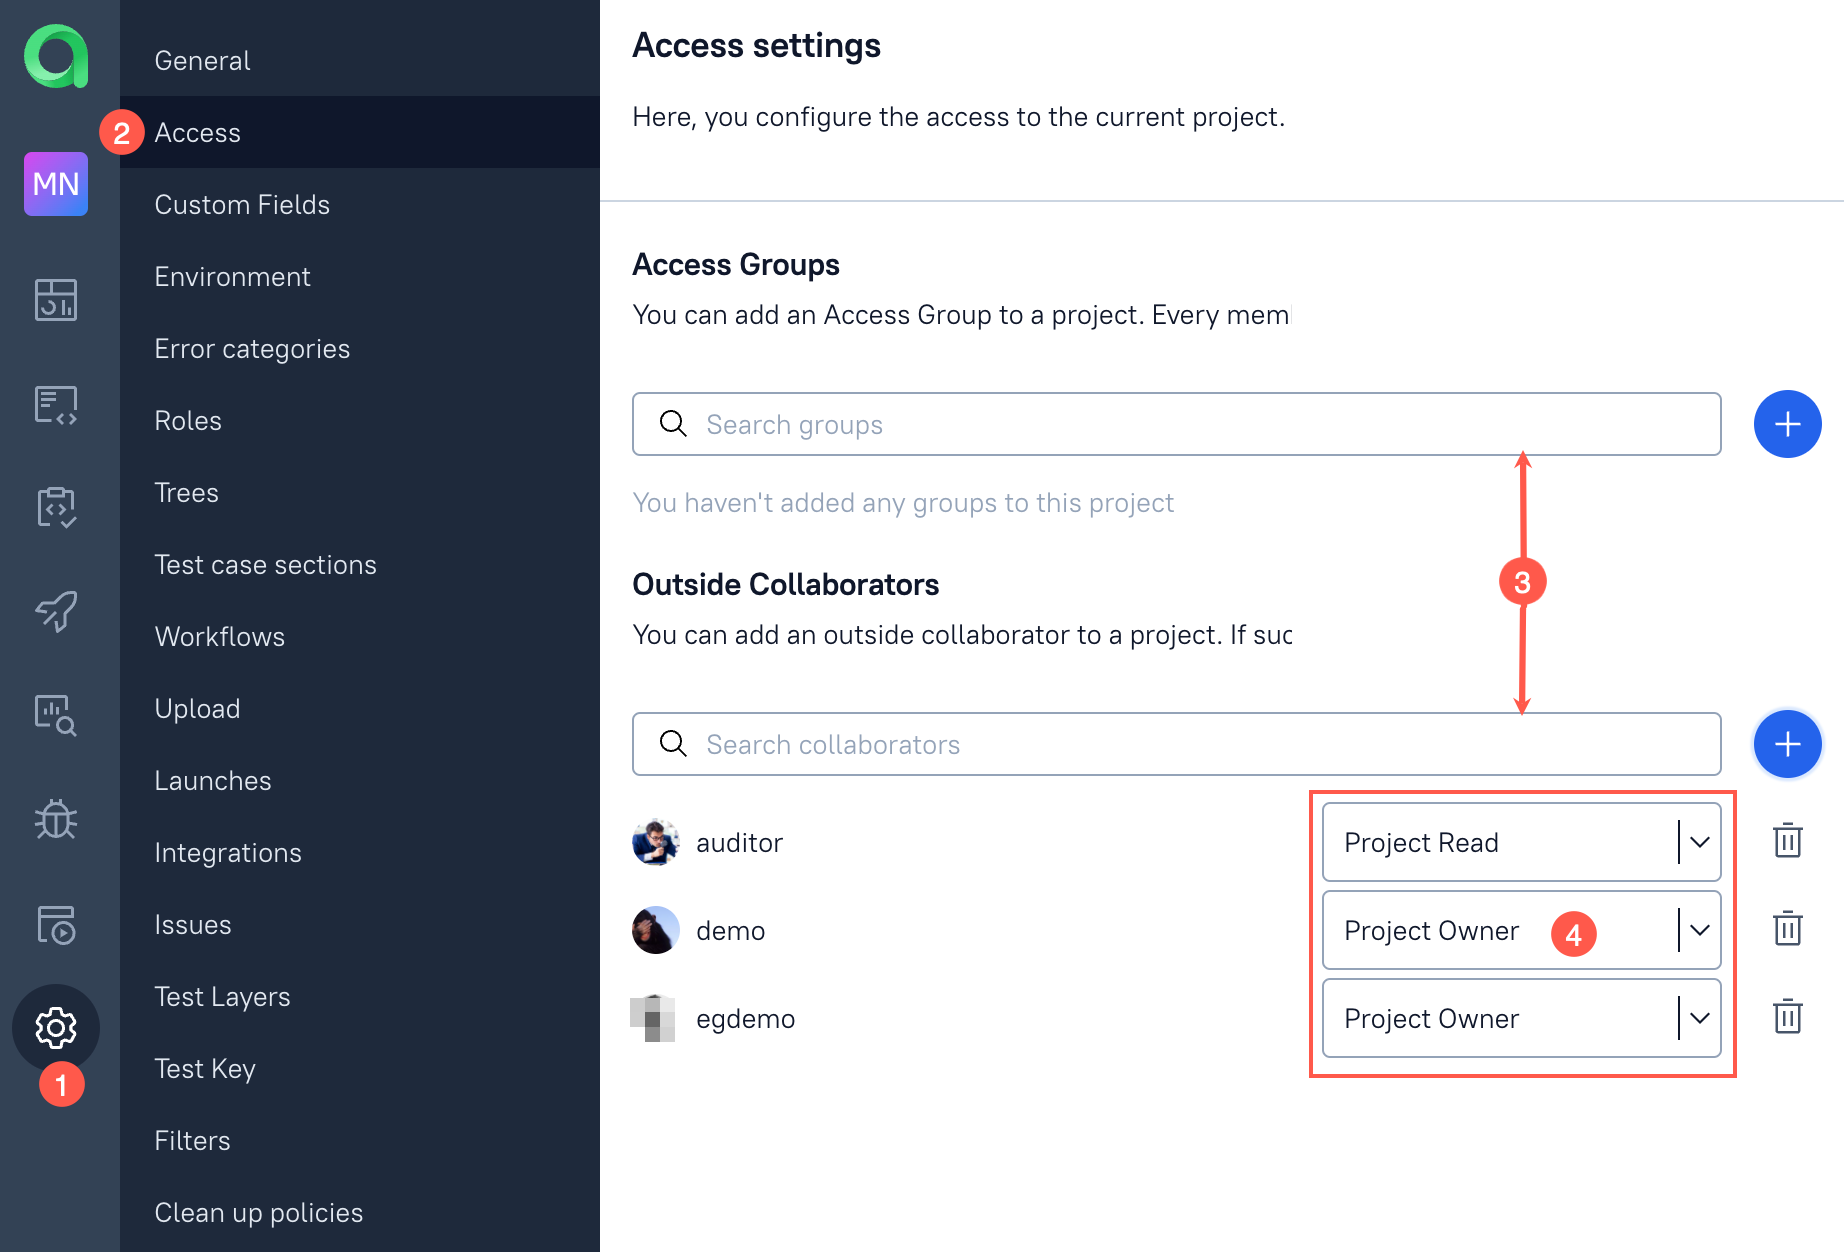
Adding team members
The person created a project will automatically become an owner of the project.
To add team members to your project do the following:
- In a project jump to the Settings.
- Select Access.
- Either in Groups or in Collaborators section find needed group or a person
- Set permission level for new team member (group) and click green plus button.
Working with automated tests
Now, when the project and team are set we can start working with automated tests.
As said before, first we need to upload the test results. We'll describe the automation of manual tests and generally creation of the automated tests in the description of IntelliJ plug-in.
Say, you have written bunch of test in your favourite test framework and they are running on your CI and so what? You need to provide the test results to a person that needs these results in consumable format. You need to keep in mind this person won't worry about looking into details as they are probably not tech savvy.
What shall we do?
Import test results to Allure TestOps
Why?
Allure will generate the test documentation and keep it updated based on the test results you upload.
Allure will ease the problems resolution process, i.e. will save your time (time = money, right?).
Allure will allow you analysing the test results by creating dashboards and widgets with the analytics, thus will allow you to find the problem areas, ineffective tests, and problematic ones, i.e. same you will save time and money.
How?
Assuming someone in your company already uses Allure TestOps, you just need to show to Allure TestOps where the tests results reside, tell what's the name of the project and plug-in or command line tool will send the test results to your project.
Integration with CI servers
Detailed description of the settings for the upload for each integration with a CI system is described in the integrations section.
Run your build job
For whatever CI system, after the configuration of Allure TestOps upload tool (plug-in or allurectl) is performed, just start your job and jump to your project in Allure TestOps to the section Launches.
You will see your launch's progress:
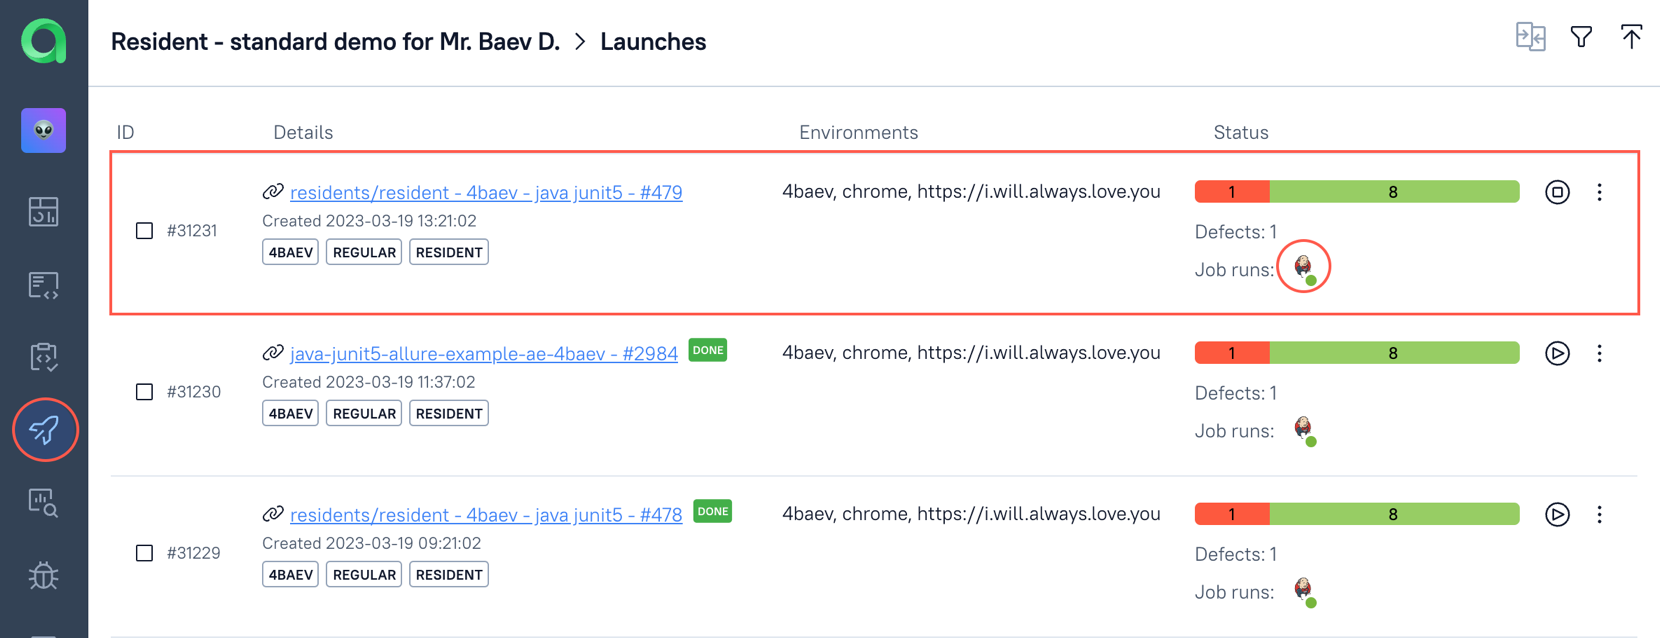
Then you will see that the test results starting to arrive from your CI to Allure TestOps.
If the executor's icon stopped blinking, then all of your test results arrived.
Analysis of test results
Analysis of the tests results goes in the tabs of a Launch. To start the review of a Launch, select it in the list of launches from the main UI of a project.
Overview tab
Overview will show you basic analysis for a launch.
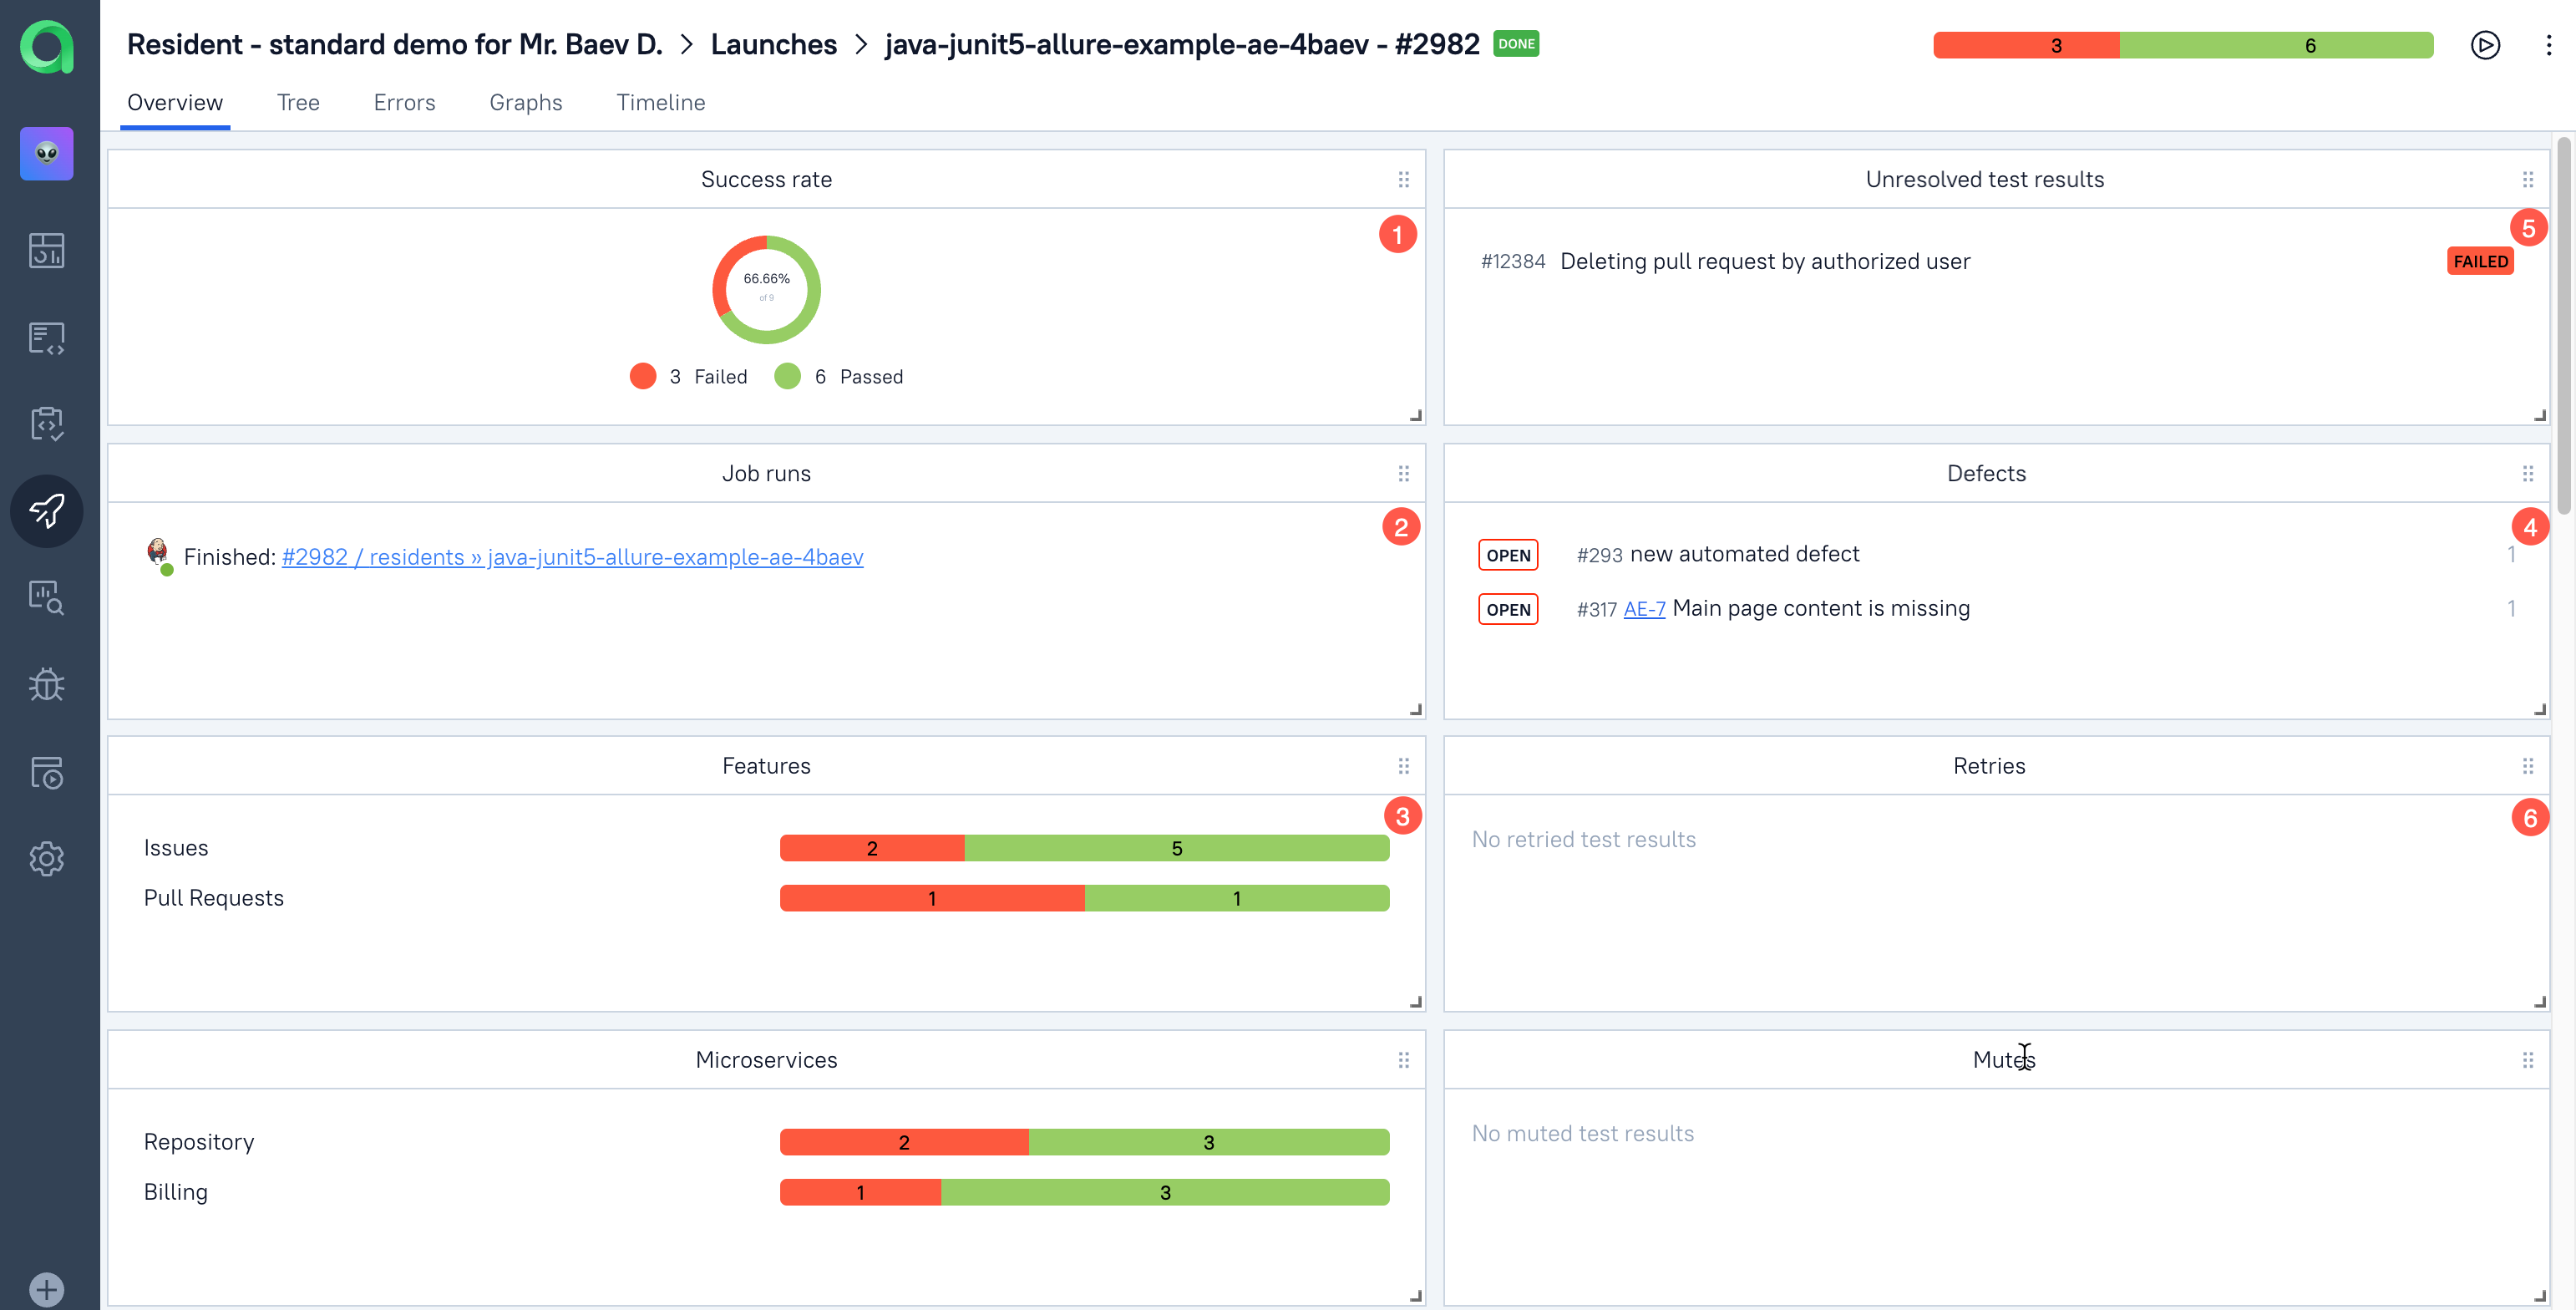
- Success rate widget shows the balance between passed and failed tests.
- Job runs shows the number of the job runs within current Launch, there could be several job runs if you made retries for some of the tests (will discuss that later on).
- Features and Suites widgets show the distribution of tests between the trees for Features or Suites defined by default for each project and their status (passed, broken, failed). This could be extended in project settings.
- Defects will show you the failed tests that your team has already analysed and detected the root cause of failure and maybe even the faulty part - code or the test, and defined a way to fix the failure. Defects are defined manually and assigned by Allure TestOps in automated way based on the created rules.
- Unresolved test results widget contains all the test results that are either failed or broken and aren't assigned to any defect, i.e. here you will see the test results you still need to analyse.
- Retries widget will contain the test cases you've retried in scope of current Launch.
Tree tab
Tree tab shows the test results in a tree structure defined for each project. By default there are two trees defined by the system - Suites (1) and Features (2) and a flat view (3).
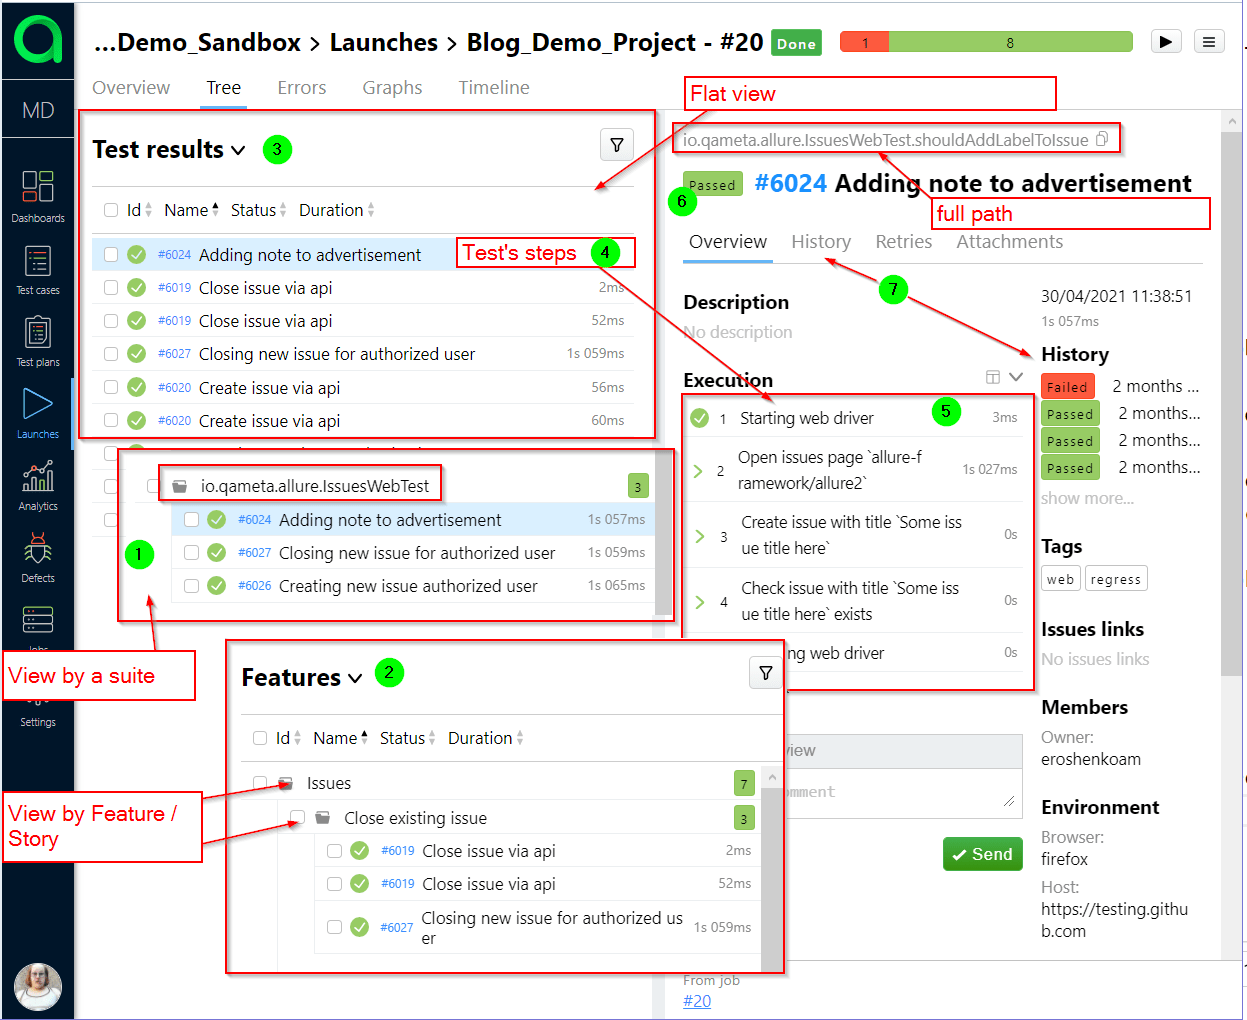
In the tree tab you can check all the test results received from your CI system by selecting a test case in a tree (4).
If no additional settings has been made then each test will contain the basic information at least about the Suite a test belongs to, steps (5), status (6), execution history (7), owner of the test if defined in the test cases code. Tree tab, or more specifically the test case area allow you to link a failed or broken test to a defect, assign mute to failed or broken tests and rerun the test to check if the failure was just random event or there is a real problem with it.
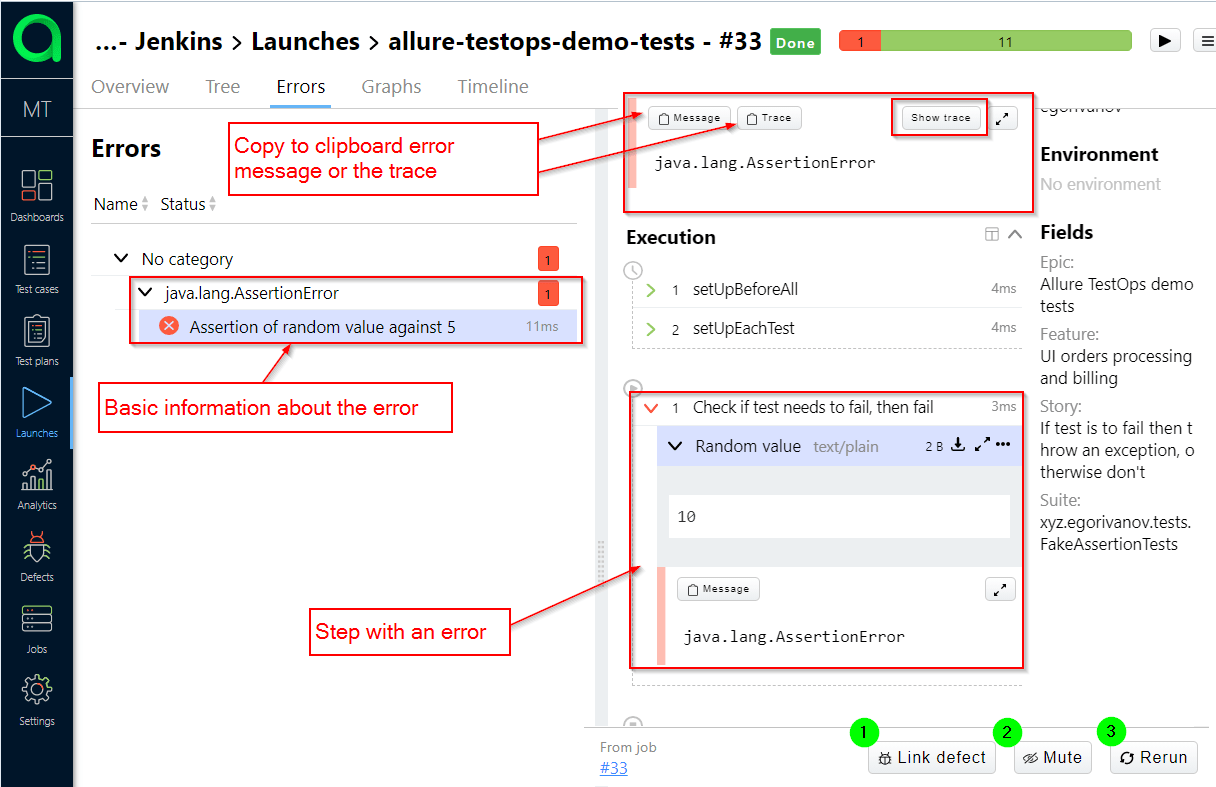
Errors tab
Errors tab will aggregate all the errors appeared in current Launch and will allow you to analyse the error messages, trace and assign a defect (1) to a certain error, mute (3) a test or rerun (3) test with errors.
As said before a defect means that you've analysed and understood the problem and further analysis of similar errors is not needed.
Mute will allow ignoring tests with similar errors if they are assigned to a certain issue in an issue tracker. Tests will arrive but the results won't be shown unless test is unmuted.
Rerun allows you to run a test again to check if the failure was not random but caused by some real error.
Graphs and Timeline tabs
These tabs will show you how your tests have been running over the time.
Generation of test cases
Test cases or test documentation or Live documentation is generated based on the test results. To generate the documentation for your tests you need to close a Launch.
Closing a Launch
Two ways:
- manual closing: just push the button.

- automated closing, settings either on global or on project's level
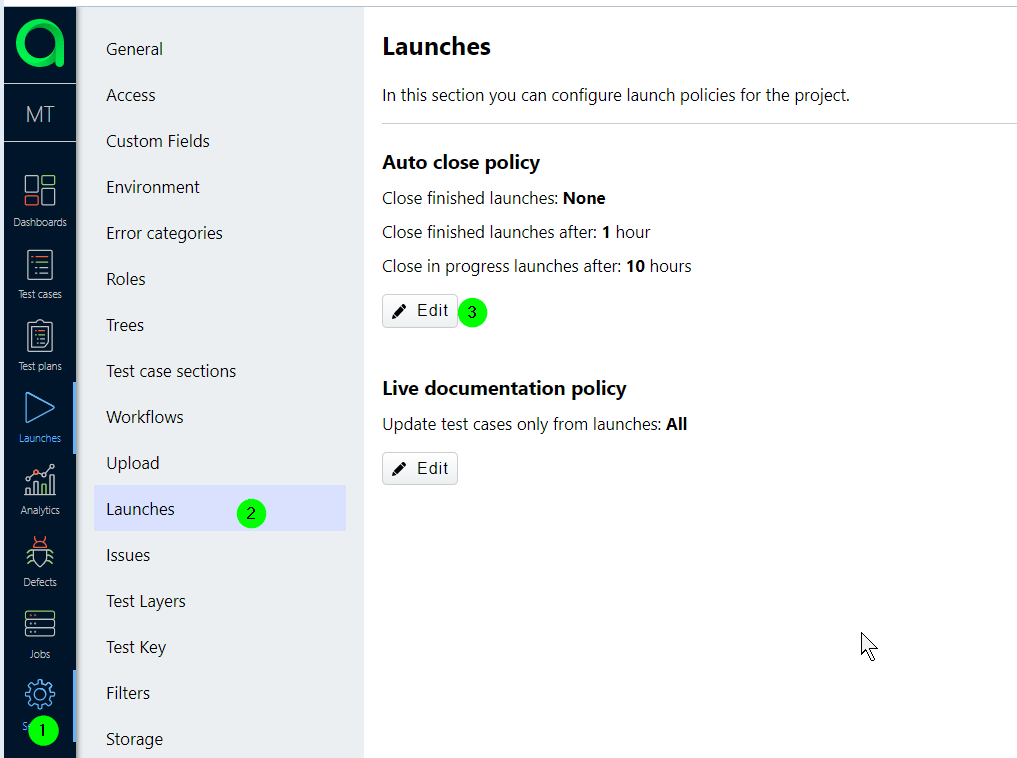
Test cases will be generated right on the closure of the launch. Alongside with the generation of the test cases Allure TestOps will count the test result for closed launch in the statistics and they will be shown in all the analytics dashboards/widgets.
Statistics / analytics / are considered as advanced study and described in [dedicated sections].
Run / rerun jobs and test cases from Allure TestOps
There are several scenarios here to run tests from Allure TestOps side:
- Run full CI job.
- Run a set of tests.
- Run a test plan
- Rerun tests failed, broken or whatever tests from an open Launch.
Run full CI job
Prerequisites
To run entire build job existing on CI server from Allure TestOps you need to run CI job it at least once on CI side and receive the test results.
Running a job
- To run entire job in your project jump to Jobs section of your project select an existing job and press run button (first button for a Job).
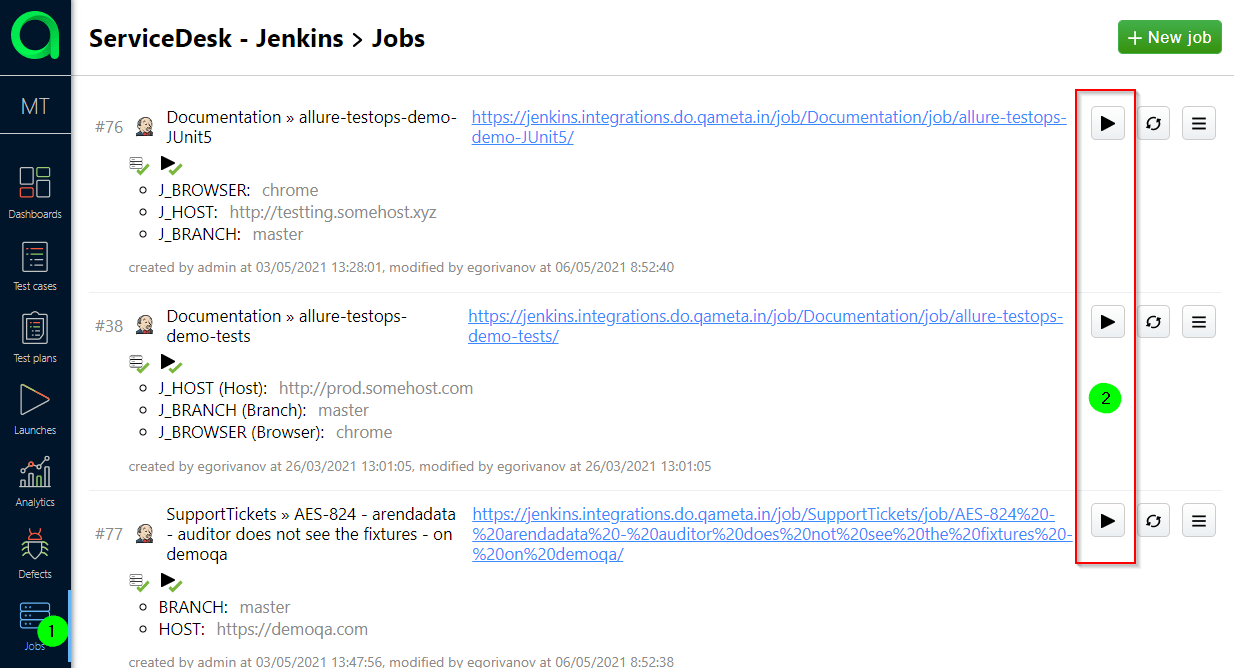
- Do not change anything in next modal window but just press Submit.
- Then you can jump to the Launches section to check the status of your launch.
Run a set of tests
- Jump to the test cases section select the test cases in a tree.
- Select test cases you want to run on CI side.
- Click on bulk actions button.
- Select Run
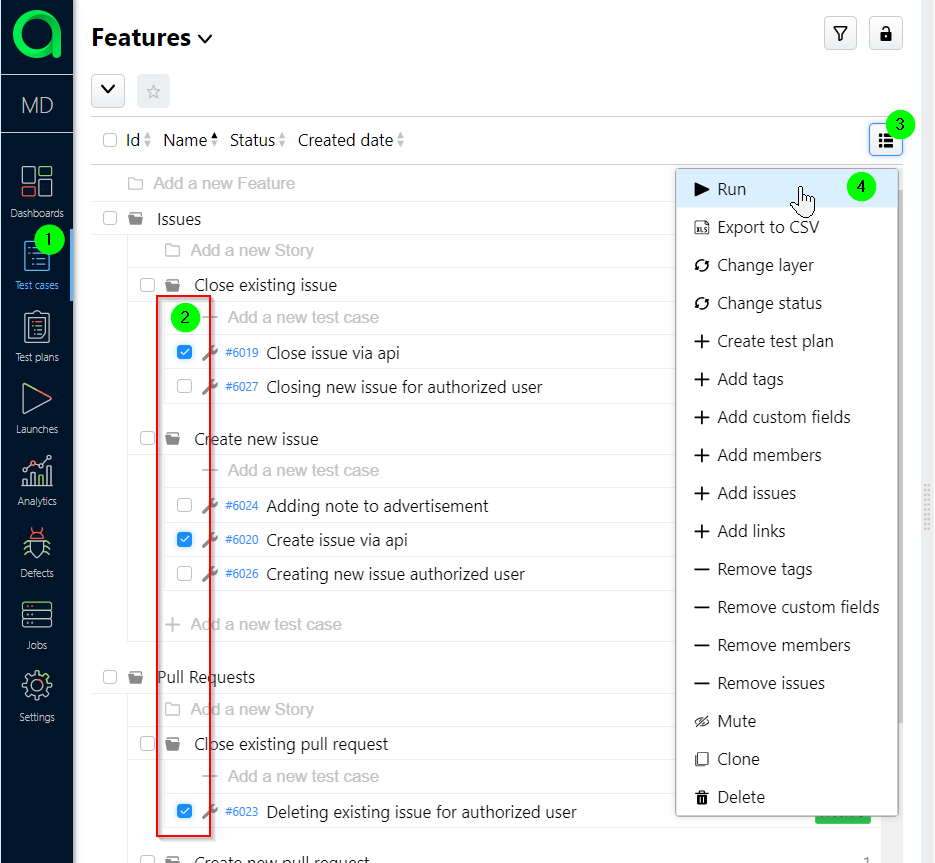
- Do not change anything in next modal window but just press Submit.
- Then you can jump to the Launches section to check the status of your launch.
Run a test plan
If you haven't any test plans, then let's create one.
Creating a test plan
There are several ways, but let's settle on creating from Test cases section.
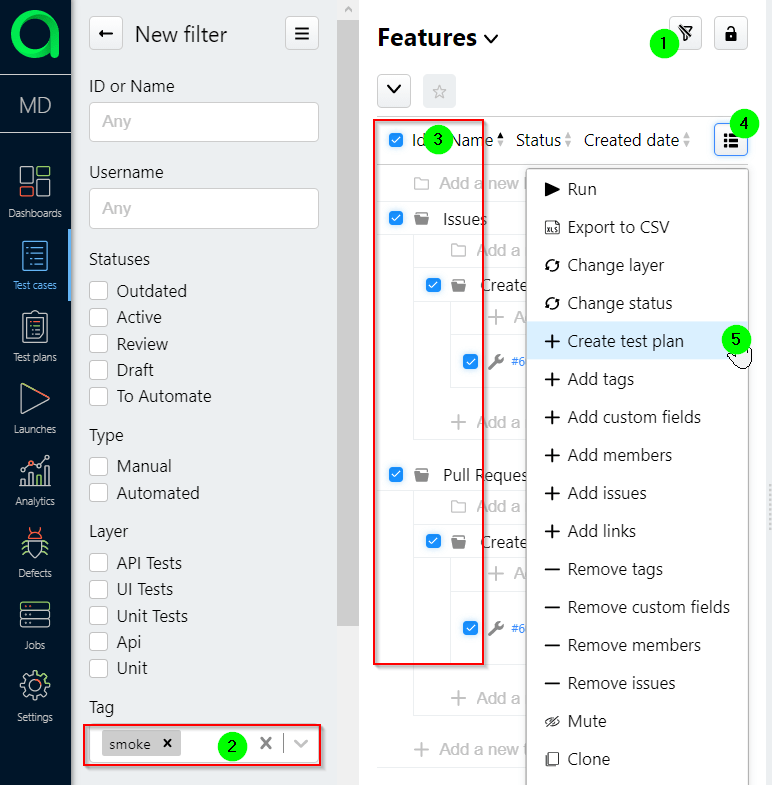
- In test cases section enable filtering.
- Apply some filter (e.g. by the tag 'smoke').
- Select all test cases appearing after you've applied the filter.
- Click on bulk actions
- Create your test plan.
Running a test plan
- Jump to Test plans section.
- Click Run for the test plan of your choice.
- Don's change anything and click submit.
- Then you can jump to the Launches section to check the status of your launch.
Rerun tests
Why rerun?
Say, you're not sure if a test is really faulty or broken and you need to test your hypothesis. Or you could have some other reason.
Rerun
- Jump to launches.
- In an open launch enable filter for tests.
- Apply the filter to select Failed test only.
- Select all failed tests, apply bulk action Rerun.
- Use the parameters suggested by Allure.
- Then you can jump to the Launches section to check the status of your launch.
Summary
These are the basic actions you will need when starting your way with Allure TestOps.
For advanced actions please use our other guides and FAQ.
