Allure TestOps quick start for manual QA
In Allure TestOps everything goes in a project. No project basically means no work can be done.
Generally, work for manual testing goes as follows:
Create project
In main Allure TestOps UI click + New Project button in upper right corner.
- Name your project.
- Add comments or description.
- Decide whether it should be public or not (see Project visibility below for clarifications).
- Hit Submit to start working on your new project.

Project visibility
Projects are private by default if not explicitly specified as Public.
Public projects are visible and accessible by every person that has an account in Allure TestOps.
Private projects are not visible for registered users that aren't added to these as project team members.
Abbreviation
Abbreviation is required now, but it will phase out in upcoming releases.
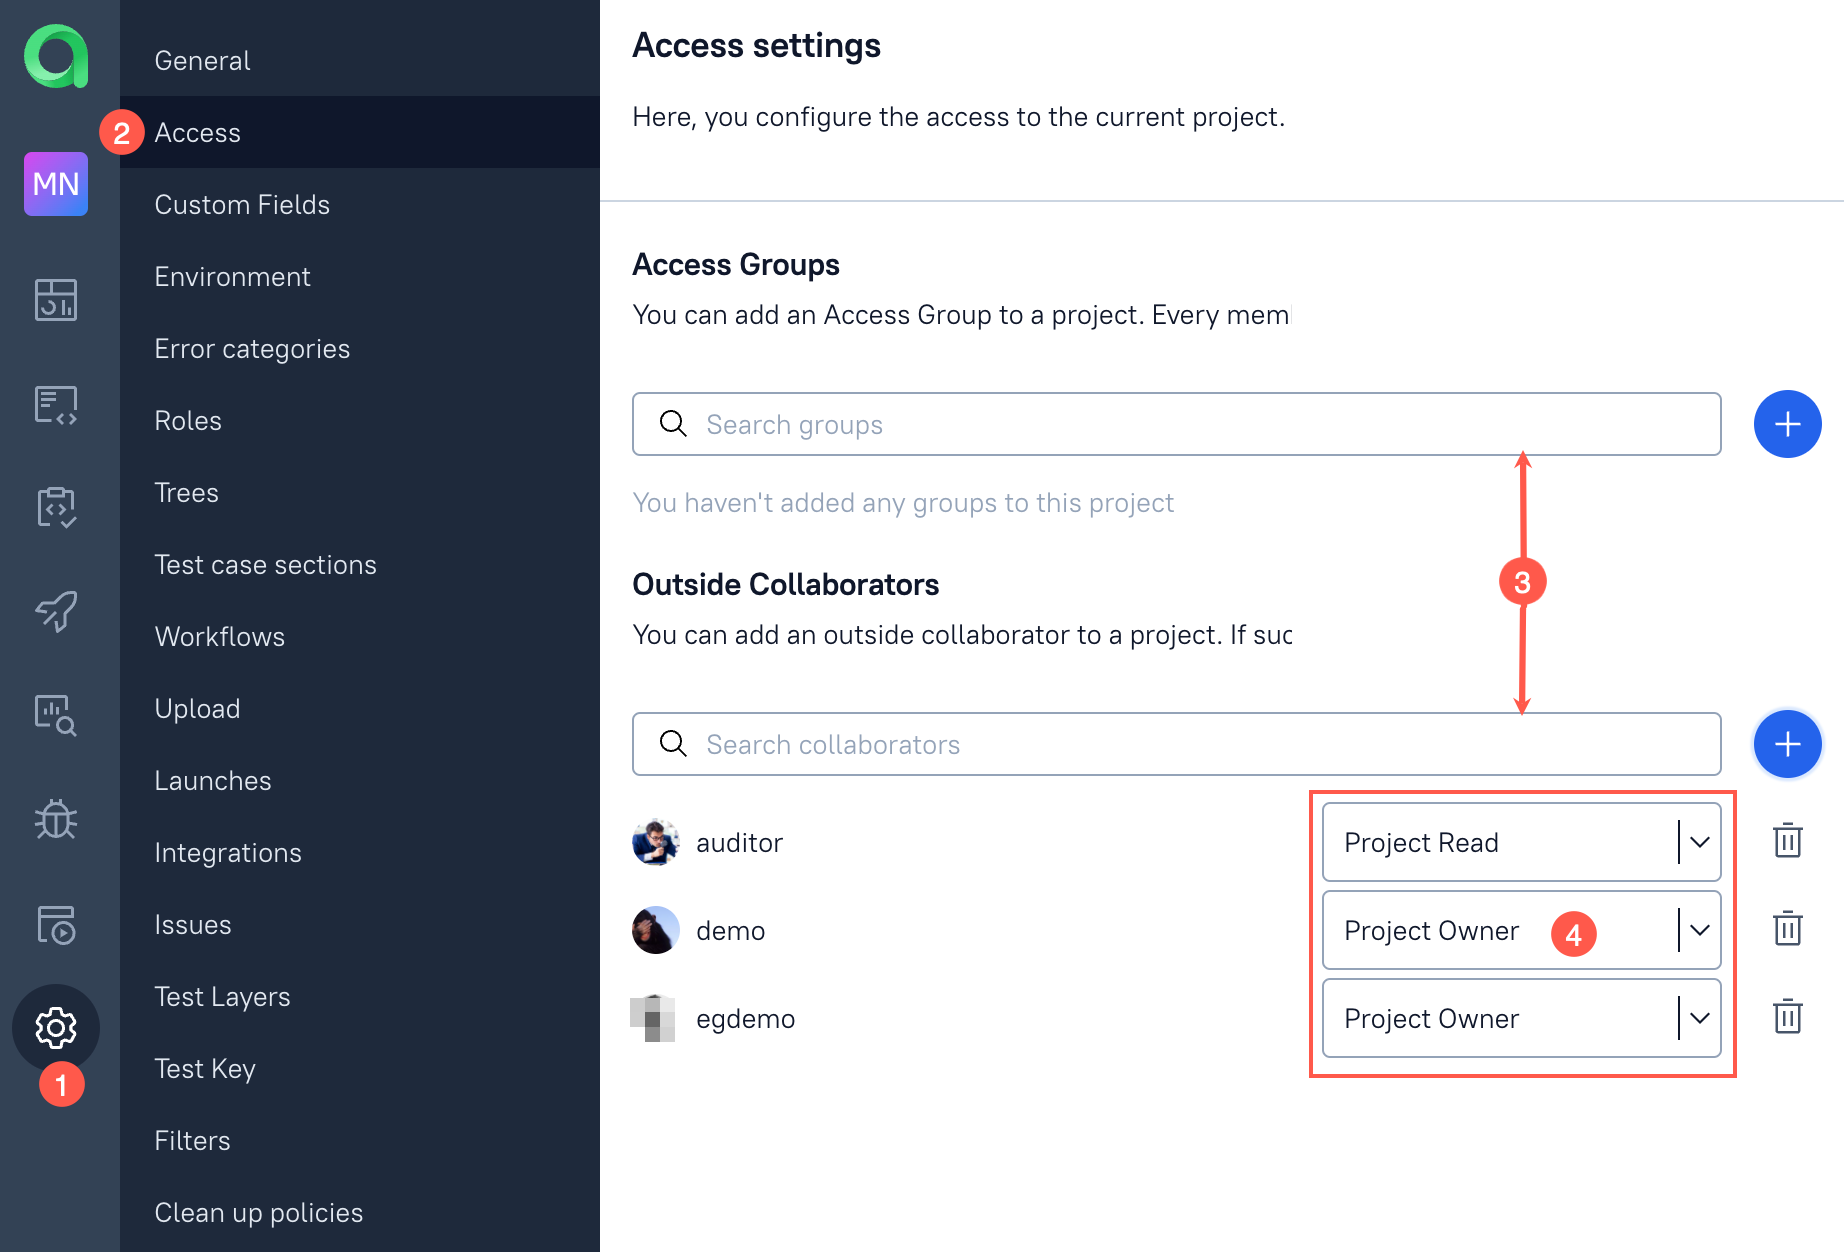
Adding team members
The person created a project will automatically become an owner of the project.
To add team members to your project do the following:
- In a project jump to the Settings.
- Select Access.
- Either in Groups or in Collaborators section find needed group or a person
- Set permission level for new team member (group) and click green plus button.
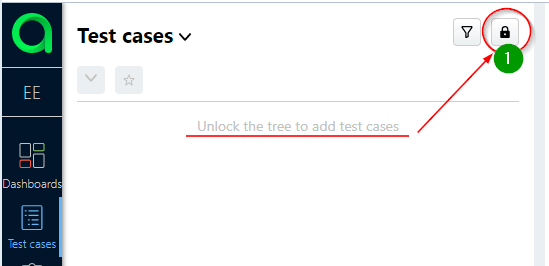
Create test cases
Now, it's time to create some test cases.
In Test cases section unlock the test cases tree.
In the unlocked space locate + Add a new test case line and type the name for your test case and press Enter key.
- test case will be created with Draft state.
- test case will get a unique ID
Select test case in the tree.
- Test case edit form will appear on the right side of the screen and you can finalise its creation.
Add a description to your test case.
Fill the scenario steps and press Submit button
- to create several lines of text, press Shift + Enter
- to convert a step to a substep, drag and drop it on another step
- to convert a substep to an independent step, press Shift + Tab
- to highlight a word (e.g. Arrange), put it in square brackets [Arrange]
- you can attach a file to a step or paste a screenshot from the clipboard

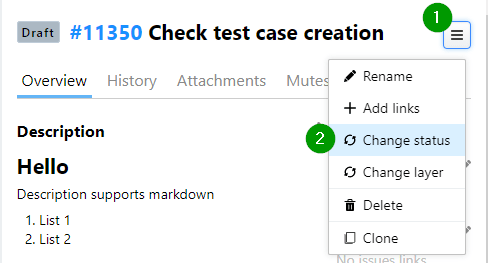
- After a test case is created it needs to be reviewed and approved for the usage.
- in a test form click Test case actions button
- select Change status
For Default manual test case workflow select Review and submit the form.
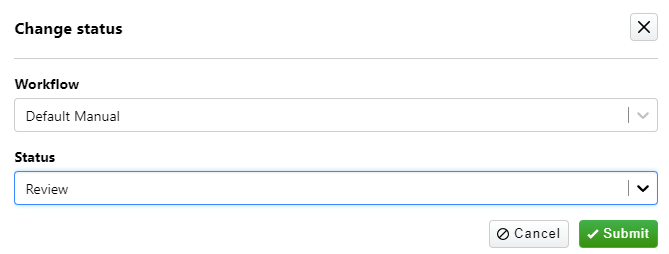
- A person making test case review will update the status of a test case to Active
- Now, the test case is ready for launch
Is that it? Definitely not. We also thought about the parameterized manual test cases and other stuff described in more detailed sections dedicated to the test cases.
Import test cases
The test cases also can be imported from third party TMS or from a MS Excel document or from Google tables document. Allure Testops allows you importing the test cases using a CSV file.
Please read this article covering the import process.
Run test
As usual in this life there are options, so we can run test cases
- form the test cases list
- from a test plan (yeah, you need to create it first)
Launching tests from test cases list
- Go to the test cases section (if not there yet), and select at least one test case.
- Press bulk actions button above the list of test cases.
- Select Run.
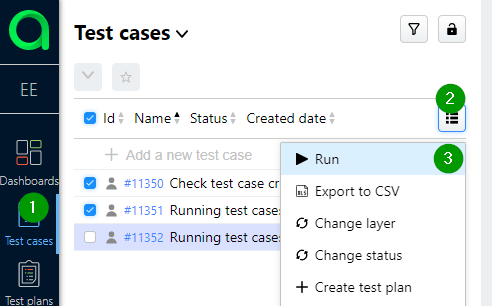
The run command will create a tests launch. Launch requires some additional information.
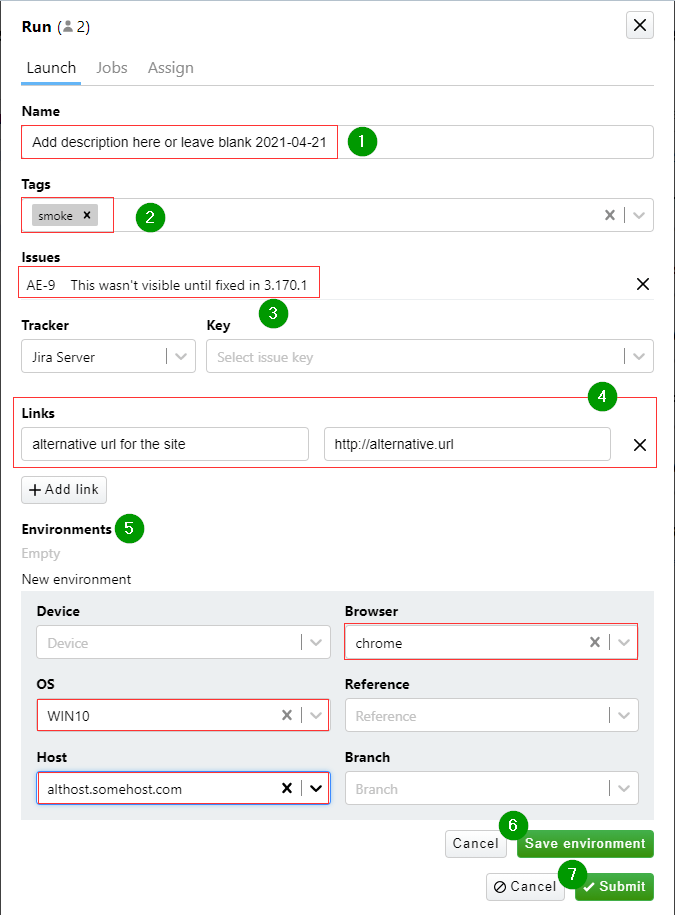
Launches parameters
- Name can be omitted, then automatic name will be created based on th date.
- Tags - add tags, it will help you filter the test results, i.e. if this is a smoke test launch then it is definitely worth to add smoke tag.
- Issues. You can link this very launch to an issue in an issue tracker system. This is considered as advanced set-up and usage and is described outside of the quick start in Administration section.
- Links. You can provide any link here with adding the description for it.
- Environment defines important conditions for a launch like browser, operating system or anything else. The environment set is adjustable and you can create your own environment parameters. This is described in details in Project's description.
- don't forget to Save environment.
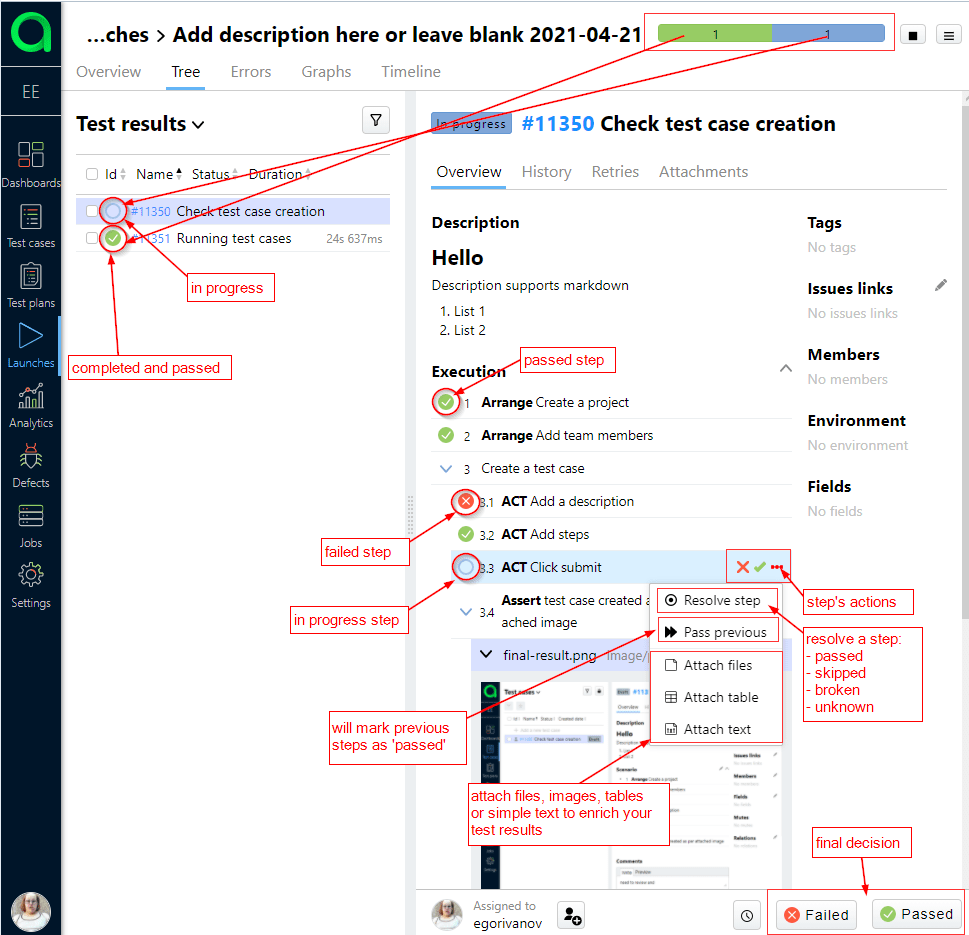
Running the manual tests
To execute the tests in scope of the launch for the test cases you've created, you need to jump to the Launches section.
Your new launch will be on top of the list and it will contain all the information provided during creation.
Check this out!
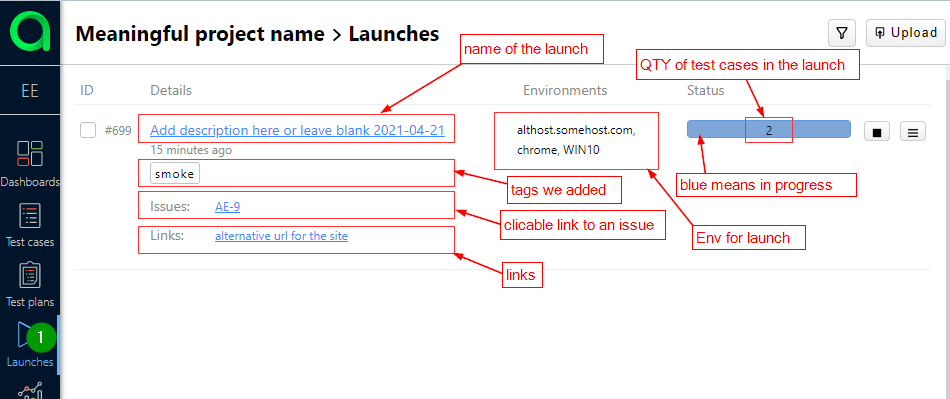
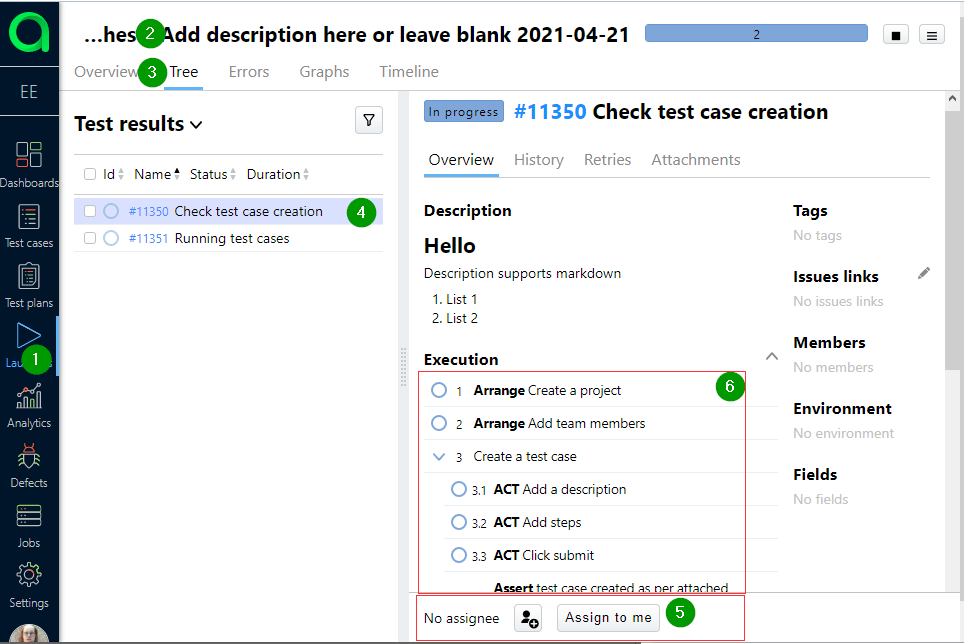
To execute the tests you need to click launch's name and in next page jump to the Tree tab, all the stuff goes there.
Also, from the beginning:
- Go to Launches
- Go to your launch
- Go to Tree tab
- Select a test case.
- Assign a test case either to yourself or to a team member (latter makes sense if you aren't a person that will perform the testing).
- Follow the steps of the test.
Following the steps of a test case
- You need to assign a test to yourself, otherwise you won't be able to perform any actions on the test.
- Since you've assigned the test, the actions in Execution section will become available.
- You need to check every step in your test and assign execution result to each step of your test.
- After you completed all the steps, you need to provide your final verdict - Passed / Failed at the bottom of the page.
Closing the launch
Allure TestOps will add the data from your test launch to the analytics only after the launch is closed.
The idea behind that is the following: before you add anything that will affect your statistics, analytics, KPIs you need to check that all the data in a launch is correct. So, closing of the launch is your certification that the tests are performed properly and test results can be considered in the analytics.

Test plan creation and execution
Test plan is a group of test combined together by the logic of its creator.
That could be...
- test cases used for smoke testing
- regression tests
- only Web UI tests
- etc.
Creating a test plan
This is the simplest option.
- Go to the Test cases section.
- Apply a filter or select test cases manually.
- Click on Bulk actions button.
- Select Create test plan.
- Name the test plan

- Jump to Test plans section an locate newly created test plan.
- Run it.
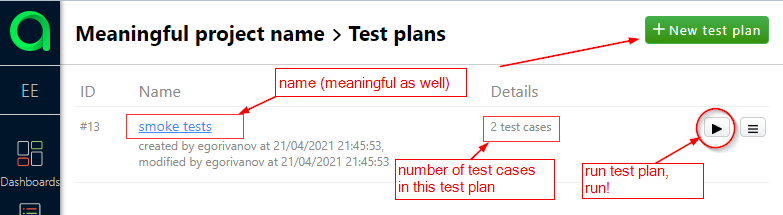
- Further steps will be similar to ones you've made for launch when running from the test cases list.
